
Product Manual


6
NEVER LEAVE THE HEATER
UNATTENDED WHILE BURNING!
EMERGENCY INDOOR USE
• Adequate combustion air and ventilation must be provided when the appliance is in use. Refer to General Safety Instructions on
Page 4 for additional information.
• Only disposable 1 lb. cylinders, marked as PROPANE can be used with this heater.
• NEVER bring a rellable propane cylinder indoors. A re or explosion can occur causing property damage, serious injury, or death.
• The LP-gas cylinder(s) must be constructed and marked in accordance with the specications for LP-gas cylinders of the U.S.
Department of Transportation (DOT).
• Not for use in a Bedroom or Bathroom.
ADDITIONAL INFORMATION REGARDING OPTIONAL ACCESSORIES TO CONNECT A
20 LB LP TANK
• Please note: this heater may be operated with (1) remote rellable propane cylinder max. 20 Lbs.
• Any CSA certied hose with a CGA 600 tting and excess ow device, that is appropriate for this application, may be used to
connect a 20 lb. propane tank.
• Non-certied or handmade hoses and adapters may not be used to connect a 20 lb. propane tank.
• The use of a fuel lter is also recommended but not mandatory. The fuel lter can reduce potential contaminants from the 20 lb. LP
tank/hose and extend the life of the heater.
• We recommend using the Dyna-Glo 20 lb. tank connection kit model# HAKITDG, which includes (1) 12’ extension hose and (1) fuel
lter (sold separately).
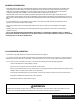
Tank Installation for 20 lb. Propane Cylinder (Fig. 1b)
• Open easy access tank compartment door. (On 18K Model Only)
• Locate regulator and swivel it upward by hand to provide better access.
• Attach Fuel Filter, Model HAKITDG to swivel mount by gently turning clockwise until it is hand tight. Do not over tighten. Do not use tools
to tighten.
• Attach GHP hose end adapter (No. HAKITDG ) to fuel lter by gently turning clockwise until it is hand tight. Attach other end of hose to the LP
cylinder. Do not overtighten. Do not use tools to tighten.
• Make sure heater control knob is in the "off" position. Open the LP cylinder valve and check for leaks by using a 50% soap-water
solution at all threaded connections.
• Close the Door and make sure the hose is routed through the cutout on the underside of the door.
• Close the access door as needed.
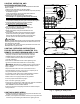
Fig. 1 - 1 lb. Cylinder Tank Installation
WIND
DIRECTION
PILOT
POSITION
OFF
POSITION
KNOB
INDICATOR
MARK
PILOT
POSITION
HIGH
POSITION
LOW
POSITION
CONTROL
KNOB
PIKOT FLAME
PILOT AIR HOLE
Regulator
1 lb. DOT Approved Cylinder
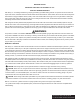
Tank
Regulator
Fuel Filter &
Hose Kit #
HAKITDG
VALVE
ODS PILOT
ASSY
ORIFICE
REGULATOR
Fig. 1b - Remote Tank Installation
Regulator
Filter
(Component of HAKITDG)
Flexible Gas Hose
(component of HAKITDG)
Door