
User Guide

6
NEVER LEAVE THE HEATER
UNATTENDED WHILE BURNING!
7. OPERATION
A.) VENTILATION
RISK OF INDOOR AIR POLLUTION/USE HEATER ONLY IN WELL VENTILATED AREAS.
Provide at least a three-square foot(2,800 sq. cm.) opening of fresh outside air for each 100,000 BTU/hr.
of heater rating.
B.) OPERATION
TO
START HEATER
1. Fill fuel tank with kerosene or No. 1 fuel oil.
2. Attach fuel cap.
3. Plug power cord of heater into three-prong, grounded extension cord.
Extension cord must be at least six feet long.
Extension Cord Wire Size Requirements
• 6 to 100 feet long, use 14 AWG conductor.
• 101 to 200 feet long, use 12 AWG conductor.
• 201 to 300 feet long, use 10 AWG conductor.
• 301 to 400 feet long, use 8 AWG conductor.
• 401 to 500 feet long, use 6 AWG conductor.
4.
Turn “Thermostat Control Knob” to desired setting(setting range : 40℉~110℉) and push
operating
switch to “ON” position, power indicator lamp and room temp. display will light and heater will start.
NOTE: Room Temp. display indicates as following,
• When room temp. is less than 0℉ : “Lo”
• When room temp. is between 0℉and 99℉ : Indicates in figure.
• When room temp. is more than 99℉ : “Hi”
If heater does not start, the thermostat setting may be too low, turn “THERMOSTATCONTROL
Knob” to higher position to start heater. If heater still does not start, turn operating switch to “OFF”
and then to “ON” position. (Figure 4). If heater still does not start, see Troubleshooting Guide on
page 13.
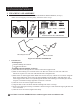
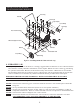
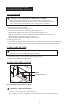
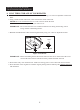
INDICATOR LAMP
ROOM TEMP. DISPLAY
THERMOSTAT CONTROL KNOB
OPERATING SWITCH
Figure 4. CONTROL PARTS
NOTICE : The major electrical components of this heater are protected by a safety fuse mounted to the PCB board.
If your heater fails to start, check this fuse first and replace as necessary. You should also check your
power source to insure that proper voltage and frequency are being supplied to the heater.