
Operating Guide


8
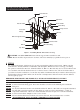
6. FUELING YOUR HEATER
NEVER FILL THE HEATER FUEL TANK IN THE LIVING SPACE : FILL THE TANK OUTDOORS.
DO NOT OVERFILL YOUR HEATER AND BE SURE HEATER IS LEVELED.
IMPORTANT NOTICE REGARDING FIRST IGNITION OF HEATER :
The first time you light the heater, it should be done outdoors. This allows the oils, etc. used in
manufacturing the heater to burn off outside.
WARNING!! : NEVER REFILL HEATER FUEL TANK WHEN HEATER IS OPERATING OR STILL HOT.
7. OPERATION
A.) VENTILATION
RISK OF INDOOR AIR POLLUTION/USE HEATER ONLY IN WELL VENTILATED AREAS.
Provide a fresh air opening of at least three square feet (2,800 sq. cm) for each 100,000 BTU/Hr.
rating. Provide extra fresh air if more heaters are being used.
Example : A KFA220C heater requires one of the following:
• a two-car garage door raised six inches (15.24 cm)
• a single-car garage door raised nine inches (22.86 cm)
• two, thirty-inch (76.20 cm) windows raised fifteen inches (38.1 cm)
B.) OPERATION
TO START HEATER
1. Fill fuel tank with fuel.
NOTE : Kerosene is recommended when the temperature drops below 0℉(-18℃) to prevent ignition
delay or failure.
2. Attach fuel cap.
3. Plug power cord of heater into three-prong, grounded extension cord. Extension cord must be at
least six feet long.
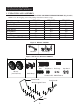
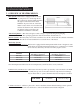
Extension Cord Wire Size Requirements
• 6 to 100 feet (1.8 to 30.5 meters) long, use 16 AWG conductor.
• 101 to 200 feet (30.8 to 61 meters) long, use 14 AWG conductor.
4. Turn “THERMOSTAT CONTROL knob” to desired setting (setting range : 40˚F ~ 110˚F)
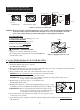
5. Push “BTU control Switch” to “High” level. (See Figure 8.)
6. Push Power Switch to “ON” position, Power lndicator Lamp will light and heater will start.
7. After startup, push “BTU control switch” to desired level “High or Low”
NOTE : Room Temperature display explanations are as follows: (KFA135C/220C Models only)
• When the room temperature is less 0℉, the LED display will show “Lo”
When room temp is between 0℉ and 99℉, the number shown on the display is the current
room temperature.
When room temperature is greater than 99℉, the LED display will show “Hi”
•
•
If heater does not start, the thermostat setting may be too low, turn “thermostat Control Knob” to
higher position to start heater. If heater still does not start, turn power switch to “OFF” and then to
“ON” position. If heater still does not start, see Troubleshootiong Guide on page15.
NEVER LEAVE THE HEATER
UNATTENDED WHILE BURNING!
NOTE : User can select to operate the heater on two different BTU levels(High or Low).
To stabilize heater and prevent ignition delay, select BTU level after turning the heater on, or
while it is in operation by pushing the BTU control switch. If the heater started at low BTU level
in cold weather or low fuel tank, ignition failure can occur.
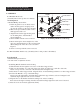
NOTE : In cold weather, ignition may be improved by holding a finger over the end of the relief valve or
block fanguard in half with newspaper etc. until the heater ignites.