
Installation Instructions


5 6
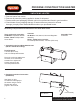
PROPANE CONSTRUCTION HEATER
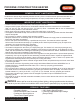
UNPACKING HEATER
1. Remove heater from carton.
2. Remove all protective packing applied to heater for shipment.
3. Retain cartons and packaging material until unit is operated and found in good condition.
4. Check heater for any shipping damage. If heater shows any external or internal
damage, promptly inform dealer/distributor where you purchased heater.
Assembly Components and Instructions for Steel Base Units:
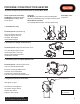
1. Assembling the Cord Wrap Attachments:
(FA100 - FA150 Series Only)
Parts Required:
4 Screws (ST3.5x10),
and 2 Cord Wrap Attachments
Place the cord wrap attachment
as shown, then use Phillips
screwdriver to tighten the
screws and secure the
cord wrap attachments.
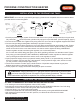
2. Regulator and Hose Connection:
(All Models)
See gure on right.
Connect the hose tightly to
the heater using a wrench.
Please also refer to
page 8 in the manual.
Tighten, clockwise,
use a wrench
Hose Assembly
Assembly Time:
5 Minutes
Contents:
All Models: Unit, Manual, Hose and Regulator
Assembly
FA100 - FA150 Series Includes:
2 Cord Wrap Attachments, 4 Screws (ST3.5x10)
Tools required for assembly:
All Models: Adjustable Wrench
FA100 - FA150: Phillips Head
Screw Driver
NEVER LEAVE THE HEATER
UNATTENDED WHILE BURNING!