Dynalink ADSL2+ Modem Router Quick Setup Guide – RTA1320 (Single Ethernet & USB) – RTA1030W (Single Ethernet & USB with Wireless) – RTA1025W (4-Ethernet ports & USB with Wireless) – RTA1046VW (4-Ethernet ports with Wireless & VoIP)
ADSL 2+ Modem Router Quick Set-up Guide 1 Important This Guide is intended to get you started quickly. We have made the factory default setting of this router suitable for your country1. All you need is to follow through the steps we describe here. This Guide should be read in conjunction with the User Manual2. It is provided as a PDF file on this CD. You can view or print this User Manual.
2 Before you start Your computer must have: • Ethernet port (or USB for models RTA1320, RTA1030W, RTA1025W) • TCP/IP protocol enabled • A web browser, such as Internet Explorer 5.x, Firefox 1.x or better. Obtain your Internet account information from your ISP: • Login user name and password • Public IP address (only if you subscribe for static IP) • DNS server IP (only if specified by ISP). Connection options: 1. Ethernet (Recommended - this option is Operating System independent.
ADSL 2+ Modem Router Quick Set-up Guide 3 Connecting the modem router 1. Connect the DSL port of the modem directly into your ADSL jackpoint (telephone wall socket) with the provided line cord. If connecting through a filter, the filter must have a designated ADSL/MODEM port for bypassing filtering of ADSL signals. 2. Connect the Ethernet port of each computer to Ethernet/LAN port of the router. One Ethernet cable is provided.
Windows XP/2000: 1. Go to Control Panel – Network Connections. Open Local Area Connections and click Properties. Double click Internet Protocol (TCP/IP). Select Use the following IP address. 2. Enter 192.168.1.x (x is a number you pick between 2 and 254). This is the IP address you assign to the computer. Subnet Mask is 255.255.255.0. 3. Enter the router’s IP 192.168.1.
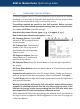
ADSL 2+ Modem Router Quick Set-up Guide See Q2 in Section 11 – Troubleshooting, if after several minutes the message “Your DSL router is not ready to connect” still shows. Once connected the screen changes to displaying on-line time. The PPP light on the front panel of the router will come on, indicating that you are online. Click Disconnect only if you wish to disconnect manually. You are now successfully connected to the Internet. Your Internet account user name & password will be saved automatically.
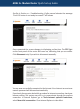
6 Setting up Wireless Models RTA1025W, RTA1030W and RTA1046VW only A full description on this topic is found in the User Manual for each model. Wireless support is enabled by default. The router is a wireless access point. IEEE 802.11g and 802.11b wireless network standards are supported. For indoor operations, these standards provide typically 20m and 60m range respectively. Wireless security features are disabled for ease of initial install.
ADSL 2+ Modem Router Quick Set-up Guide Next, enter your choice of ‘password’ into the Pre-Shared Key: box. Any printable characters may be used. Good practice is to use a strong password of random characters and is over 20 characters long. Click Apply to take effect. The same key must be entered into your computer when you attempt to connect wirelessly. Refer to the vendor’s instructions of your computer or wireless adaptor for details.
7 Voice over IP Model RTA1046VW only VoIP (Voice over IP) is a voice service provided over the internet by some service providers. It allows users to talk without using a conventional telephone service and often provides lower call costs. A full description on this topic is found on Chapter 4: Web Configuration > Voice over IP on page 117 of the User Manual. 7.1 Connecting the hardware 1. Connect a telephone handset to Phone1 port. 2.
ADSL 2+ Modem Router Quick Set-up Guide 7.2 Configuring the VoIP settings The router supports only SIP (Session Initiation Protocol) protocol for Internet telephony. It is necessary to subscribe and receive the settings required from your VoIP service provider in order to set up VoIP service. The settings required are specific to your VoIP provider. Before you start, make sure you have received appropriate settings from your service provider. Go to Voice > SIP Basic.
8 Advanced functions 8.1 Firewall & traffic restrictions Default firewall configuration By default the firewall blocks all inbound requests including Ping from the Internet to your local network. In the outbound direction, all traffic that originates from your local network are allowed. Most users do not require changing any firewall settings and are automatically protected by this default configuration.
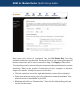
ADSL 2+ Modem Router Quick Set-up Guide To set IP extension, go to the Advanced menu. Select WAN > Internet. Click on the “modify icon” under Edit: The next screen displays VPI/VCI as 8/35 (Australia) or 0/100 (New Zealand). Do not change these numbers. Go Next. Select PPPoE LLC (Australia) or PPPoA VCMUX (New Zealand). Go Next. On the next screen untick Enable NAT, and tick PPP IP extension as illustrated. Go Next. Enter your Internet account user name and password. Go Next.
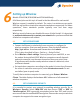
9 Tips for security This router is shipped “secure” with firewall enabled by default. In order to take full benefit from the security features of this router: Do: • Change your router’s administrative user name & password. • Back up your router’s configuration. This function can be found in the router’s Management > Backup Config menu. • Disable UPnP if you don’t need this function. • Read about the more advanced functions. They can be found in the User Manual for each of the models.
ADSL 2+ Modem Router Quick Set-up Guide Advanced security is provided by WPA/WPA2 and 802.1x. These are robust security mechanisms. A special “home mode” known as WPA-PSK is recommended for most users. You choose a password, known as Pre-Shared Key or PSK, for the wireless network. Please refer to Section 6.2 of this Guide for setting up. WEP offers basic protection from eavesdropping. When enabled, all wireless stations transmit data encrypted using a predetermined key.
10 Indicator lights Function Color and Status Definition Off Power is off Solid Green Power is on and the device operates normally Power on self-test in progress Power Solid Red The device enters the console mode of the boot loader Power on self-test failure if this light remains solid DSL PPP Ethernet/ LAN 1 to 4 Flashing Red Firmware upgrade in progress Off No DSL signal Slow Flashing Green DSL line handshaking in progress Fast Flashing Green DSL line training in progress Solid Green
ADSL 2+ Modem Router Quick Set-up Guide 11 Troubleshooting Q & A Q1. Cannot display page to enter Internet user name & password? 1. If previously the computer had a dialup modem, check browser setting. For example in Internet Explorer, go to Tools–Internet options–Connections, and select Never dial a connection. Check LAN Settings that the option Use a Proxy Server is not selected. 2. Check that the router’s ETHERNET light is on. If not, check your Ethernet cable is firmly plugged in. 3.
• If the DSL light is on but the PPP light is off This means the modem is unable to go online because the Internet username or password you entered as described in Section 5 – Going Online is incorrect, or the Internet account has not been activated. Check that you have entered your Internet user name and password in the exact format as specified by ISP. Repeat entry if necessary.
ADSL 2+ Modem Router Quick Set-up Guide Q5. What is the assigned WAN IP when the router is on line? Go to Status > Internet Connection, the WAN IP is displayed here. Q.6 How to get information update? This Quick Guide and User’s Manual on CD are the primary source of information about the product. Please check the Dynalink website http://www.dynalink. com.au or http://www.dynalink.co.nz regularly for updates, links, or to download a more current version of this Quick Set-up Guide.
12 Default Configuration This router is shipped with the following factory default settings depending on your region. Router IP address Subnet mask VPI/VCI WAN IP DHCP DNS relay UPnP IGD 192.168.1.1 255.255.255.0 8/35 (Australia) 0/100 (New Zealand) PPPoE LLC/SNAP (Australia) PPPoA VC-MUX (New Zealand) enabled ADSL2+ (Australia) G.
Warranty Dynalink warrants this product against defects in materials and workmanship for a period of twelve months from the original date of purchase. We will, at our discretion, repair or replace the faulty unit, free of charge, provided it is returned to us with proof of purchase from an authorised dealer within the warranty period. Return delivery after repair will be paid for by Dynalink.