
Setup guide


ADSL 2+ Modem Router Quick Set-up Guide
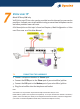
Connecting the modem router
1. Connect the DSL port of the modem directly into your ADSL jackpoint
(telephone wall socket) with the provided line cord. If connecting through
a filter, the filter must have a designated ADSL/MODEM port for bypassing
filtering of ADSL signals.
2. Connect the Ethernet port of each computer to Ethernet/LAN port of the
router. One Ethernet cable is provided.
Note: If you choose to connect via the USB port (not recommended), there
is no need to use the Ethernet cable. Do not plug in the USB cable yet.
During driver installation, you will be advised to do so. Refer to the User
Manual for instructions.
3. Connect the provided AC/AC power adaptor to the Power jack of the router.
Plug the adaptor into a mains power outlet. Switch on the router. In normal
operation the following lights should be on: Power, DSL, Ethernet/LAN
(1, 2, 3 or 4 if using 4-port models), WLAN (wireless models only). Section
10 of this Guide explains how these indicator lights work.
3
Getting the computer ready
You have two options. Option (1) is recommended and is the Windows
default network setting.
1. Obtain an IP address automatically
Most computers are already configured this way. By default the router
is a DHCP server which automatically assigns an IP address to a computer
that is connected to it. Now go to Section 5 – Going On-Line.
If you are unsure of your computer’s network configuration, refer to Q1-6
in Section 11 – Troubleshooting.
2. Assign an IP address manually
The router’s default address is 192.168.1.1. If you prefer to assign an IP
address manually to your computer, use 192.168.1.x (x is a number
between 2 and 254).
4