
Setup guide


6
Setting up Wireless
Models RTA1025W, RTA1030W and RTA1046VW only
A full description on this topic is found in the User Manual for each model.
Wireless support is enabled by default. The router is a wireless access point.
IEEE 802.11g and 802.11b wireless network standards are supported. For indoor
operations, these standards provide typically 20m and 60m range
respectively.
Wireless security features are disabled for ease of initial install. It is important
to enable wireless security to protect your network after you have verified that
all wireless computers can connect.
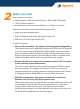
6.1 SET UP PROCEDURE
1. Connect via Ethernet or wirelessly from a computer to configure for
wireless operation. Start your web browser. Enter the default address
http://192.168.1.1. Username and Password are both admin.
(This is also described in Step 1, Section 5 – Going On-line)
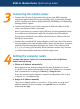
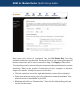
2. Go to Wireless > Basic settings. You may choose your own SSID, or use
the unique factory default SSID. Wireless computers scan all channels
and once connected, use the same channel as the access point. Note:
if interference with another nearby wireless network is detected, select
a different channel.
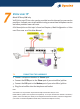
3. Set up wireless computers according to the vendor’s instructions. Because
the router is a wireless access point, select infrastructure mode. Do not
use Adhoc (peer-to-peer) mode.
To verify that a wireless computer is connected, go to Status > Wireless
Clients. The table displays the hardware MAC addresses of all connected
wireless computers.
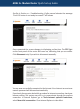
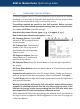
6.2 SET UP WIRELESS SECURITY
It is essential to protect your network by enabling wireless security. Go to
Wireless > Security. Select ‘WPA-PSK’ and then choose ‘TKIP’ or ‘AES’ for
‘Data Encryption’. AES is generally accepted as better than TKIP, and is much
more secure than the outdated WEP encryption. Please make sure your wireless
computer also supports the same encryption type.