DYNASTY FIREPLACES Allegro Series | Séries Allegro Linear smart electric fireplace • Cheminée électrique linéaire intelligente Installation Instructions & Operating Manual Manuel d’Installation & d’Utilisation Models / Modèles DY-BFM58 / DY-BFM68 / DY-BFM76 / DY-BFM82 READ CAREFULLY BEFORE ATTEMPTING TO ASSEMBLE, INSTALL, OPERATE, OR MAINTAIN THIS PRODUCT. PROTECT YOURSELF AND OTHERS BY OBSERVING ALL SAFETY INFORMATION.
For setup guides, full product specs, and warranty information, please visit us at: support.dynastyfireplaces.com Contact us: support@dynastyfireplaces.com 1-877-521-1009 © 2023 Dynasty Fireplaces | V 1.0.
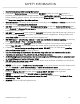
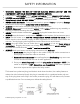
SAFETY INFORMATION • • • • • • • • • • • • • • • • Read all instructions before using this heater! This heater is hot when in use. To avoid burns, DO NOT let bare skin touch hot surfaces. If provided, use handles when moving this heater. Keep combustible materials, such as furniture, pillows, bedding, papers, clothes, and curtains at least 3 feet (0.9m) from the front of the heater and keep them away from the sides and rear.
SAFETY INFORMATION • • • • • • • • • • • • WARNING: REDUCE THE RISK OF FIRE OR ELECTRIC SHOCK---DO NOT USE THIS HEATER WITH ANY SOLID-STATE SPEED CONTROL DEVICES. This product is not intended to be a primary heat source. It is for supplemental heat only. INDOOR use only! NEVER use this heater outdoors! Doing so may result in electric shock! Risk of electric shock! DO NOT OPEN! No user-serviceable parts inside! NEVER modify this heater. Doing so could result in personal injury or property damage.
FCC Statement: This device complies with part 15 of the FCC Rules. Operation is subject to the following two conditions: (1) This device may not cause harmful interference, and (2) this device must accept any interference received, including interference that may cause undesired operation. FCC warning: Any Changes or modifications not expressly approved by the party responsible for compliance could void the user's authority to operate the equipment.
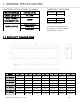
1. GENERAL SPECIFICATIONS ELECTRICAL SPECIFICATIONS (all models) INPUT VOLTAGE 120V AC, 60 Hz CABLE LENGTH 72", 2.0m MAX. POWER CONSUMPTION 1500W FLAME ONLY OPERATION 1500W Nominal HEAT OUTPUT DY-BFM58 25 W DY-BFM68 32 W DY-BFM76 41 W DY-BFM82 46 W WiFi OPERATION 1500W Max. • Controlled via Dynasty app • Connect on 2.4 GHz network only WiFi 802.11 b/n/g 750W Min. 1.
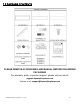
1.2 PACKAGE CONTENTS PLEASE REMOVE ACCESSORIES AND MANUAL BEFORE DISCARDING PACKAGING For warranty, parts, or product support, please visit our site at: support.dynastyfireplaces.com Contact us at: support@dynastyfireplaces.com © 2023 Dynasty Fireplaces | V 1.0.
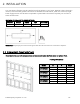
2. INSTALLATION Your new electric fireplace may be installed virtually anywhere in your home. However, when choosing a location, ensure that the general instructions are followed. For best results, install out of direct sunlight. Power supply service must be either completed or placed within the electric fireplace prior to finish to avoid reconstruction. MINIMUM CLEARANCE TO COMBUSTIBLES FRONT BACK SIDES TOP BOTTOM 36" / 0.
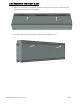
2.2 PRE-INSTALLATION PREPARATION 2.2.1 REMOVE FROM PACKAGING After removing the fireplace from the packaging, remove the two trim pieces and edging strips as indicated in the figure below. Set aside these parts for later use. Trim #1 Edging Strips Trim #2 The fireplace can be installed in 2 different configurations. The intended configuration should be considered before installation: 1) Flush-mount configuration The fireplace will be installed flush to the finished wall.
2.2.2 REMOVING THE FRONT GLASS 1) With the trim removed, located the two bolts underneath the top trim, loosen the two bolts and remove the two hinge plates. 2) Tip glass forward from the fireplace. Safely set aside glass for later. © 2023 Dynasty Fireplaces | V 1.0.
2.3 INSTALLATION PROCEDURE – FLUSH MOUNT 1. The flush-mount installation method will have the front face of the fireplace parallel to the face of the wall. Build frame according to framing dimensions on previous page and ensure a power source is available. Top View: 2. It is recommended to install the fireplace after finishing the wall to ensure the unit sits flush with the wall finishing. 3. After finishing the wall, place the fireplace unit into the wall opening.
4. Locate the oval shaped opening on both sides of the fireplaces, underneath the top trim. From the inside of the panel, secure the screw through the oval to the wall studs. 5. Place fireplace media onto flame bed and place glass back on. 6. Put trim piece onto fireplace and check for fit. 2.4 INSTALLATION PROCEDURE – BUILT-IN NOTE: There are four rubber feet on the bottom of the fireplace that can be removed before installation 1.
2. With the trim taken off, remove the magnetic clips along the top and bottom of the fireplace. 3. Install the edging strips onto each both sides, top, and bottom using the screws provided. 4. Place the mantel into the opening, and ensure the trim portion sits outside of the framing. © 2023 Dynasty Fireplaces | V 1.0.
5. Apply finishing materials around the trim portion. NOTE: The finishing material may overlap the trim portion if too thick. 6. Install Trim #1 onto the fireplace. © 2023 Dynasty Fireplaces | V 1.0.
2.5 PLACING MEDIA ON FLAME BED The following number of faux wood and large crystal stones are supplied with each model: Model Logs Crystals DY-BFM58 5 20 DY-BFM68 5 20 DY-BFM76 6 20 DY-BFM82 7 20 CRYSTAL MEDIA: Carefully spread the small crystal stones across the fuel bed. To maximize crystal spread, evenly arrange the larger crystal stones starting about 2 inches away from the inset window ledge at the front of the firebox.
2.6 POWER OPTIONS 2.6.1 Plug-in You may run the power cord out of the framed wall opening to an existing outlet or install an outlet on a nearby wall stud within the wall). If the cord is not long enough to reach the outlet, a grounded extension cord minimum AWG No. 14 wiring and rated to a minimum or 1875 watts may be used. 2.6.2 Hard-wire A qualified electrician may remove the cord connection and wire the appliance directly to the house hold wiring.
1. 2. 3. 4. Remove terminal block cover plate located on the right end of the appliance. Keep screws for reassembly. Install a wire strain relief bushing into the cover plate. Terminate type NM-B wire to the terminal block, ensure connections are secure, and tighten the strain relief. Use 3/32 slotted head screwdriver, or equivalent, to depress the springloaded terminals for the conductors. Replace terminal block cover plate and retaining screws. 2.
2.
3. OPERATION This appliance can be operated by remote control, smartphone app, and onboard buttons, however onboard buttons have limited functions. A beep should be heard when the power is first applied. 3.1 ONBOARD BUTTONS The onboard buttons are located under the trim on the top left. Heater Indicator WiFi Indicator Heater Flame Timer Press the Flame button to turn on/off the flame LED and cycle through flame brightness levels High/Medium/Low.
WIFI SETUP NOTE: WiFi control and operation of the fireplace can only be done after an account has been created, and the device has been linked to your account 1. Download the Dynasty app, follow the onscreen instructions to create an account. Only an active email is required to create an account 2. With the fireplace in standby mode (flame and heater turned off, plugged into power), press and hold the heater button for 5 seconds until fireplace makes a beep sound 3.
3.2 REMOTE CONTROL © 2023 Dynasty Fireplaces | V 1.0.
4. CLEANING & MAINTENANCE ALWAYS turn the heater OFF and unplug the power cord from the outlet before cleaning, performing maintenance, or moving this fireplace. Failure to do so could result in electric shock, fire, or personal injury. Cleaning NEVER immerse in water or spray with water. Doing so could result in electric shock, fire, or personal injury. Metal: l Buff using a soft cloth, slightly dampened with a mild cleaning solution if needed.
Maintenance Risk of electric shock! DO NOT OPEN! No user-serviceable parts inside! ALWAYS turn the heater OFF and unplug the power cord from the outlet before cleaning, performing maintenance, or moving this fireplace. Failure to do so could result in electric shock, fire, or personal injury. Electrical and Moving Parts: l The fan motors are lubricated at the factory and will not require lubrication. l Electrical components are integrated in the fireplace and are not serviceable by the consumer.
5. WARRANTY This product is inspected, tested and carefully packaged to minimize the chance of damage during shipment. If a part within two years, or 24 months from the date of purchase proves to be defective in material or fabrication under normal use, the part will be repaired or replaced. Dynasty Fireplaces’ obligation under the warranty is to replace or repair defective parts at our discretion.
Pour obtenir des guides d'installation, les spécifications complètes du produit et des informations sur la garantie, veuillez-vous rendre à l'adresse suivante : support.dynastyfireplaces.com SCANNEZ-MOI Pour nous contacter : support@dynastyfireplaces.com 1-877-521-1009 © 2023 Dynasty Fireplaces | V 1.0.
CONSIGNES DE SÉCURITÉ • • • • • • • • • • • • • • • • Lire toutes les instructions avant d'utiliser cet appareil de chauffage ! Cet appareil est chaud lorsqu'il est en marche. Pour éviter tout risque de brûlure, NE PAS toucher les surfaces chaudes. Si elles sont fournies, utiliser les poignées pour déplacer l'appareil.
CONSIGNES DE SÉCURITÉ • • • • • • • • • • • • ATTENTION : POUR ÉVITER LES RISQUES D'INCENDIE OU DE CHOC ÉLECTRIQUE, NE PAS UTILISER CE CHAUFFAGE AVEC DES DISPOSITIFS DE CONTRÔLE DE VITESSE À SEMI-CONDUCTEURS. Ce produit n'est pas conçu pour être la principale source de chauffage. Il sert uniquement de chauffage d'appoint.
d'utiliser l'appareil et faites appel à un électricien qualifié pour inspecter et/ou remplacer les prises défectueuses. Ce chauffage est équipé d'une fiche polarisée (une lame est plus large que l'autre). En tant que dispositif de sécurité visant à réduire le risque de choc électrique, cette fiche est conçue pour être insérée uniquement dans une prise polarisée. Si la fiche ne s'insère pas correctement dans la prise, essayez dans l’autre sens. Si le problème persiste, contactez un électricien qualifié.
Déclaration de la FCC : Cet appareil est conforme à la partie 15 du règlement de la FCC (Commission Fédérale des Communications). Son fonctionnement est soumis aux deux conditions suivantes : (1) cet appareil ne doit pas causer d'interférences nuisibles, et (2) cet appareil doit accepter toute interférence reçue, y compris les interférences susceptibles de provoquer un fonctionnement indésirable.
1. CARACTÉRISTIQUES GÉNÉRALES SPÉCIFICATIONS ÉLECTRIQUES (tous modèles) TENSION D'ENTRÉE LONGUEUR DU CÂBLE CONSOMMATION MODE FLAMME 120 V CA, 60 Hz 72", 2.0m CONSOMMATION PUISSANCE MAX. 1500 W DY-BFM68 32 W DY-BFM76 41 W DY-BFM82 46 W FONCTIONNEMENT DU WIFI 1500 W Nominal CHALEUR DÉGAGÉE DY-BFM58 25 W - Contrôlé via l'application Dynasty - Connexion au réseau 2,4 GHz uniquement WiFi 802.11 b/n/g 1500 W Max. 750 W Mpo. 1.
1.2 CONTENU DE L'EMBALLAGE VEUILLEZ RETIRER LES ACCESSOIRES ET LE MANUEL AVANT DE JETER L'EMBALLAGE Pour toute question liée à la garantie, aux pièces détachées, ou à l’assistance sur les produits, veuillez consulter notre site Internet : support.dynastyfireplaces.com Ou contactez-nous à l'adresse suivante : support@dynastyfireplaces.com © 2023 Dynasty Fireplaces | V 1.0.
2. INSTALLATION Votre nouvelle cheminée électrique peut être installée (presque n’importe) où vous le souhaitez dans votre maison. Cependant, lorsque vous choisissez un emplacement, assurez-vous de suivre les instructions générales. Pour une performance optimale, évitez un endroit trop ensoleillé. Le service d'alimentation électrique doit être achevé ou situe à proximité de l’appareil avant la finition pour éviter toute reconstruction.
2.2 PRÉPARATION DE L'INSTALLATION 2.2.1 RETIRER DE L'EMBALLAGE Après avoir sorti le foyer de son emballage, retirez les deux pièces d’ornement et les bandes de chant tel qu’indiqué sur le schéma ci-dessous. Mettez ces pièces de côté pour les utiliser ensuite. Ornement #1 Bandes de chant Ornement #2 Le foyer peut être installé dans deux configurations différentes.
2.2.2 RETRAIT DE LA FAÇADE AVANT EN VERRE 1) Une fois l'ornement retiré, repérez les deux boulons situés sous l'ornement supérieur, desserrez-les deux boulons et retirez les deux plaques de charnière. 2) Faites basculer la façade vers l’avant pour la séparer du foyer. Gardez-la dans un endroit en sécurité pour la suite. © 2023 Dynasty Fireplaces | V 1.0.
2.3 PROCÉDURE D'INSTALLATION - MONTAGE AFFLEURANT 1. Dans le cas du montage affleurant, la face avant du foyer est parallèle à la face du mur. Construisez le cadre selon les dimensions indiquées à la page précédente et assurez-vous qu'une source d'alimentation est disponible à proximité. Vue de dessus : Finition du mur 2. Il est recommandé d'installer le foyer après avoir terminé le mur afin de s'assurer que l'appareil est bien affleurant au bord du mur. 3.
Couche de finition Mur à montants 4. Repérez l'ouverture ovale des deux côtés du foyer, sous l'ornement supérieur. Depuis l'intérieur du panneau, fixez la vis à travers l'ouverture ovale sur les montants du mur. 5. Placez le support du foyer sur le lit de flammes et remettez la façade en verre en place. 6. Placez la pièce d'ornement sur le foyer et vérifiez qu'elle est bien ajustée. © 2023 Dynasty Fireplaces | V 1.0.
2.4 PROCÉDURE D'INSTALLATION – MONTAGE ENCASTRÉ Remarque : un jeu de quatre pieds en caoutchouc se trouve sur le dessous du foyer et peut être retiré avant l'installation. 1. Le montage encastré permet un encastrement plus profond pour accueillir des matériaux de finition plus épais et offre davantage de possibilités de conception. Construisez le cadre selon les dimensions indiquées à la page précédente et assurez-vous qu'une source d'alimentation est disponible à proximité.. 2.
4. Placez le foyer dans l'ouverture, en veillant à ce que la section de l'ornement se trouve à l'extérieur de l'encadrement. 5. Appliquez les matériaux de finition autour de la section de l'ornement. REMARQUE : le matériau de finition peut chevaucher la section de l'ornement s'il est trop épais. © 2023 Dynasty Fireplaces | V 1.0.
6. Installez l'ornement #1 sur le foyer. © 2023 Dynasty Fireplaces | V 1.0.
2.5 MISE EN PLACE DES ÉLÉMENTS SUR LE LIT DE COMBUSTION Chaque modèle contient le nombre suivant de fausses bûches et de grosses pierres de cristal : Modèle Bûches Cristaux DY-BFM58 5 20 DY-BFM68 5 20 DY-BFM76 6 20 DY-BFM82 7 20 CRISTAUX : Répartissez soigneusement les petites pierres de cristal sur le lit de combustion.
2.6 OPTIONS D'ALIMENTATION 2.6.1 Branchement électrique Vous pouvez faire sortir le cordon d'alimentation de l'ouverture du cadre mural vers une prise existante ou installer une prise sur un montant proche du mur. Si le cordon n'est pas assez long pour atteindre la prise, vous pouvez utiliser une rallonge avec mise à la terre, de type câble 14 AWG d'une puissance nominale d’au moins 1875 Watts. 2.6.
1. 2. 3. 4. Retirer le cache du bornier situé à l'extrémité droite de l'appareil. Conserver les vis pour le réassemblage. Installer une douille de décharge de traction à l’intérieur du cache. Raccorder le fil de type NM-B sur le bornier, s'assurer que les branchements sont sécurisés et serrer la douille décharge de traction. Utiliser un tournevis à tête fendue de type 3/32 ou équivalent, pour enfoncer les bornes à ressort des conducteurs. Remettre en place le cache du bornier et les vis de maintien. 2.
2.
3. FONCTIONNEMENT Cet appareil peut être utilisé et actionné à l'aide d'une télécommande, d'une application pour téléphone intelligent, et de commandes manuelles situées sur l'appareil, mais les commandes manuelles présentent des limites en termes de fonctionnalités. Un signal sonore doit être émis lorsque l'appareil est mis sous tension pour la première fois. 3.1 COMMANDES MANUELLES Les commandes manuelles sont situées sous l'ornement, en haut à gauche.
3.2 CONFIGURATION DU WIFI La série Allegro est contrôlable via l'application pour téléphone intelligent de smartphone de Dynasty Fireplaces pour Android et iOS. Téléchargez l'application Dynasty, créez un compte avec votre adresse courriel et connectez votre foyer. Pour télécharger l'application, visitez : dynastyfireplaces.com/download Pour plus d'informations sur l'installation du WiFi et la connexion à l'assistant vocal, visitez : support.dynastyfireplaces.
3.2 TÉLÉCOMMANDE © 2023 Dynasty Fireplaces | V 1.0.
4. NETTOYAGE ET ENTRETIEN TOUJOURS ÉTEINDRE l’appareil de chauffage et débrancher le cordon d’alimentation de la prise murale avant de le nettoyer, de faire des réparations ou de le déplacer. Le non-respect de ces instructions pourrait provoquer un choc électrique, un incendie ou des blessures corporelles Nettoyage Ne JAMAIS immerger l’appareil dans l’eau, ou asperger de l’eau dessus. Cela pourrait provoquer un choc électrique, un incendie ou des blessures corporelles.
Entretien Risque d'électrocution ! NE PAS OUVRIR ! Aucune pièce réparable par l'utilisateur ne se trouve à l'intérieur ! TOUJOURS ÉTEINDRE l’appareil de chauffage et débrancher le cordon d’alimentation de la prise murale avant de le nettoyer, de faire des réparations ou de le déplacer. Le non-respect de ces instructions pourrait provoquer une électrocution, un incendie ou des blessures corporelles.
5. GARANTIE Ce produit est inspecté, testé et soigneusement emballé afin de minimiser les risques de dommages pendant le transport. Si une pièce s'avère défectueuse au cours des deux ans ou 24 mois à compter de la date d'achat, que ce soit au niveau des matériaux ou dans sa fabrication, dans des conditions normales d'utilisation, elle sera réparée ou remplacée. L'obligation de Dynasty Fireplaces en vertu de la garantie est de remplacer ou de réparer les pièces défectueuses, à notre discrétion.