
Installation Guide


3
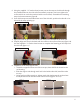
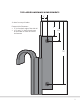
2. Using a good quality level, lightly score a level pencil line on the headerboard where the
bracket screw will be fastened into.
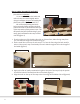
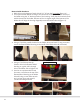
3. To splice rails together using the E-Glide splice kit (EG.41) complete the following steps:
• Slide the splice half-way into one of the rails and tighten down the 2 set screws
(figure 3, image 1)
• Slide the other rail over the splice and tighten those set screws
(figure 3, image 2)
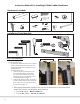
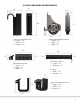
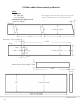
4. Slide all the brackets onto the rail, see the recommended spacing below
(figure 4)
.
Leave the brackets loose on the rail at this point.
5. Starting at one end, secure each bracket with the supplied screws to the wood
header along the line that was scored as described in step 2 of this section.
6. After all the brackets are screwed to the wood header and the rail is in the intended
position, tighten the small set screw on front of each bracket to the rail
(figure 4)
.
Installation
2
4
3
278mm
630mm
630mm
630mm
278mm
x4
2mm
2mm
1
2
Installation
2
4
3
278mm
630mm
630mm
630mm
278mm
x4
2mm
2mm
1
2
11”
24¾”
24¾”
24¾”
11”
Figure 4
Figure 3