
Installation Guide


5
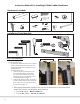
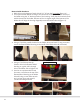
5. Using the supplied 1 ¼” washer-head screws, secure the step to the side rail through
the predrilled holes on the side rails (for aesthetic purposes, don’t over tighten the
screws which can crack the wood around the screw head). Assemble the remaining
steps in the same manner
(figure 9)
.
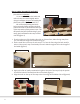
6. Once all the steps are assembled onto one of the side rails, position the side rail on its
side with the steps pointing up.
7. Apply a thin film of glue on the ends of each step and in the dado of the other rail.
8. Properly align each step in the dado with the mark on the surface of the step
(figure 10)
.
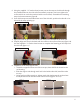
Use the supplied 1 ¼” washer-head screws to complete the fastening of the steps into
the side rails
(figure 11)
.
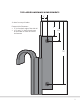
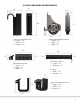
9. Installation of the step support rods:
• Thread the support rod into one of the nut caps, leave half of the thread on the
rod showing.
• Slide the support rod through each hole in the ladder side rails, install the other
nut cap.
• Using two 5mm Allen wrenches, tighten each side simultaneously so that there
are equal amounts of thread on each side of the rod
(figures 12 & 13).
Figure 11
Figure 13
Figure 9
Figure 10
Figure 12