
Installation Sheet
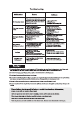

Min
Max
Adjustment of whole flush level:
when the white card is on the
highest position, the whole flush
water is at the least.
Adjustment of partial flush level: The
partial flush float is higher, the partial
flush water is less.
Max
Min
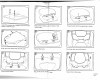
General DrawingGeneral Drawing
The Installation ManualThe Installation Manual
Do not use an in-tank type bowl cleaner in your toilet. In-tank cleaners containing chlorine(calcium hypochlorite)
can seriously damage fittings in the tank. We shall not be responsible for any tank fitting damage caused by the
use of cleaners containing chlorine(calcium hypochlorite).
We will not be liable for damages due to improper handling or installation, abuse or alteration of the product.
We any responsibility for incidental or consequential damages.
WARNING:
disclaim
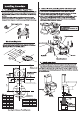
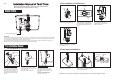
Connect Water supply Tube
To install
into tank, remove locknut and
slide Fill Valve into the hole in
tank. Next, position Fill valve to
desired position and tighten the
locknut.
(Torque <2.2 LB-FT)
installing Fill Valve:
(DO NOT OVER TIGHTEN)
Upper Shank
Lower Shank
Adjust Height of Fill Valve:
To adjust height, push the
up, turn the upper shank
clockwise to unlock teeth from
lower shank. Next, adjust the
height by pulling up or down on
upper shank to set at desired
height.
Tamper
proof
After adjusting height of Fill valve,
rotate the upper shank counter
clockwiseto lock into lower shank.
Next, push down
On to secure it.Tamper proof
Tamper proof
Installation Manual of Tank TrimsInstallation Manual of Tank Trims
Please give the manual to the end user. Please read
the manual thoroughly before using it.
562622
09-A
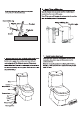
Rotate the flush valve body separate the
body from base as shown in the Fig.
Install the flush valve base into the
outlet to make the "U" clasp can clip
on the tank properly. Rotate the base
to choose proper angleand lock the
screw.
2.The installation of Outlet Vlave
base
screw
3.Push button installation
1 The Installation of Fill Valve
body
base
Cut the rod to a proper length, put the
push button into the hole.
Tighten the nut.
Full flush.
Partial flush.
Adjust the direction of the push button.
Be sure the full flush button toward
the full flush touch piece.
Attention: If the product is different from the drawing , Please take the object as right.