
Operating instructions
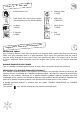
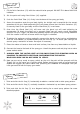
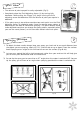

Twist and click the Air Cap (2) horizontally to obtain a vertical side to side spray pattern.
Twist and click the Air Cap (2) vertically to obtain a horizontal up and down spray pattern.
Twist and click the Air Cap (2) to a diagonal setting for a round spray pattern for more
detailed projects.
8
1.
2.
3.
4.
5.
7.
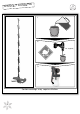
Fill the Paint Container (13) with the material to be sprayed. DO NOT FILL above MAX level
indicator.
Stir the paint well using Paint Stirrer (16) supplied.
Push the Paint Feed Tube (11) firmly into the base of the spray gun body.
Screw the container onto the gun body tightly. An airtight seal is essential for the correct
operation of this gun. Before operating the unit please ensure that the Paint Container (13)
is securely fixed to the gun body and the Gland Nut (9) is not loose.
Over time the Gland Seal (10) will wear and the gland nut will need adjusting to
compensate. To check the gland nut is correctly fitted you will need a small adjustable
spanner. Pull the Trigger (14) back and gradually tighten the gland nut by turning clockwise
until the needle is not free to move when the trigger is released.
To obtain the optimum setting gradually unscrew the gland nut by turning anticlockwise
until the Fluid Needle (6) moves forward into the Fluid Tip (4). To check your settings are
correct spray a container of water. Re-adjust if necessary.
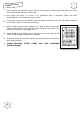
Place the motor unit onto a clean and level surface, free from any loose debris or liquids.
Connect the hose to the back of the spray gun. Uncoil the power cord and plug into a mains
power socket-outlet.
ALWAYS KEEP THE MOTOR UNIT AS FAR AWAY FROM THE SPRAYING AREA AS
POSSIBLE TO PREVENT PAINT FROM CONTAMINATING THE MOTOR.
MASK ANY AREA YOU DO NOT WISH TO SPRAY.
Now you are set up ready to spray, switch on the unit. No paint will be sprayed until the
Trigger (14) on the spray gun is gently pulled. Before starting any work on spraying actual
objects we suggest you spend some time practicing on cardboard or newspaper until you
have got used to how the spray gun works.
6.
1.
2.
3.
O
p
e
r
at
i
on
Spray Pa
tterns
Fig.2
8.
9.
Vertical Jet Horizontal Jet Round Jet
10.