EZ Click Hardwood Flooring Installation, Care and Warranty Guide Warranty coverage may be voided due to failure to strictly abide by all the installation instructions and recommendations in this manual. This includes the use of improper tools and materials. Read all instructions carefully. Rev.
Part I INSTALLATION AND CARE: Product Description: EZ Click hardwood flooring planks are designed for use in multiple locations. Acceptable location includes basements, ground floors or high-rise buildings. EZ click flooring can be floating on, directly nailed or glued to a wooden or concrete sub-floor. Professional advice should be sought for the type of glue and method of glue-down installation to ensure trouble free installation.
Crucial Points to Remember: 1. Plan your project by making an installation sketch. Determine the installation starting point. Consider if it is one regular-shaped room; a number of rooms with landings; or rooms on one floor, including a hall or main room. Think about how to get the most out of your budget. If in doubt, ask your dealer for advice. 2. Choose the floor plank direction. It is strongly recommended that you install boards at a 45 0 or 900 angle to the joist direction.
exceeds 12%. Any responsibility for failures or deficiencies related to job site quality is declined by the manufacturer. Installation Work: Once you are ready to install your floor planks, open a case to check that product species, grade, color, size and quality are correct. If everything is in order, then open several cartons of flooring at the same time for installation. This will allow you to balance plank length, color and variations in the grain of the wood.
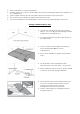
Please refer back to Job Site Preparation. If below grade, you must lay a 6-mil Polyfilm with seams overlapping 8" (200 mm) in addition to 2in-1 underlayment. Fasten Polyfilm seams every 18" to 24"(450 to 600 mm) with duct tape or poly tape. Run 4" (100 mm) of poly-film up against the perimeter of wall. Lay foam underlayment by butting edges and then duct tape the full length of the seam. Floating Installation Step by Step: The sub-floor should be free from any surface defect.
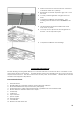
Place the second plank tight to the short end of the first one. Fold down with a single action movement. At the end of the first row put a spacer to the wall and measure the length of the last plank to fit. Cut hardwood floor plank with circular saw face turned down OR with a hand saw with the hardwood face turned up. Proceed with installing second row. Place the floor plank tight to the short end of the previous plank and fold it down in a single action movement.
Plank on the last row and the first row must be in a minimum width of 2” (50mm). Remember to include expansion gap of ½” from the wall. Cut the plank lengthwise and glue the short ends. Complete installation with moldings. Any molding must be fixed to the wall, never to the floor. Disassembling (without the use of tools): EZ click floor planks can be easily disassembled by proper method. This allows for replacement during installation and also during use.
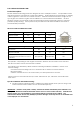
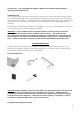
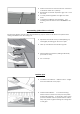
IMPORTANT: A minimum amount of adhesive can be used on the end joint between the tongue and groove. During Installation, immediately wipe any adhesive from the floor’s surface. STAPLE DOWN INSTALLATION Staple down installation can only be used with PS-2 rated oriented strand board (OSB) or plywood sub-floors. The manufacturer recommends using 3/4" (18 mm) OSB or plywood on joists spaced no more than 19.2" (450 mm) apart, center-to-center. OSB or plywood must be structurally sound. Recommended tools: 1. 2.
Lay 15 lb non-tarred felt paper or equivalent (with 3” to 4” overlapping end) in the direction of the boards using staples. This will reduce the normal mechanical friction between materials and facilitate installation. Felt paper is not required if the floor has an acoustic membrane. Use chalk line to trace starting line with a ½” expansion joint at the side and ¼” at row ends. Lay out 4 to 5 rows of planks ahead of time that match in terms of woodgrain and color.
Plank on the last row and the first row must be in a minimum width of 2” (50mm). Remember to include expansion gap of ½” from the wall. Cut the panels lengthwise and glue the short ends. Complete installation with moldings. Any molding must be fixed to the wall, never to the floor. The final planks should be installed the same way as the 1st plank. You may have to rip the last row lengthwise to leave ½” for the expansion joint. Complete installation with moldings.
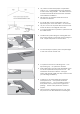
Preparing and leveling the sub-floor: Please refer back to Job Site Preparation. The sub-floor should be free of any surface defect. For concrete installation, ensure that the concrete is not low-density (below 3000 psi) or friable. Glue Down Installation Steps: Lay out 4 to 5 rows of planks ahead of time that match in terms of joints and color. Cut out imperfections in planks or place them in less visible areas.
Proceed from left to right to install other planks in the row. Do small sections to ensure adhesive does not dry before the planks are laid. As you work, immediately clean any adhesive from the wood surface. Start the subsequent row using the remainder of the cut-off end plank from previous row. The remainder should be at least 6” in length. Insert the tongue end into the groove and lower the plank as closely as possible to the adjacent one.
Part II MAINTENANCE & CARE Finishing & Maintenance: You can hide the small holes left by finishing nails with wood putty. 1. 2. 3. 4. Fill the hole. Wipe excess wood putty immediately with a clean cloth and cleaner. Apply a thin coat of urethane to the clean surface of the putty. Let it dry for about 1 hour. Regular Maintenance: Clean your wood floors with a damp cloth or terrycloth mop/applicator. Wipe in the direction of the grain (length of the boards). Waxing is NOT recommended.
Part III WARRANTY Scope of Warranty This limited warranty extends only to the original purchaser/s of this product for as long as they own their premises and is not transferable. Warranty covers the flooring only and applies to the purchase/s through legal proof of purchase. It does not cover downgraded or discounted purchase. Labor costs incurred for whatever purpose are excluded and not covered by this warranty.
Wood is a natural material, variation of color and woodgrain is a natural characteristic of wood. These variations are natural due to species, age, character of wood and exposure to sunlight. All these naturally occurring characteristics of wood such as grain, color, mineral streaks and knots are not considered defects. Adhesion breakdown or dimensional changes caused by moisture damage and/or water damage is not covered under this warranty.
Should the report not be justified for claim, the case will be considered dissolved and the claimer will have to bear the cost of the inspection. If justification is claimable, the manufacturer will provide suggestion to claimer to reach an agreement for reimbursement and settlement.