
Warranty Guide
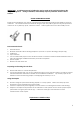


Preparing and leveling the sub-floor:
Please refer back to Job Site Preparation.
The sub-floor should be free of any surface defect.
For concrete installation, ensure that the concrete is not low-density (below 3000 psi) or friable.
Glue Down Installation Steps:
Lay out 4 to 5 rows of planks ahead of time that
match in terms of joints and color.
Cut out imperfections in planks or place them in
less visible areas.
For concrete installation, ensure concrete is not
low-density (below 3000 psi.).
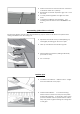
Use chalk line to trace starting line with ½”
expansion joint at the side and ¼” at row ends.
Nail a guide plank along the starting line if your
wall is not in perfect straight line. The plank will
serve as a guide for the 1
st
row of planks.
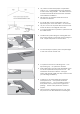
Use the trowel and apply adhesive at a
45°angle from the starting line outward.
Install the first plank alone the guide strip with the
tongue facing you and the groove facing the
starting wall.
The adhesive should not be applied if the
subfloor or room temperature is above 85
0
F
(29.6
0
C) or below 50
0
F (10
0
C).
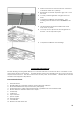
Install the first plank along the starting line with
the tongue facing out and the grove facing the
wall.