
Warranty Guide


12
Proceed from left to right to install other planks in
the row.
Do small sections to ensure adhesive does not
dry before the planks are laid.
As you work, immediately clean any adhesive
from the wood surface.
Start the subsequent row using the remainder of
the cut-off end plank from previous row. The
remainder should be at least 6” in length.
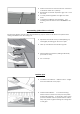
Insert the tongue end into the groove and lower
the plank as closely as possible to the adjacent
one. Avoid contact with the adhesive as much
as possible.
For best results, stagger the joints 6" to 8" from the
previous row and alternate board lengths.
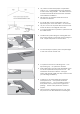
Use a 100-150 lb. roller to apply pressure to
installed sections while the adhesive is still active
(approximately 45-60 min).
Remove all dust and debris prior to rolling.
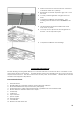
Once the entire surface is covered, remove the
guide planks and replace with flooring planks.
Remove the expansion spacer to install molding
to cover the expansion joint.
Complete installation with moldings.
Do not walk or place any personal belongings
on newly installed floor for at least 24 hours. This
will enable the adhesive to properly cure.
IMPORTANT: During Installation, immediately wipe any adhesive from the floor surface using
Bostik’s Ultimate solvent and/or wipes.