
Warranty Guide
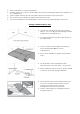

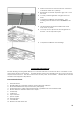

Lay 15 lb non-tarred felt paper or equivalent
(with 3” to 4” overlapping end) in the direction
of the boards using staples. This will reduce the
normal mechanical friction between materials
and facilitate installation.
Felt paper is not required if the floor has an
acoustic membrane.
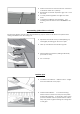
Use chalk line to trace starting line with a ½”
expansion joint at the side and ¼” at row ends.
Lay out 4 to 5 rows of planks ahead of time that
match in terms of woodgrain and color.
Cut out imperfections on planks or place them in
less visible areas.
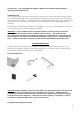
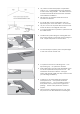
Install the first plank along the starting line with
the tongue facing out and the grove facing the
wall. Staple the planks to the sub-floor.
On the subsequent plank, place this plank tight
to the short end of the first one.
Cut plank to fit end row, allowing for ¼” to ½”
expansion gap. No pull bar is needed.
Start subsequent row using the remainder of the
cut-off end plank from the previous row. The
remainder should be at least 6” in length.
Fasten with simple angle and drop-down motion
(as in floating installation).
Continue to use pneumatic floor staple for
subsequent rows. Each plank should be
stapled every 12”. Do not staple less than 2”
from plank end to prevent the tongue from
splitting. Fasten each plank with at least 2-
staples.
For best results, stagger the joints 6” to 8” from
the previous row and alternate board lengths.