
Instructions / Assembly
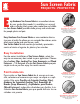


9
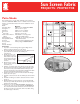
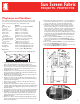
This example is for a 6' high fence in 8' long sections. Materials can
be varied to construct a taller fence in 6' sections. Pressure treated
lumber is recommended.
Tools:
■
P
osthole digger
■
Scissors
■
Hammer
■
Level
■
Wood saw
■
Utility knife
■
Measuring tape
■
6' stepladder
Materials required for each 8' section:
■
6' roll Sun Screen Fabric as long as
fence desired
■
4" x 4" x 8' pressure treated posts —
one post to start fence and one additional
post for each 8' section.
■
Two 2" x 4" x 8' lumber
■
One 1" x 6" x 8' lumber
■
Two 1" x 2" x 8' lumber
■
Four metal fence brackets
■
One sack of concrete mix per post
■
One-half pound 8d galvanized box nails
■
One-half package Wood Fasteners
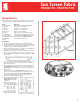
Instructions:
1. Determine location of 4"x4" posts. Have no more than 7'6" be-
tween posts.
2. Set posts 2' deep in concrete. Make sure they are properly
aligned, spaced and plumbed.
3. Cut a 2" x 4" rail to fit between the tops of the first two posts
and install flush with the tops of the posts using fence brackets.
4. Measure down from the top of the posts 5'9" and mark. Install
fence brackets above these marks.
5. Cut a 2" x 4" rail to fit into these lower brackets but do not nail
in place.
6. Cut a length of Sun Screen Fabric 4" longer than the distance
between the posts (7' - 10' in our example).
7. Fasten one 7' - 10' side to the bottom edge of the bottom
2" x 4" rail using Wood Fasteners. The fabric should extend
2" beyond the ends of the rail.
8. Install the bottom 2" x 4" rail and nail in place.
9. Stretch the Sun Screen Fabric up over the top rail and fasten
to the top edge with Wood Fasteners.
10. Cut a 1" x 6" cap to extend to the center of the post. All splices
should be on top of the posts. Nail to posts and top rail.
11. Cut 1" x 2" furring strips between the rails. Fold Sun Screen
Fabric under 1" x 2" and nail to post.
12. Trim off excess Sun Screen Fabric with utility knife.
13. Repeat procedures for remaining sections.
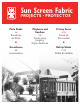
PROJECTS • PROYECTOS
Sun Screen Fabric
Privacy Fence