1 Installation.........................................................................................................................................-21.1 Requirement........................................................................................................................................... -21.2 Installation steps......................................................................................................................................-22 Detailed instructions....................
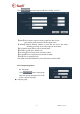
1Central Management 1.1 Installation Requirement Hardware condition: 1、Pentium IV series,CPU frequency above 2.0G 2、memory above 2G 3、hard disk >= 120G 4、monitor 1024×768 or above Software condition: Windows2000/WindowsXP/Windows2003/Windows Vista/Windows 7,recommendation Windows XP 1.2 Installation steps Double click installation package,it pops up as below: Select path then click “next”. After installation, it creates an icon on desktop as below: At program list as below: -2- MVH3E-E-2.0.1.
2 2.1 Detailed instructions Login and Logout 【Login】the default user is admin and no password,click “ok”to access software main interface. 【Logout】only admin authority can logout,user and guest authority can not It needs to input administrator user and password when logout. 2.
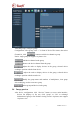
Click to change to preview interface Click to change to playback interface Click to change to map operating interface Click to change to configuration interface Click to change to log operating interface Logout or change user Click to logout ◆Devices list: 【List mode 】 display area, settings and channel from user set 【Group mode 】 display group and channel from user set 【Current screen】 display devices current screen connected, only available on List mode ◆Real-time preview: electronic enlarging butto
Devices list fold/unfold button, click to fold/unfold Alarm information list fold/unfold button, click to fold/unfold 2.3 DEVICE MANAGEMENT 2.3.1 Add device Firstly click “Config” button on label list to access device management page. 2.3 Device management 2.3.1 Add device Firstly click “Config” button on label list to access device management page.
Click button then pop up add device dialog, as below: 【Name】Device name, support custom, length less than 30 byte. Only display name instead of IP after input name. 【Channel】Support different channel on case that one device has many channels, presently device only supports one channel.
After add groups, configure groups Configuration: select group, click “+” in front of device IP or name, then select Channel 01, click button to add device channel to group.
2.4.1Non-cycle preview Click “+” in front of device’s name or IP, then double click Channel 01 or drag Channel 01 to the window to view video. device connected Channel 01, if the display as It displays a blue triangle after , it means device does not connect. And if the display as , it means there is alarming. Right click on one area, it pops up dialog as: -8- MVH3E-E-2.0.1.
: 【Connected All】connect device in selected area 【Disconnected All】disconnect device in selected area 【Arm All】devices in selected area arm 【Disarm All】devices in selected area disarm 【Start Manual Record of Area】enable manual record in selected area 【Stop Manual Record of Area】disable manual record in selected area 【Main Stream All】connect device with main stream in selected area 【Sub Stream All】connect device with sub stream in selected areaIf device is in connection, it should be disconnected then recon
【Sub Stream】connect device with sub stream, on tick means current selection is sub stream. 【Auto Adjust】selected channel auto adjusts view proportion 【Check Time】selected channel synchronizes time with PC. Right click on preview window, pop-up dialog as: 【Full Screen】select full screen for software full screen view, double click to view full screen for single window. 【Auto Adjust】on tick to display according to image proportion, off tick to display according to window’s size of multi-picture view.
Enlarge aperture, need device hardware support Narrow aperture, need device hardware support Enlarge focus, need device hardware support Narrow focus, need device hardware support Focus forward adjustment, need device hardware support Focus back adjustment, need device hardware support Light button, click to light on/off, need device support Wiper button, click to wiper on/off, need device support 2.5.
Adjust image brightness Adjust image white balance Adjust image contract Adjust image color Recover to factory set color 2.6 Video management 2.6.1. Plan of record Click “Config”, then “Record Management”, then tick “Enable the plan of record”, picture as above: 【enable plan record】Select channel to record, then left click to drag out a green box(the box range is the time to record). Click “Save” to finish. 【disable plan record】Untick “Enable the plan of record”, then click “Save”.
single record file’s size can be 1-60 minutes. To modify size in General Record Length blank then click Save. 【Recovery of remaining disk】The selecting range is 1-10G, when space is less than selected range, it should save record to another disk or cover the former records. 【Record format】It can support 264 and AVI formats, and for 264 format, only can play with factory player.
【Hard Disk Error】Alarm on hard disk error Linkage Alarm: 【Popup Video Window】Tick for popping up windows on alarm 【Electron Map Alarm】Tick for flashing on electron map on alarm 【Linkage Record】Tick for recording to local disk on alarm 【Sound Alarm】Tick for displaying sound on alarm 【Alarm Duration Time】Alarm duration time, default is 10 seconds, selecting range is 5-60 seconds. 【Pre-recorded alarm Length】Pre-recording’s length on alarm, default is 5 seconds, selecting range is 1-15 seconds.
2.7 Playback. 2.7.1.
click to view the video; right click on timeline, the display length should turn into 2-hour from 24-hour, it means the time point extending 2.7.2Searching-file Playback Step 1: select file type and device channel Step 2: select searching time then click “Search”, the eligible files should list on device tree Step 3: select playback windows then double click record file to view video, it can support one video displaying on four windows at the same time 2.8 Electron map 2.8.
2.8.3 Delete Map Select map name then click “Delete Map” to cancel map 2.9 Parameters configuration To connect device for configuration on parameters configuration page (double click device channel, the image should display on right side image frame). 2.9.
【Frequency】support 50Hz and 60Hz, default is 50Hz 【Bit Rate】different bit rate for different model 【Frame Spaced】N standard or 60Hz device has range 1-30fps, P standard or 50Hz device has range 1-25fps 【I Frame Spaced】the interval of two I frame of image 【Rate Control】support VBR and CBR 【Rate Quality】support 6 levels, lower level with better quality 2.9.3Audio 【Stream Type】support main stream and second stream 【Audio Capture】ON or OFF 【Audio Type】G727, G711 and AMR 【Input Mode】MIC or Line In 2.9.
2.9.6Motion Detection Configure motion detection: Step 1: tick area, then it display a green dialog on left image Step 2: drag the green dialog to position wanted, and configure its size Step 3: configure sensitivity of alarm area detection. Sensitivity range: 0-75, default is 35, the greater the value, the more sensitive, and vice versa. Step 4: click “Linkage Alarm” to select alarm type Step 5: enable arm function for device, otherwise it can not support alarm linkage 2.9.
After select time, click “Set Time” to modify time of device 【Sync with computer time】tick then click “Set Time” to enable 【Reboot】click to reboot 【 Restore 】 click to restore factory settings, after restore, need to reboot to reconfigure network parameters of device for reconnection 2.10 User management Factory set administrator name is admin, no password. Login with administrator then add, delete and configure user authority. User authority includes three levels: admin, user and guest.
Step 2: click “Add” button, input name and password then select permission Step 3: click “Save” button to finish 2.10.2 Delete User Step 1: login with admin then click “Config” then “User Management” Step 2: select user then click “Delete” button 2.10.3 Modify User Authority Step 1: login with admin then click “Config” then “User Management” Step 2: select user then click “Modify” Step 3: select permission then click “Save” 2.10.
Step 2: select device to inquire, default is “All Devices” Step 3: select start time and end time then click “Search” Step 4: click “Export” then select backup path Note: 1. It should search log before backup 2. Exported log is with Excel format 3. Each Excel table only saves 5000 pieces of logs, extras will be saved as another Excel table, and so on 2.