0
Table of Contents 1. Camera Precautions………………………………… 3 2. Preparation…………………………………………... 6 z Standard Accessories………………………... 6 z Parts Names…………………………………... 7 z Charging the Battery …….…..…………….... 8 z Loading the SD card………..………………… 10 z Attaching the Strap………..………………….. 11 3. Quick Start…………………………………………….12 z Powering the camera On/ Off……………….. 12 z Taking Picture…………………………………. 13 Holding the camera correctly…………….. 13 Capturing Still Images…………………….. 14 Recording Video Clips....…………………..
Table of Contents Playback Mode……………………………….. 21 Pictures/ Video Clips Playback………..… 21 Single Video Clip Playback Delete…..…. 21 Thumbnail……..…….…………………….. 22 Slide Show………….……………………… 22 Delete Current Picture or Video Clip……. 23 Delete All……………..……………………. 23 Protect……………………………………… 24 Print………………………………………... 24 Playback Zooming………………………… 25 5. Setting………………………………………………… 26 z Language……….……….…………………….. 26 z Format Storage....…………………………….. 27 z Auto Power Off..………………………………. 27 z Light Frequency……………………………….
Welcome Thank you for choosing the Camera to pursue your DSC. Whether you are creating memories of your friends and family or exploring the great outdoors to get the utmost satisfaction from your DSC, please take a moment to read through this manual. Its contents will send you on an educational journey into your camera's multiple capabilities. 1. Camera Precaution Before using the camera, please ensure that you read and understand the safety precautions described below.
• Keep the camera away from water and other liquids. Do not use the camera with wet hands. Never use the camera in the rain or snow. Moisture creates the danger of fire and electric shock. • Keep the camera and its accessories out of the reach of children and animals to prevent accidents or damage to the camera. • If you notice smoke or a strange odor coming from the camera, turn the power off immediately. Take the camera to the nearest authorized service center for repair.
FCC Notice This equipment has been tested and found to comply with the limits for a Class B digital device, pursuant to Part 15 of the FCC Rules. These limits are designed to provide reasonable protection against harmful interference in a residential installation. This equipment generates, uses and can radiate radio frequency energy. If not installed and used in accordance with the instruction, it may cause harmful interference to radio communication.
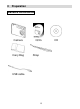
2.
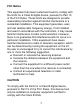
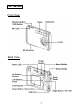
Part Names Front View Back View 7
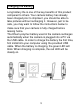
Charging the Battery Long battery life is one of the key benefits of this product compared to others. Your camera battery has already been charged prior to shipment, you should be able to take pictures without recharging it. However, just to be safe, you may want to follow the instructions below to make sure that your camera is fully charged before leaving home. The lithium-polymer battery used in the camera recharges automatically when the camera is plugged into a PC via the USB cable.
Battery Power Status CAUTION * It takes approximately 1.5~2 hours to fully charge a depleted battery. * The camera can be charge at ambient temperatures between 0℃ (32℉) and +40℃ (104℉). * The battery does not need to be fully discharge or exhausted before being recharged. * Lithium-polymer battery loses their charge even when not used. So, be sure to charge the battery before taking pictures. * To ensure that your battery lasts as long as possible, switch the camera off when you are not using it.
Loading SD Card Insert SD card into memory card slot and push it all the way in. The LCD will show the SD card indicator when an SD card is in the slot. When the optional SD card is installed: * All images/ movies by default will be automatically stored in SD card * It may be necessary to format the SD card if the card has been used in devices other than your camera. To format, see Format Storage in page 27.
Attaching the Strap 1. The small loop goes through the strap holder. 2. Then the small loop goes through one clutch of the loop again and pulls tightly.
3. Quick Start Powering the camera ON/ OFF Power ON 1. Press the Power Button to turn on. The green LED light up indicate power is on. 2. When the LCD Monitor has been activated, the camera is ready to use. Power OFF 1. Press the Power Button again to turn the camera off. 2. The camera also turns off automatically for power save reason. To set the Auto Power Off, please refer to page 27.
Taking Picture Holding the camera correctly Due to the extremely compact size and light weight of the camera, it is critical that you hold the camera securely in order to avoid “camera shake”. The camera is particularly sensitive to shake in low light environments. Taking a picture in low light requires a longer exposure time for the image to be captured and any movement during this time might cause a blurred image. When taking a photo in low light the flash may trigger.
Capturing Still Images 1. Power on the camera. 2. Press the Shutter Button to take a picture. Recording Video Clips 1. Power on the camera. 2. Slide the Mode Switch and select the Video Mode. Press OK button for confirmation. 3. Press the Shutter Button to start recording a movie. 4. Press the Shutter Button again to stop recording.
Basic Shooting Functions Using the Zoom 1. Under Still mode and Movie mode. 2. Use the LCD monitor to frame your subject. 3. Press the zoom in and zoom out to take a picture or record a movie clip. Flash Setting 1. Under Still mode. 2. Press / Flash button directly to change the flash mode- auto/ force on/ off. The green LED light would quick blinking until the flash is fully charged.
4. Advance Mode Still Mode The Camera is default on Still Mode. To press Menu Button for modes setting, press Menu Button again to return the capture mode. Picture Quality 1. Under Still Mode. 2. Press Menu Button. 3. Press or to select 1M (1280x960)/ 3M (2048x 1536)/ 12M (4032x3024 by interpolation) you want to change. 4. Press for next mode setting or press Menu Button to return the capture mode.
Exposure Value 1. Under Still Mode. 2. Press Menu Button and press to select Exposure Value mode. 3. Press or to adjust the exposure compensation from -2 to +2 in 0.5 increments. White Balance 1. Under Still Mode. 2. Press Menu Button and press to select White Balance mode. 3. Press or to select Auto/ Sunny/ Cloudy/ Tungsten/ Fluorescent1/ Fluourscent2 according to various lighting conditions.
Burst Snapshot 1. Under Still mode, 2. Press Menu Button and press to select Burst Snapshot mode. 3. Press or to select Single/ Burst. 4. Press Menu Button to return the capture mode, and then press Shutter Button to capture 3 images continuously. Self-timer 1. Under Still mode. 2. Press Menu Button and press to select Self-timer mode. 3. Press or to select Off/ 10 sec/ 15 sec/ 20 sec. 4. Press Menu Button to return the capture mode, and then press Shutter Button to capture images by seconds delay time.
Video Mode Slide the Mode Switch and select the Video Mode. Press Shutter/OK button for confirmation. To press Menu Button for modes setting, press Menu Button again to return to recording mode. Video Resolution 1. Under Video Mode. 2. Press Menu Button. 3. Press or to select 320x240/ 640x480 movie format you want to change. 4. Press for next mode setting or press Menu Button to return the capture mode.
Exposure Value 1. Under Video Mode. 2. Press Menu Button and press to select Exposure Value mode. 3. Press or to adjust the exposure compensation from -2 to +2 in 0.5 increments. White Balance 1. Under Video Mode 2. Press Menu Button and press to select White Balance mode. 3. Press or to select Auto/ Sunny/ Cloudy/ Tungsten/ Fluorescent1/ Fluourscent2 according to various lighting conditions.
Playback Mode Pictures/ Video Clips Playback 1. Slide the Mode Switch and select Playback Mode. 2. Press Shutter/OK button for confirmation. 3. Press or to select the pictures/ video clips you want to review. Single Video Clip Playback 1. Press to playback, to press twice is quick playback. 2. Press to stop, to press twice is backward.
Thumbnail 1. Press Shutter/OK Button to enter Thumbnail to show 6 pictures/ video clips at the same time on TFT display. 2. To press Shutter/OK Button to return the original picture/ video clip playback status. Slide Show 1. Under Playback mode. 2. Press Menu Button. 3. Press Shutter/OK button to start slide show, press Shutter/OK button again to stop.
Delete Current Picture or Video Clip 1. Under Playback mode. to select Delete 2. Press Menu Button and press mode. 3. Press Shutter/OK button to delete current picture or video clip. 4. Press Shutter/OK button again for confirmation, press Menu button to exit. Delete All 1. Under Playback mode. to select Delete All 2. Press Menu Button and press mode. 3. Press Shutter/OK button to delete all pictures and video clips. 4. Press Shutter/OK button again for confirmation, press Menu button to exit.
Protect 1. Under Playback mode. to select Protect 2. Press Menu Button and press mode. 3. Press to select ON to protect current picture or video clip. 4. The Protect symbol will be shown on the top right of picture or video clip. Print 1. Under Playback mode. to select Print 2. Press Menu Button and press mode. 3. Press to select ON to mark current picture to be printed. 4. The Print symbol will be shown on the top right of picture.
Playback Zooming 1. Under Picture Playback mode. 2. Press to pan the center of the picture to view. 3. Press OK Button to fix the zoom frame. Press to move to a specific area you want to see. 4. Press OK Button again to return the picture playback zooming.
5. Settings Slide the Mode Switch and select Setting Mode. Press Shutter/OK button for confirmation. To Slide the Mode Switch again to return the Mode status. Language 1. Under Setting Mode. 2. Press Shutter/OK Button. 3. Press to select English/ French/ German/ Spanish/ Dutch/ Italian/ Chinese languages you want to change, and press Shutter/OK Button to set, press Menu Button for exit.
Format Storage 1. Under Setting Mode. 2. Press to select Format Storage Mode. 3. Press Shutter/OK Button to format memory card, press Menu Button for exit. Auto Power Off 1. Under Setting Mode. 2. Press to select Auto Power Off Mode. 3. Press or to choose the 30 sec/ 1min/ 3min/ 5min you want to change, and then slide Mode Switch to return the Mode status.
Light Frequency 1. Under Setting Mode. 2. Press to select Light Freq. mode. 3. Press or to choose the correct frequency50Hz/ 60Hz in your territory when you take picture indoors, and then slide Mode Switch to return the Mode status. Default Setting 1. Under Setting Mode. 2. Press to select Default Setting Mode. 3. Press Shutter/OK Button to restore default system setting, press Menu Button for exit.
System Information 1. Under Setting Mode. 2. Press to select System Info. Mode. 3. Press Shutter/OK Button to show firmware version for this camera, press Shutter/OK again to return setting mode.
6. Making Connection Install PhotoImpression 1. Insert the installation CD into your PC’s CD-ROM drive. 2. The introduction screen will appear automatically. 3. Click “ArcSoft PhotoImpression” 4.
5. Click “NEXT” 6. Click ”YES” 7.
8. Click “NEXT” 9. Click “Finish” Note: To find out more about PhotoImpression5.0 or how to use it, consult online help by clicking ” ? “ icon on the top menu bar or website www.acrosoft.
Install VideoImpression 1. Insert the installation CD into your PC’s CD-ROM drive. 2. The introduction screen will appear automatically. 3. Click “ArcSoft VideoImpression” 4.
5. Click “NEXT” 6. Click ”YES” 7.
8. Click “NEXT” 9. Click “Finish” Note: To find out more about VideoImprssion or how to use it, consult online help by clicking ” ? “ icon on the top menu bar or website www.acrosoft.
Connecting to PC Window 2000/ XP- No Driver Required: 1. Power on the camera first. 2. Plug the USB cable to the camera and computer or notebook properly.
Download Pictures, Videos 1. Power on the camera first and plug in USB cable 2. For Windows 2000: Double click “My Computer” icon on the Windows Desktop. For Windows XP: Select “Open Folder view files using Windows Explorer” and click “OK” 3. Double click on the DCIM folder to open. 4. Double click on the 100CRESI folder for pictures and movies. 5. You can copy the pictures and movies to your designated folder or album.
7. Appendix Specifications Image Sensor Built-in Memory External Memory Lens Specification Lens Focus Flash Strobe Flash Distance White Balance CMOS 2048 x 1536 pixels None SD card memory slot F2.8, f=6.3mm Fixed, 1.5m (4.9 ft) to infinity Auto, Force on, Flash off Approx. 1.3m ~ 2.8m Auto, Sunny, Cloudy, Tungsten, Fluorescent Exposure Auto, ±2.0 EV, 0.5 EV steps Still Image Res.
Computer System Requirement z z z z z z z Windows 2000/ XP 266 MHz Pentium or better 32MB RAM 200MB available Hard Drive space CD-ROM or DVD Drive Color monitor Available USB port 39
Icons & Indicators SD card Indicator Shaking Hand Battery Full Auto White Balance Battery 2/3 Sunny Battery 1/3 Cloudy Battery Empty Tungsten Still Mode Fluorescent Video Mode Delete Still Resolution Delete All Video Resolution Burst Auto Flash Protect Force On Print Flash Off Slide Show Exposure Zoom In Self-timer Zoom Out 40
Standard number of available pictures/ recording time reference table The number of available pictures/ recording time depending on the subjects photographed. Still Image # of Available Shots RES. Size SD card 16 256 512 MB MB MB 1G 2G 1M 40 726 1464 2931 5783 3M 15 283 571 1144 2258 12M 4 73 147 293 590 Movie # of Available Recording Time RES.