WARNING! Not suitable for children under 36 months.
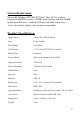
System Requirement Microsoft® Windows ME/2000/XP/Vista/7, Mac OS10.4 or above, Pentium III 800MHz or above, 128MB system memory and free 500MB system hard disk space, Available USB port; 800x600 Screen area, 16-bit color display (higher color setting recommended) Product Specification Image Sensor 3 Mega Pixel CMOS Sensor Lens F=2.6; f=5mm Focus Range 2m~infinite LCD monitor 1.77”/4.
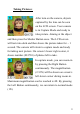
Introduction This camera is specially designed as the “First” digital camera for your kids. Its durable design allows your kids to experience photo taking through hands-on electronic play. It includes a USB port and cable to connect to the PC for photo viewing and editing. To ensure a truly enjoyable experience from the camera, please read the manual thoroughly and retain it for future reference. Enjoy your purchase and have a great time with your kids.
Camera Layout and Buttons: Please refer to the following diagrams for various parts and buttons of your camera.
Usage of Control Buttons Button Functions 1. To select various functions in Menu Mode. 2. To zoom-out in Capture Mode. 3. To select cartoon frames in Capture Mode. Left Right Power Playback Shutter 1. To select various functions in Menu Mode. 2. To zoom-in in Capture Mode. 3. To select cartoon frames in Capture Mode. 1. To turn on/off the camera. 2. To enter or exit the Menu Mode. To enter or exit the Playback Mode. 1. To take pictures or record videos. 2. To confirm the selection.
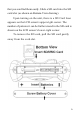
that you can find them easily. Slide a SD card into the SD card slot (as shown on Bottom-View drawing). Upon turning on the unit, there is a SD Card Icon appears on the LCD screen’s upper-right corner. The number of pictures it can be further stored in the SD card is shown on the LCD screen’s lower-right corner. To remove the SD card, pull the SD card gently away from the card slot.
n Battery Installation: Once the battery compartment is opened and memory is inserted, place the two batteries into the battery compartment with plus (+) and minus (-) ends placed according to the orientation of the battery marks in the battery compartment. The battery compartment fits only one way. Please don’t force if it does not fit, try the other way. After batteries are inserted, place the battery compartment cover to its original position.
7. Do not attempt to recharge ordinary batteries. 8. The supply terminals are not to be short-circuited. 9. Only batteries of the same and equivalent type as recommended are to be used. n Turning On/Off the Camera: Press Power Button to turn on the camera. You can see the startup screen on the LCD screen. Wait for a few seconds until the LCD screen shows the image captured by the lens. If there is no memory card inserted in camera, the LCD screen will show “Insert a SD Memory Card” as a reminder.
Taking Pictures: After turn on the camera, objects captured by the lens can be seen on the LCD screen. Your camera is in Capture Mode and ready to take picture. Aiming at the object and then press the Shutter Button once. The LCD screen will turn into dark and then shows the picture taken for ~ 1 second. The camera will return to capture mode and ready for taking next picture. On screen’s lower-right corner, it shows number (001730) of photos left to take.
Cartoon Frames: There are 10 built-in cartoon frames can be chosen as background of your pictures. In the Capture Mode, press the Right (Left) Button once, the first cartoon frame will appear on the screen. Press the Left (Right) Button once removes the cartoon frame. You can continue to press the Right (Left) button 10 times to see all of the 10 cartoon frames. At the 11th time, the camera will go back to the Capture Mode without cartoon frame.
Your camera is now ready to take video. Press Shutter Button and camera will start to record videos. During recording, you can see recorded time (00:00:32) on screen’s lower-right corner. Press Shutter Button again to stop video recording. Caution! When SD/MMC card is full, “CARD FULL" message appears on the LCD screen. Please download or erase pictures/videos to free up memory space. Battery Icons and Power Levels: In Battery Icon the Capture Mode, Battery Icon is shown on screen’s upper- right corner.
Reviewing Pictures and Videos on Camera: In the Capture Mode, press Playback Button to enter Playback Mode. You will see the last picture or video taken. The picture icon (JPG) or video icon (AVI) is shown on screen’s upper-left corner. Press Right Button shows the first picture or video taken. Press Left Button returns to previous picture/video. On screen’s lower-right corner, the sequence number of the picture (000004/000006) is shown.
Afterwards, press the Power Button once. You can see the LCD screen as shown here. Press the Left button to select YES, then press the Shutter Button to delete the picture. The camera will return to Playback Mode once picture is deleted. You can press the Playback Button again to return to the Capture Mode. To format the SD CARD, press the Playback Button to enter Playback Mode. Press the Power Button twice, you can see the LCD screen as shown here. Press the Left button to select YES.
Exploring various Functions inside the Menu Mode n Taking picture with Self-Timer In Capture Mode, press Power Button once brings to Menu Mode . Press Right Button once to see the “self-timer” icon . Then, press Shutter Button to return to the Capture Mode. You can see the “Self-Timer” icon stays on screen’s upper-left corner. Now you can take picture with Self-Timer. Picture will be captured 10 seconds after pressing the Shutter button.
Press Left Button twice to see the “Blast icon” Then, press Shutter Button to return to the Capture Mode. You can see the “Blast” icon stays on screen’s upper-left corner. Now your camera is ready to take three pictures in a row after pressing the Shutter button. Transferring Pictures/Videos to PC To save pictures/videos to PC, you need to connect camera to your PC by USB cable. The larger plug of the USB cable fits into the computer, and the smaller plug fits into the slot on the side of the camera.
Then enter “My Computer”, find the “Removable Disk” and enter it. You can see a file called “DCIM”. Enter the “DCIM” file and find another file called “100JLCAM”. Enter the “100JLCAM” file, you can see all the picture and video files. Now you can save them to your computer. Alternatively, you can take the SD card in the camera and transfer the captured pictures and videos into you computer and other memory media.
Producer: Easypix Em Parkveedel 11 • 50733 Köln • Germany 17