
Operation Manual

8
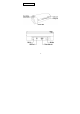
3.3 Scan an Original
1. Insert your photo or name card with the side to be
scanned facing upward and in correct orientation, place
the left edge of the original against the left edge of the
feed slot, and then adjust the guide lever so that it is
against the right side of the original. Do not apply any
force to the original.
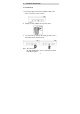
2. Gently push the original into the feeding slot and let
go when it begins to feed into the slot.
3. When the scan is completed, the scanner will
automatically create a folder titled “Photo1” on your
memory card or flash disk, which will hold the first 9999
scans. Then “Photo2” folder will be created for the next
9999 scans, and so on.
(Each scanned image is given a file name with the prefix
scan followed by a 4- digit sequential number in the
order the images are stored. For example,
IMG 0001.jpg, IMG 0002.jpg, etc.)
Note
:
Do not remove the memory card or disconnect the power
supply while the indicators are blinking.
This scanner only supports output images in JPEG (.jpg)
format, and the date/ time attribute will not be added.
If the memory card is near full (lower than 1MB), the power
indicator light blinks. Use another card or delete some files on
it if necessary.
Insert only one original at a time, and insert the next original
only when the previous one is done and the blinking has
stopped, otherwise the scanner may malfunction.