Installation and Operation Manual Room Air Conditioners Portable Heat Pump Range Local Air Conditioners ECO15P Register your air conditioner Model information can be found on the CE label. Please register your product online at www.ecoair.org. For your future convenience, record the model information below.
Congratulations! You have purchased the very latest in room air conditioner technology. Your new EcoAir high efficiency room air conditioner will give you many years of dependable service. Many features have been built into your EcoAir portable air conditioner to assure quiet operation, the best circulation of cool, dry air, functional controls, and the most economical operation. Table of contents BS Plug Wiring ...............................................................................................
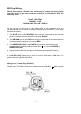
BS Plug Wiring Wiring Instructions: Should it be necessary to change the plug please note the wires in the mains lead are coloured in accordance with the following code: BLUE - NEUTRAL BROWN – LIVE GREEN AND YELLOW - EARTH As the colours of the wires in the mains lead of this appliance may not correspond with the coloured markings identifying the terminals in your plug, proceed as follows: 1.
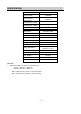
SPECIFICATION Model no. ECO15P 15000 BTU/hr 4395watts 11600 BTU/hr 3400watts Cooling capacity Heating capacity Power/Ampere consumption for cooling Power/Ampere consumption for heating Air volume (max. speed) Humidity removal capacity Power supply 1655 W/ 7.5A 1280 W/ 5.9A 550m3/h 1.
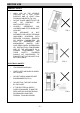
BEFORE USE GENERAL SAFETY • ONLY USE IN THE UPRIGHT POSITION ON A FLAT LEVEL SURFACE AND AT LEAST 50cm FROM ANY OBJECTS (Fig 1&4). • DO NOT PLACE OBJECTS ON THE UNIT OR RESTRICT AIR INLET/OUTLET (FIG. 2). • CLOSELY SUPERVISE ANY CHILDREN AND PETS WHEN UNIT IS IN USE. • FIG.
FOR MAXIMUM EFFICENCY • Do not exceed the recommended room size. • Take into the account the number of people or equipment used in the room as these produces heat and will reduce the cooling effectiveness. • Avoid opening doors frequently. • Keep curtains or blinds closed during the warmest part of the day. • Keep filters clean. • Once room has reached the desired conditions, reduce temperature and ventilation setting.
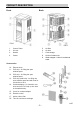
PRODUCT DESCRIPTION Front Back FIG.5 FIG.6 1. Control Panel 5. Air filter 2. Air vent 6. Air inlet 3. Handle 7. Cord storage 4. Caster 8. Outlet of exhaust air 9. Water stopper / outlet of condensed water Accessories 10. Exhaust hose. 11. PVC strip - for filling the open window space 12. PVC strip - for filling the open window space 13. PVC strip (with hole) - for filling the open window space and with hole for connection to tie-in 14.
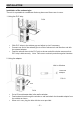
INSTALLATION Installation of the exhaust pipe The unit is a portable air conditioner that may be moved from room to room. 1. Using the PVC strip FIG.8 • • • Offer PVC strips to the window gap and adjust to size if necessary. Connect one end of the exhaust pipe to outlet of exhaust air and the other end with the outward adapter. Feed the exhaust hose to the PVC strip as shown and slide window across so that PVC strip is held securely. Note: Take care to maintain protection against intruders. 2.
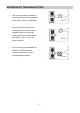
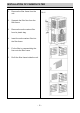
MOUNTING OF THE EXHAUST PIPE • • • Use only the hose provided and clip exhaust hose and unit adaptor to the back of the air conditioner. FIG.11 Avoid kinks and bends in the exhaust hose as this will cause expelled moist air to build up causing the unit to overheat and shut down. Fig 11 & 12 show correct position. FIG.12 The hose may be extended from 300mm to 1500mm but for maximum efficiency use the shortest length possible. FIG.13 FIG.
INSTALLATION OF CARBON FILTER 1. Remove the filter frame from the unit. FIG.15 2. Separate the filter fixer from the filter frame. 3. Remove the active carbon filter from its plastic bag. 4. Insert the active carbon filter into the filter frame. 5. Fix the filter by reassembling the fixer onto the filter frame. 6. Re-fit the filter frame inside the unit.
OPERATION OF THE CONTROL PANEL Control panel FIG.16 1. 2. 3. 4. 5. 6. 7. 8. 9. 10. 11. 12. Fan Speed button Timer button Display window Receiver for remote control Heating operation indicator(optional) Mode (function) button Auto operation indicator Cooling operation indicator Fan operation indicator “Temperature up” button “Temperature down” button Power indicator 13. 14. 15. 16. 17. 18. 19. 20. 21. 22. 23.
Indicators of the functions in progress come on at the same time. NOTE! The display window shows the ambient room temperature from 0oC to 50oC. To turn the unit off, press ON/OFF button again, then close the air louvers. Setting mode/function Press MODE button to select required working mode: automatic, cooling, fan or heat (Heat is only available for heating & cooling models.) Indicator of the selected mode comes on. Setting Temperature 1.
3. 4. 5. In SLEEP mode, the fan will be kept at low speed. Re-press the SLEEP button, the setting temperature and ventilation speed will return to the pre-selected one. In SLEEP mode, the unit will shut down automatically after running for 12 hours. Please note, the sleep function is not available while the machine is working in fan mode. Only available in Cooling or Heating mode. Heating function (This is optional, only for cool & heat model.) 1.
IMPORTANT DIAGNOSIS NOTE This machine is equipped with diagnosis function. Please contact us if your machine displays “E1” or “E2” codes. The above warnings will also appear on your remote control. Note that this control will require 2 AAA size batteries to operate. FIG.18 NOTE: 1. To prolong the compressor's life, after switching off the unit, please wait for a minimum of 3 minutes before switching on again. 2.
DRAINAGE During the process of cooling, some water will be extracted from the air into the unit. Most of the water will be evaporated by the coil for maximum efficiency. However in very warm temperature or humid condition, excessive condensation may occur and will require water drainage when tank is full. If the tank is full, both of the compressor and motor will stop. The “water full” sign will light ON, also the machine will beep as reminder.
• The drain tube may be extended by adding an extension tube and using a suitable connector. FIG.21 Please note 1. The drain must be at or below the outlet level. 2. Flashing comp / ‘full water’ indicator will not function in this mode of drainage. 3. If you want to extend the water tube, you can connect it with another tube (OD: 18mm) FIG.22 Special caution for heating function! While using the heating function, please note: 1.
MAINTENANCE Always unplug the air conditioner from the mains before cleaning. To maximize the efficiency of the air conditioner, clean regularly. Cleaning the housing Use a soft, damp cloth to wipe the body clean. Never use aggressive chemicals, gasoline, detergents, chemically treated cloths, or other cleansing solutions. These all could possibly damage the cabinet.
FAULT CHECK LIST The air conditioner does not run y y y y Is the air conditioner plugged in? Is there a power failure? Is the comp / ‘full water’ indicator flashing? Is the room temperature below the set temperature? The machine seems to do little y cooling Is there direct sunshine? (Please put down the curtain.) Are too many windows or doors open? Are there too many people in the room? Is there something in the room producing lots of heat? y y y The machine seems to do nothing.
ORDER FORM Post Order Form Your Details Company Name: Name: Address: Post code: Telephone: Mobile: Fax / Email: Model Number Description of Item Quantity Unit Price £Amount Filters 15P-108 & 109 Real Filter & Fixer £14.99 15P-110 Side Filter £14.99 15P-116 Filter Track £8.99 15P-806 Active Carbon Filter £12.99 15P-205 Remote Control £29.99 15P-141 Exhaust Hose (1.5m) £24.99 15P-137 Tube for continuous drainage £6.99 15P-817 Extension drainage tube (1m) £5.
ONE (1) YEAR LIMITED WARRANTY SAVE THIS WARRANTY INFORMATION EcoAir guarantees this product free from defects in materials and workmanship for a period of one (1) year from the date of purchase, limited to parts only. Faults arising from a faulty installation is specifically excluded. This unit must be operated under conditions as recommended, at voltages indicated on the unit. Any attempts made to service or modify the unit by unqualified technician, will render this WARRANTY VOID.