User Guide EcoFlow RIVER Pro Contact us: www.ecoflow.com WARNING 1. Keep EcoFlow RIVER Pro (hereinafter referred to as RIVER Pro) and the accessories dry and do not expose them to high heat. 2. Never disassemble, puncture, shock, crash, or incinerate the product. 3. Recycle and dispose of RIVER Pro in accordance with the local regulations. 4. Pay attention to safety when handling the RIVER Pro. 5. Children or people with disabilities should use the machine under the protection of the supervisor.
Glossary The following terms are used in this document to indicate various levels of potential harm that may be caused by improper operation. NOTICE The instructions, if not properly followed, may result in property damage and minor physical damage. CAUTION The instructions, if not properly followed, may result in property damage and serious physical damage. WARNING The instructions, if not properly followed, may result in property damage, major accident and serious injury.
10. Do Not allow pins, wires or other metal pieces to insert to the device case, outlets or controls. Metal pieces may short circuit the product. 11. Avoid collision. DO NOT place heavy objects on the machine. 12. If there is dirt on any plug or outlet surface, use a dry cloth to clean it. Otherwise, it will cause abrasion and result in energy loss or inability to charge. Product Charging: 1. Always use EcoFlow approved charging cables.
NOTICE To turn RIVER Pro on or off, you need to PRESS and HOLD the ON/OFF system Power Button. To turn on the AC power outlet, you need to PRESS and HOLD the AC Button after turning on RIVER Pro. We set the AC power button for users to turn off AC power when they don’t need it and save power. Please follow this introduction step-by-step to be familiar with each of RIVER Pro’s ports, buttons, display screens and more. Please fully charge (100%) your RIVER Pro before use it.
CONTENTS EcoFlow App Download Guide 1 Features of the RIVER Pro 2 LCD Display Introduction 4 Solar Panel Connection 8 Entry-Level UPS 9 AC X-Boost Mode 10 RIVER Pro and RIVER Pro Extra Battery Connection 11 Technical Specifications 12 How to Recharge RIVER Pro 13 FAQs 14 What’s in the Box 14
EcoFlow App Download Guide 1. Download the EcoFlow App Search “EcoFlow” in the Google Play Store or App Store to download the App. You may also use your mobile phone to scan this QR code or enter the download link in your browser: https://ecoflow.com/pages/ecoflow-app 2. For more information about the App, please follow the instruction on the App or our official website www.ecoflow.com.
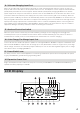
Features of the RIVER Pro 1. LCD Display 2. USB-A Output Ports 1 3. ON/OFF Button of LED Light 2 3 8 4. IOT Reset Button (PRESS & HOLD 3s to reset Wi-Fi) 5. USB-C 100W Output Port 6. Power Button & LCD Display Screen ON/OFF Power Indicator 4 5 6 7. DC Output ON/OFF Button (Car Outlet, 2 DC 5521 Output Ports) & DC Output Indicator 7 8. Fast Charge USB-A Output Port 9. AC Power Button (PRESS for ON/ 11 10. 3 AC Output Sockets (100-120V) 2 AC Output Sockets (220-240V) 11. Ventilation Fan 12.
3. ON/OFF Button of LED Light There’re three types of LED light: low light, strong light, and SOS rescue signal flash. Press it once to turn on the low light; press it twice to turn on the strong light; press it one more time to turn on the SOS rescue signal flash; then press it again to turn off the LED light. Long press can turn off the LED directly. 4.
12. X-Stream Charging Input Port Plug in an AC cable with a universal three-pin plug (one that can withstand an effective current of 10A) into the port and connect the cable to an AC power source. The U.S. and Japanese version supports 100Vac-120Vac (50Hz/60Hz)/international version supports 220Vac-240Vac (50Hz/60Hz) charging.
a. Remaining Charge/Discharge Time The number indicates the remaining charge/discharge time (in minutes) for RIVER Pro. b. Battery Level Indicator Shows the remaining power. The icon rotates while charging. c. Battery Level Percentage Shows the percentage of the power. If it displays 0%, please charge RIVER Pro immediately. d.
Protection Information Instruction The RIVER Pro display screen uses different icons and combined icons to indicate the reason for device protection. USB-A Overload Protection USB-A and OVERLOAD icons flash together. Disconnect all electrical appliances and wait 10 seconds before adding each appliance back. USB-C High Temperature Protection USB-C and High-Temperature icons flash together. Let RIVER Pro cool before adding each appliance back.
Communication Failure between Main Board and AC AC icon Flashes. Restart RIVER Pro. Inverter Output Overload AC and Overload icons flash together. Wait 10 seconds, turn AC Power ON/OFF. If the icons keep flashing, do not charge or discharge the unit. Please note that electrical appliances must be operated within rated power. (For more information about X-Boost function, go to P10. Inverter High Temperature Protection AC and High-temperature icons flash together. Let the inverter cool down.
Solar Panel Connection How to recharge the RIVER Pro using solar panels? If you need to know more about the connection of solar panel, please refer to the Solar Panel User Guide. Here we focus on demonstrate how to connect RIVER Pro to 1 set of solar panel or connect RIVER Pro to 2 sets of solar panels in parallel. The RIVER Pro can support a 10-25V DC input. When the input exceeds 25V, the RIVER Pro's overvoltage protection will be triggered. Over voltage may damage the product.
2. RIVER Pro supports the use of third party solar panels (DIY solution) Users can buy universal solar panels of MC4 connection standard on their own to power RIVER Pro, as long as the voltage and current (10-25V DC, 12A Max) comply with the specifications of RIVER Pro, the panels will be able to recharge RIVER Pro through the MC4 to XT60 conversion cable.
AC X-Boost Mode X-Boost allows you to use 600W-1200W appliances with the 600W inverter without the disruption caused by overload protection. Traditional inverters will overload when one electrical appliance with a higher rated power is connected. Those inverters cannot be used to power such appliances. X-Boost enables the powering of 600W-1200W electrical appliances. Please take note of the following when using this mode: 1. The X-Boost mode is enabled by default.
RIVER Pro and RIVER Pro Extra Battery Connection Get the RIVER Pro , RIVER Pro Extra Battery and Expansion Power Cable ready. Then turn off the power of RIVER Pro and RIVER Pro Extra Battery. Follow the steps below. If the devices are not turned off, they cannot be successfully connected. 1. Open the soft cover below the AC port of RIVER Pro to expose the Expansion Power Port. Connect the Expansion Power Cable to the port. Tighten the screws on both sides of the port to secure the connection. 2.
Technical Specifications General Specs Net Weight * 15.9 lbs (7.2kg) Dimensions * 11.4 x 7.1 x 9.3 in (28.9 x 18.0 x 23.5 cm) Capacity 720Wh (28.8V) Testing and certification UL Standard, CE, FCC, RoHS Outputs AC Output (x3) / 600W (Surge 1200W) total, 120Vac (50Hz/60Hz) / (x2 International Version) Full Sine Wave 230Vac (50Hz/60Hz) USB-A Output (x2) 5Vdc, 2.4A, 12W Max, per port USB-A Fast Charge (x1) 5Vdc, 9Vdc, 12Vdc, 2.
How to Recharge RIVER Pro Example 1: 660W Max X-Stream charging <2 hrs AC Cable 0-80% charged in 1 hour 0-100% charged in 1.6 hour (AC charging cable included) Example 2: Car Charger (120W Input) <6.5 hrs Car charge cable 0-100% charged less than 6.5 hours (Car charge cable included) How do I recharge my RIVER Pro? RIVER Pro has an AC charging port and an XT60 charging port located on the side of RIVER Pro. The RIVER Pro can be charged via AC power, 12V car charger or solar panels.
FAQs How do I clean for RIVER Pro? The RIVER Pro is a versatile tool on many adventures, so that simple cleaning will likely be required from time to time. Use dry, non-abrasive cloths to wipe. If you need to clean more thoroughly, we recommend that you use detergent that used for cleaning mobile phones and computer screens. Do Not expose RIVER Pro to lots of liquid. How do I store RIVER Pro? Please store RIVER Pro in a dry and cool place. DO NOT place it near water.