
CA Cleaning Products Right to Know Act


ENGLISH
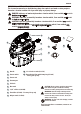
1. Pull lid latches in an outward motion, remove
power head and some accessories that may
have been shipped in the tank.
2. Before replacing power head, refer to this
manual to ensure you have the proper filters
installed for the cleaning operation.
4. Replace power head, and apply pressure with
thumb to each latch until it snaps tightly in place.
Make sure all lid latches are clamped securely.
5. Insert the hose end into inlet of tank.
6. Attach one of the cleaning accessories (depending on
the cleaning requirements) on the hose. Twist slightly
to tighten the connection.
7. Plug the cord into the wall outlet. The vacuum is
ready for use.
8. Turn the unit “ON” by pushing the switch from
position “O” to position “I”. The “O” is the
“OFF” position and the “I” is the “ON” position.
UNPACKING & SET-UP SUMMARY
4
WARNING: Do not alter the plug in any way.
If the plug does not fit fully in the outlet, reverse
the plug. If it still does not fit, contact a qualified
electrician to install the proper outlet.
WARNING: To reduce the risk of injury from
accidental starting, always shut off vacuum and
disconnect the power plug from the wall outlet
before installing any part or cleaning accessory.
WARNING: To reduce the risk of fire or
explosion, do not operate this vac in areas with
flammable gases, vapors or explosive dust in the
air. Flammable gases or vapors include but are not
limited to: lighter fluid, solvent-type cleaners, oil-
based paints, gasoline, alcohol or aerosol sprays.
Explosive dusts include but are not limited to: coal,
magnesium, aluminum, and grain or gun powder. Do
not vacuum explosive dust, flammable or
combustible liquids or hot ashes.
Do not use this vac as a sprayer for any flammable
or combustible liquid. To reduce the risk of health
hazards from vapors or dusts, do not vacuum toxic
materials.
WARNING:
The operation of any utility vac can
result in foreign objects being blown into the eyes,
which can result in severe eye injury. Always wear
safety goggles complying with ANSI Z87.1 (or in
Canada, CSA Z94.3) before starting operation.
CAUTION: To reduce risk of hearing damage,
wear ear protectors when using the vacuum for
extended hours or when using it in a noisy area.
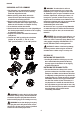
1. Installing the foam filter will help to protect the
motor
and minimize the potential for misting
that may appear in the exhaust air or dripping
of liquid around the lid.
DRY PICK-UP
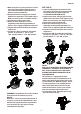
2. The reusable filter must always be in correct
position to reduce the risk of leaks and possible
damage to vac. Make sure that the reusable filter
is completely covering the filter cage. Attach the
clamp ring and press it down to lock this reusable
filter. Make sure there are no gaps between the
reusable filter and the lid (See illustration). It is
very important to assemble the reusable filter to
the cage without any possible leaks or tears. Any
leaks will allow the picked up debris to be blown
out of the blower port and back into the
surrounding environment.
INSTALLING THE FOAM FILTER
INSTALLING THE REUSABLE FILTER