
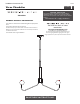
Installation & Assembly

2
1
2
1A
3
4
5
6
7
8
Screw the half ball to the stem which will be on top.
Determine the wanted height or look of the fixture with the provided stems, then assemble them by screwing them together.
Feed the fixture wires through the column, then screw it onto the fixture.
Feed the fixture wires through the stem assembly, then screw it onto the column.
Feed the fixture wires through the collar nut, canopy, and the half ball assembly, then screw the half ball assembly onto the stem
assembly.
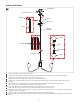
Align and secure the mounting plate to the junction box, then slide the half ball assembly onto the mounting plate.
Connect the fixture to a suitable ground in accordance to local electrical codes.
Connect the white fixture wire (square and/or rigid) to the neutral power line wire with a wire nut.
Connect the black fixture wire (round and/or smooth) to the hot power line wire with a wire nut.
Neatly place all the wires into the junction box, place the canopy onto the mounting plate, and secure it in place by screwing the collar
nut tightly onto the mounting plate.
Screw the lamps into the sockets. Refer to the label on the socket for Max Wattage Information.
Install the shade by screwing it onto the shade base. Make sure the shade is correctly installed before releasing. Repeat for remaining
shades.
9
10
Install the Fixture
9
8
MOUNTING PLATE
JUNCTION BOX
STEM
HALF BALL
1
STEM ASSEMBLY
3
CANOPY
COLLAR NUT
HALF BALL
ASSEMBLY
COLUMN
11
4
12
LAMP
11
SHADE
SHADE
SHADE BASE
12