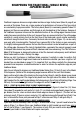
Modell 316 instructions Sharpener For Asian Knives Read these instructions before use. It is essential that you follow these instructions to achieve optimum results. © 2011 EdgeCraft Corp.
Important Safeguards When using electrical appliances, basic safety precautions should always be followed including the following: 1. Read all instructions. Every user should read this manual. 2. To protect against electrical hazards, do not immerse the Chef’sChoice® Model 316 in water or other liquid. 3. Make sure only clean knife blades are inserted in the Model 316. 4. Unplug from outlet when not in use, before putting on or taking off parts and before cleaning. 5. Avoid contacting moving parts. 6.
You Made a Good Choice Chef’sChoice® introduces the Asian Knife Sharpener Model 316 in response to requests for a precision means to restore the edges of Japanese and other Asian knives to their original factory sharpness. This new sharpener incorporates highly precise angle control and the Diamond Hone® technology that has made Chef’sChoice® sharpeners the choice of leading chefs worldwide.
The contemporary Japanese blade and Chinese cleavers should be honed and polished on both sides of the blade. The traditional single bevel Japanese blade, such as the sashimi blade, must be honed and polished primarily on the front side of the blade, which has the very large factory bevel (Bevel A. See page 9). Please read carefully the following detailed sharpening instructions in order to optimize your results and to avoid any damage to these specialized blades.
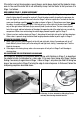
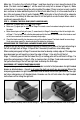
If the knife is not yet shaving sharp, repeat steps a and b above. Again test the blade for sharpness. In the event the knife still is not sufficiently sharp it will be faster to first pre-hone it in Stage 1 as follows: Use Honing Stage 1, When Necessary a. Pull the blade alternately through the left and right slots (see Figure 3) of Stage 1, making about 3 pair of pulls, taking about 3 seconds for each pull.
Sharpening the Traditional (Single Bevel) Japanese Blade Traditional Japanese knives are single sided and have a large factory bevel (Bevel A, page 9) on one side of the blade. There are a large number of manufacturers of knives of this type which are used widely to prepare sashimi. The factory bevel (Bevel A) is commonly ground at about 10 degrees, but there are exceptions and that angle is not standardized at the factories.
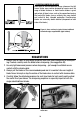
Make ten (10) pulls in the left slot of Stage 1 and then check for a burr along the back of the blade. (The burr created in Stage 1 will be small but easily felt as shown in Figure 4). Make certain the burr is present along the entire length of the edge. If there is no burr or only a partial burr, continue to make additional pulls all in the left slot about five (5) at a time and check for a burr after each group of five (5) pulls.
How to Create the Asian Edge on Euro/American Blades If you have a Euro/American brand knife, it is relatively simple to convert its edge to the low angle Asian double faceted edge. Remember that the advantage of the Asian edge is due to the thinner cross-section of the typical Asian blade where the edge facets are formed, and the smaller angle (about 15°) of each edge facet.
Re-sharpening the Euro/American Blade Re-sharpen in Polishing Stage 2 as described above. You will be able to re-sharpen repetitively about 10 times using only Stage 2 as described above. After resharpening a number of times, you may want to hone in Stage 1 to speed the re-sharpening process. In Stage 1 make about 5 pairs of alternating slow pulls and check for a burr. When a burr exists, proceed to polish in Stage 2 as described above.
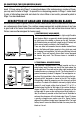
3. European/American Blades While most of the Euro/American knives (shown on the left) have a thicker cross-section designed for heavier work, the range of blade thickness in these familiar blades is great and certain of these knives, such as the conventional paring, fillet and utility blades, have a relatively thin cross-section well suited to their intended application. Euro/American blades are universally double beveled (sharpened on both sides of the blade.) Figure 9.
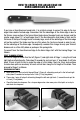
5. The edge of the knife blade, while sharpening, should be held in a level position relative to the top of the counter or table. To sharpen the blade near the tip of a curved blade, lift the handle up slightly as you approach the tip so that each section along the curved length of the edge as it is being sharpened is maintained “level” to the table. 6. You may find it helpful to occasionally clean the ultrafine diamond abrasive disks in Stage 2.
Service In the event post-warranty service is needed, return your sharpener to the EdgeCraft factory where the cost of repair can be estimated before the repair is undertaken. Outside the USA, contact your retailer or national distributor. Please include your return address, daytime telephone number and a brief description of the problem or damage on a separate sheet inside the box. Retain a shipping receipt as evidence of shipment and as your protection against loss in shipment.