instruction manual Commercial Diamond Hone Knife Sharpener 2100 ® Read instructions before use. It is essential that you follow these instructions to achieve optimal results.
IMPORTANT SAFEGUARDS When using electrical appliances, basic safety precautions should always be followed including the following: 1. Read all instructions. 2. To protect against electrical hazards, do not immerse the Chef’sChoice® Model 2100 motor drive section in water or other liquids. 3. Make sure knife blades are cleaned thoroughly before they are inserted in the Model 2100 sharpener. 4.
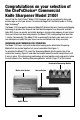
Congratulations on your selection of the Chef’sChoice® Commercial Knife Sharpener Model 2100! You will find the Chef’sChoice® Model 2100 Sharpener puts an exceptionally sharp and durable edge on all of your knives. It is backed by EdgeCraft, the World Leader in Cutting Edge Technology®. The Model 2100 incorporates advanced EdgeCraft diamond abrasive, honing and stropping technology to produce the sharpest and most durable edges of any sharpener available today.
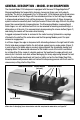
GENERAL DESCRIPTION - MODEL 2100 SHARPENER The standard Model 2100 sharpener is equipped with the novel 3-Stage EdgeSelect® Sharpening Module that sequentially sharpens, hones and strops your knife edge to perfection. The knife is sharpened in the 1st Stage with 100% diamond-surfaced abrasives and then honed in the 2nd Stage with finer diamond particles. In the 3rd Stage the edge is stropped and polished to hair splitting sharpness.
Understanding the Versatile EdgeSelect® Diamond Hone® Sharpening Module The unique Chef’sChoice® EdgeSelect® Sharpening Module (Figure 4) supplied with the standard Model 2100 is designed so that you may sharpen each knife according to your intended use. This three (3) stage sharpener has two precision conical sharpening / honing stages with fine 100% diamond abrasives and one polishing/stropping stage using proprietary flexible abrasive disks.
This unique 3-Stage design gives you an edge of remarkable sharpness and, because of the triple angle bevel it creates on each facet, you will note knives stay sharp longer. The following sections describe the general procedures for optimal sharpening in each stage and suggest how you can optimize the edge for your intended uses. Unless you do a lot of heavy duty cutting you will need to use Stage 1 only once in a while.
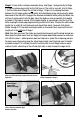
and level, slide it down between the plastic spring and the guide plane and pull it toward you at a uniform rate as it contacts the sharpening or stropping disk. You will be able to feel and hear the contact as it is made. Always keep the blade moving uniformly through each stage; do not stop the pull in mid stroke. Consistent pull speed of about 4 seconds per stroke for an eight (8) inch blade is recommended. The time can be less for shorter blades and more for longer blades.
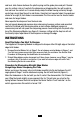
tage 1: (If your knife is already reasonably sharp, skip Stage 1 and go directly to Stage S 2.) If you are sharpening a knife for the first time or if the knife is very dull, start in Stage 1. Pull the knife once through the left slot of Stage 1 (Figure 5) by slipping the blade between the left angle guide and the plastic knife hold down spring and moving the blade downward in the slot until it engages the diamond coated disk while pulling the blade. You will hear it make contact with the disk.
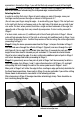
symmetrical. Generally in Stage 1 you will find that only one pull in each (left and right) slot is adequate. Before proceeding to Stage 2, carefully check the edge of your knife to be sure a burr has been formed along the sharpened edge, as described next: Detecting the Burr In order to confirm that a burr (Figure 6) exists along one side of the edge, move your forefinger carefully across the edge as shown in the Figures 6 & 7. (Do not move your finger along the edge – to avoid cutting your finger).
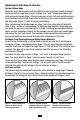
Optimizing the Knife Edge for Each Use For the Polished Edge Where the finest and smoothest cuts are preferred in order to prepare smooth unmarked sections of fruits or vegetables, sharpen in Stage 2 (or 1 and 2 as described above) and make extra pulls through Stage 3. Three or more pairs of pulls, with each pull alternating in the left and right slots of Stage 3 will refine the third facet and create remarkably smooth and sharp edge, (Figure 11) ideal for elegant presentations.
Procedure for Sharpening Serrated Blades Serrated blades are similar to saw blades with scalloped depressions and a series of pointed teeth. In normal use the pointed tips of the teeth do most of the cutting. Serrated blades of all types can be sharpened with the EdgeSelect Sharpening Module. However, use only Stage 3 (Figure 14), which will sharpen the teeth of the serrations and develop ultra sharp microblades along the edge of these teeth.
Dressing of Stropping/Polishing Disks – Stage 3 The Chef’sChoice® EdgeSelect Sharpening Module is equipped with a built-in accessory to manually dress the stropping disks in Stage 3. This is not a substitute for regular cleaning of the entire sharpening module as described in a subsequent section to remove grease or food from these disks.
To remove the Sharpening Module, first turn the motor switch to the “OFF” position. Then press the release button while pulling the Sharpening Module away from the motor housing (see Figure 16). The Sharpening Module should remove easily. NEVER IMMERSE THE MOTOR DRIVE SECTION IN WATER OR SPRAY IT WITH WATER. CLEANING THE SHARPENING MODULE When the Sharpening Module becomes soiled or contaminated it should be removed as described and cleaned of food and grease by either of the following two methods: A.
HOW TO GET THE MOST OUT OF YOUR Chef’sChoice® Model 2100 1. There is no maintenance required other than for hygene reasons to remove and clean the Sharpening Module as described regularly in the sink or dishwasher. It is unnecessary to clean this module simply because the honing wheels darken – that is normal. The wheels are self cleaning (through mild ablation) unless they become covered with fat and grease.
11. To increase your proficiency with the Chef’sChoice® EdgeSelect Sharpening Module, learn how to detect a burr along the edge (as described above). While you can sharpen well without using this technique, it is the best and fastest way to determine when you have sharpened sufficiently in Stages 1 and 2. This will help you avoid over sharpening and ensure incredibly sharp edges every time. Cutting a tomato or a piece of paper is a convenient method of checking for blade sharpness. 12.
EdgeCraft Corporation 825 Southwood Road, Avondale, PA 19311 U.S.A. Customer Service (800) 342-3255 or 610-268-0500 Engineered and assembled in the U.S.A. www.chefschoice.com This product may be covered by one or more EdgeCraft patents and/or patents pending as marked on the product. Chef’sChoice®, EdgeCraft® and Diamond Hone® are registered trademarks of EdgeCraft Corporation, Avondale, PA. Conforms to UL Std. 793 Certified to EN 55014-1, EN 60335-1, EN60335-2 A-weighted sound pressure 71dB, uncertainty 0.