
Operation Manual


8
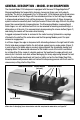
Stage 1: (If your knife is already reasonably sharp, skip Stage 1 and go directly to Stage
2.) If you are sharpening a knife for the first time or if the knife is very dull, start in Stage
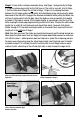
1. Pull the knife once through the left slot of Stage 1 (Figure 5) by slipping the blade
between the left angle guide and the plastic knife hold down spring and moving the blade
downward in the slot until it engages the diamond coated disk while pulling the blade. You
will hear it make contact with the disk. Insert the blade as close as possible to its bolster
or handle. If the blade is curved, lift the handle slightly as you sharpen near the tip of the
knife, keeping the blade edge approximately parallel to the table. Sharpen the entire blade
length. For an eight (8) inch blade each pull should take about 4 seconds. Pull shorter
blades through in 2-3 seconds and longer blades in 6 seconds. Next, repeat with one full
length pull in the right slot of Stage 1.
Note: Each time you insert the blade you should simultaneously pull the blade toward you.
Never push the blade away from you. Apply just enough downward pressure to make con-
tact with the wheel – added pressure does not improve or speed the sharpening process.
To ensure even sharpening along the entire blade length, insert the blade near its bolster
or handle and pull it at a steady rate until it exits the slot. In each Stage make an equal
number of pulls, alternating in the left and right slots, in order to keep the edge facets
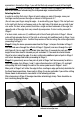
Figure 6. Develop a distinct burr along knife edge
before stropping in Stage 3.
Figure 5. Stage 1. Inserting blade in slot between
guide and knife hold down spring. Alternate left and
right slots.
Figure 8. Inserting blade in left slot of Stage 2.Figure 7. Burr can be detected by sliding fingers
across and away from the edge.
Caution! See text.
Move fingers
across and
away from edge