Portable Air Conditioner AP14003W Owner’s Manual For more information on other great EdgeStar products on the web, go to https://www.edgestar.com To use the EdgeStar self-diagnostic tool, go to https://support.edgestar.com V3.
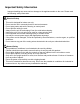
Important Safety Information Improper handling can cause serious damage to the appliance and/or to the user. Please read the following safety information. Electrical Safety This unit is designed for indoor use only. Do not use the unit in extremely humid or wet environments. Do not spray water and wet the housing or control panel. Do not pull the unit by the cord. Always turn the unit off and unplug it from the outlet when cleaning.
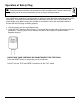
Operation of Safety Plug Note: Electrical products should not be disposed of with household waste. Please contact your local recycling center for more information on how to recycle electronic waste. Your portable air conditioner is supplied with a Leakage-Current Detection and Interruption (LCDI) safety plug. This device provides protection to reduce the risk of fire due to arcing faults in the power supply cord.
Table of Contents IMPORTANT SAFETY INFORMATION .......................................................................................................................... I OPERATION OF SAFETY PLUG ................................................................................................................................... II Table of Contents ..................................................................................................................................................................
Introduction Thank you for purchasing this EdgeStar portable air conditioner. We hope that this purchase will be the beginning of a lasting and rewarding relationship between you and EdgeStar. We will provide the customer support and exemplary products necessary to nurture that relationship. This manual contains important information regarding the proper installation, use, and maintenance of your portable air conditioner.
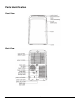
Parts Identification Front View Back View 2
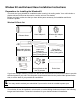
Window Kit and Exhaust Hose Installation Instructions Preparations for Installing the Window Kit You must vent your portable air conditioner when running it in cooling mode. Your unit includes a window exhaust kit that can be used to vent the unit out of a window. Before you begin, make sure that you have all the parts necessary for installation and that a location is picked.
Installation Preparation Before you begin, make sure that you have all the parts necessary for installation and that you have selected a suitable location. Location When choosing a location, please keep in mind: The air conditioner should be placed on a firm, level location in order to minimize noise and vibration. Your appliance has casters to aid in placement. Use caution when rolling on carpet and do not attempt to roll the unit over any objects as this may result in the unit tipping over.
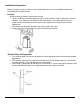
Installation in a Double Hung Sash Window Step 1: Cut the foam seal to the proper length and attach it to the window sill, and window frame as shown in the image to the left. Your window kit includes four (4) adhesive backed foam strips for this step, two that are short and two that are longer. Note: If desired, you may choose to attach the adhesive foam seal to the window slider kit instead of the window sill and frame. Step 2: Attach the window slider kit to the window sill.
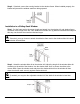
Step 4: If desired, secure the security bracket to the window frame. When installed properly, the bracket will prevent the window sash from being opened. Installation in a Sliding Sash Window Step 1: Cut the foam seal to the proper length and attach it to the window sill, and window frame as shown in the image to the left. Your window kit includes four (4) adhesive backed foam strips for this step, two that are short and two that are longer.
Step 3: Cut the foam seal to an appropriate length and seal the open gap between the top window sash and outer window sash. Step 4: If desired, secure the security bracket to the window frame. When installed properly, the bracket will prevent the window sash from being opened.
Step 2: Place the Unit in the Installation Location Roll the unit towards the location where the window kit has been installed. Please ensure that the unit is at least 12 inches from the wall to ensure proper ventilation. Step 3: Connect the Exhaust Hose to the unit Align the hooks on the Hose Adapter (c) to the Exhaust Air Outlet on the back of the unit. Slide the hose downward and into place.
Notes About the Exhaust Hose Your portable air conditioner is designed to exhaust condensed water that is collected from the air. This water, in either gaseous or droplet form, will be expelled out of the exhaust port of the unit. Please take this into account when deciding how to vent it. 1. The exhaust hose supplied with the portable air conditioner can be extended up to approximately 48 inches; however, for maximum efficiency, use the shortest length possible. 2.
Draining the Unit When the portable air conditioner is in cooling mode, or dehumidify mode, it will remove moisture from the air. The condensed water from the air will be collected in an internal reservoir and will be evaporated and exhausted out of the exhaust hose. However, in very humid conditions, the internal reservoir may fill completely. This causes the air conditioner to turn off and display the “P1” code to avoid overflowing the internal reservoir. The fan will continue to operate.
Control Panel Overview SWING Use to stop or start louver movement. If held down for more than two (2) seconds, the louver auto swing feature is activated. TIMER This button is used to initiate the AUTO ON start time and AUTO OFF stop time program, in conjunction with the - and + buttons. MODE This button selects the appropriate operating mode in the following sequence Auto, Cool, Dry and Fan. Decrease (-) / Increase (+) Use to adjust Temperature settings or the Timer setting.
Using the Control Panel LED Display In cooling mode and auto-timer setting the display will show the set temperature in either ºC or ºF (To switch between ºC or ºF, press and hold the - and + buttons at the same time for three (3) seconds.) In dehumidify or fan mode the display will show the current temperature of the room. The LED display will also display error codes and alerts. Refer to the Error Code section in this manual for additional information. Mode Select the desired mode setting.
Swing When the Power is ON, the louvers open fully. Press the SWING button on the panel or remote control to initiate the Auto swing feature. The louver will swing up and down automatically. Note: Do not adjust the louver manually. Timer When the unit is on, press the timer button to initiate the Auto-off stop program. The TIMER OFF indicator light will illuminate. Press the + or - button to select the desired time.
Remote Control The included universal remote control can be used to operate the functions of your portable air conditioner. To operate the remote control, select the desired settings and press the ON/OFF button to start or stop the operation. See below diagrams and table for additional operation details.
Remote Control Display 15
Button On / Off Function Press the ON / OFF button to start or stop the unit after the desired settings have been selected. Press the MODE button until you reach your desired operation mode. The remote cycles through the following modes: Auto, Cool, Dry, Heat*, and Fan. Mode *The remote includes a heat mode symbol even though the air conditioner itself does not have a heat function.
Additional Notes on Remote Operations The remote control has an operating range of 16 feet from the appliance. The remote signal receiver/sensor is located on the control panel of the air conditioner. Reception of signal commands is confirmed by an audible beep. Direct sunlight can interfere with the infrared signal. To replace batteries, remove the back cover by pressing where indicated and sliding off the battery cover.
Remote Control Batteries Your air conditioning unit comes with two AAA batteries. Install the batteries in the remote control before use. To install or replace: 1. Slide the back cover from the remote control downward, exposing the battery compartment. 2. Insert the batteries and be sure to match up the (+) and (-) ends of the batteries with the symbols inside the battery compartment. 3. Slide the battery cover back into place. Error Codes E1 – Room temperature sensor error.
Maintenance Clean the air conditioner and filters regularly to maximize performance and efficiency, and prolong the unit’s life. Be sure to always unplug the air conditioner from the power outlet before cleaning. Cleaning the Unit Use a soft dry cloth to wipe the body clean. If necessary, use lukewarm water to dampen a cloth to clean the unit. Use a soft bristle brush to clean between the vents. Carefully use a vacuum cleaner to clean the condenser coils.
Troubleshooting Follow the troubleshooting guide below to resolve common issues. Issue My air conditioner is not functioning at all. My remote control does not work and the indicator light on the remote does not turn on. My air conditioner is making a loud noise. My air conditioner is making a continuous metallic knocking or pinging sound. My air conditioner is leaking. Possible Cause The unit is not receiving power. The LCDI power cord is tripped. There is insufficient power.
Issue Possible Cause Solution My air conditioner is not cooling at all. The unit is not operating in cooling mode. Set the unit to operate in cooling mode, and lower the set temperature. The compressor is not on. The compressor may take up to 3 minutes to turn on, or longer if it is too warm. Lower the room temperature to be below 90°F. Clean the filters. The ambient temperature is too high. The filter may be dusty or blocked. The exhaust port is blocked.
Specifications Description of product Portable Air Conditioner Model AP14003W Voltage/Frequency AC 115 V ~ 60 Hz Input Power 1300 W Current 11.3 A Cooling Capacity (SACC) 9000 BTU Cooling Capacity (ASHRAE) 14000 BTU Color White Coolant R-410A Timer 24 Hour Dimensions WxDxH 18.38” x 15.63” x 30.13” Weight 74.7 lbs.
New Portable Air Conditioner BTU’s You may notice that the cooling capacities (in British Thermal Units or BTU’s) labeled on portable air conditioners (PAC’s) are now lower than on models produced prior to October 1, 2017. This is because the labeling on new productions of PAC’s must follow a new federal test standard that was established by the Department of Energy: 10 CFR 430, subpart B, appendix CC. The SACC rating shown on your new PAC is a result of this new standard.
EdgeStar Limited Warranty One (1) Year Parts & Ninety (90) Days Labor This product is warranted by EdgeStar to be free from defective workmanship and materials, subject to any conditions set forth as follows: WHAT IS COVERED: LABOR: For a period of NINETY (90) DAYS from the date of original purchase, labor will be performed free of charge at an authorized EdgeStar repair facility.