AP420HS Portable Air Conditioner Owner’s Manual This owner’s manual provides instructions on safe installation use, and maintenance. Please read it carefully and save it for reference.
Safety Instructions Improper handling can cause serious damage to the appliance and/or to the user. This portable air conditioner is not intended for use by children. Children should be supervised to ensure that they do not play with this product. Electrical Safety General Safety 1. This unit is designed for indoor use only. 2. Do not use the unit in extremely humid or wet environments. 3. Do not wet the housing or control panel. 4. Do not pull the unit by the cord. 5.
Table of Contents Safety Instructions.............................................. 2 Introduction..................................................... 4 Parts Identification............................................. 5 Installation Carbon Filter Installation................................. 6 Exhaust Hose Installation.................................. 7 Operation Using the Control Panel.................................... 9 Using the Remote Control...................................
Introduction Thank you for purchasing this EdgeStar portable air conditioner. We are glad you chose us. We believe that your purchase of this product opens a relationship between you and EdgeStar. We will provide the customer support needed to nurture that relationship. This manual contains important information regarding the proper installation, use and maintenance of your portable air conditioner. Following this manual will ensure that your product will work at its peak performance and efficiency.
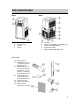
Parts Identification Front 1. 2. 3. 4. Back Control panel Front air vent Handle Caster 5. 6. 7. 8. 9. Pre-filters Air inlets (evaporator and condenser) Power cord compartment Exhaust air outlet Water stopper/drainage point Accessories 10. Exhaust hose 11. Window kit (part 2 ) - for filling the open window space 12. Window kit (part 1) used to connect the exhaust hose and filling the remaining open window space 13. Oval adapter for insertion onto hose and into window kit 14. Remote control 15.
Installation – Activated Carbon Filter Instructions to install the carbon filter 1. Remove the pre-filter frame from the unit. 2. Separate the pleated panel from the pre-filter frame. 3. Remove the activated carbon filter from its plastic bag. 4. Place the activated carbon filter into the pre-filter frame. 5. Secure the filter by reassembling the pleated panel to the pre-filter frame. 6. Install the pre-filter frame to the unit.
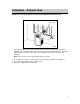
Installation – Exhaust Hose Follow the instructions below to install the window kit and exhaust hose. Window kit 20” FIG.5 1. Open the window and insert the window kit to cover the open gap. Next, slide the window across so that the kit is held securely. You may need to adjust the size of the window kit and secure it with screws. This technique may also be used for sash windows. Note: Take care to secure your window against intruders. 2.
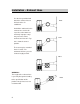
Installation – Exhaust Hose Use the hose provided and attach the exhaust hose to the back of the air conditioner. Avoid kinks and bends in the exhaust hose as this will cause the unit to work less efficiently. Improper setup may cause the unit to overheat and shut off. Figs. 6 & 7 show the correct position. FIG.6 FIG.7 The hose may be extended from 11” to 59.” For maximum efficiency use the shortest length possible. FIG.
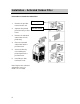
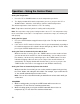
Operation – Using the Control Panel Control Panel Parts FIG.10 1. 2. 3. 4. 5. 6. 7. 8. 9. 10. Fan speed button Timer button Display window Senor for remote control Heat mode indicator Mode (function) button Automatic mode indicator Cooling mode indicator Fan mode indicator Temperature up button 11. 12. 13. 14. 15. 16. 17. 18. 19. 20.
Operation – Using the Control Panel Setting the Temperature 1. Press the ‘UP’ or ‘DOWN’ buttons to set the temperature you desire. 2. The display window will show the temperature you set as you press the ‘UP’ or ‘DOWN’ buttons. Otherwise, it will always show the ambient temperature. The default temperature of this machine is: 75o F for cooling. Note: Temperature control only works in cooling and heating modes. Note: The temperature range for the heating function is 45 to 77o F.
3. To turn off sleep mode, re-press the ‘SLEEP’ button, the setting temperature and fan speed will return to the pre-selected one. 4. The sleep function will automatically shut down the unit after 12 hours of continuous use. Note: The sleep function is not available while the unit is in fan, or auto mode. Sleep mode is only available in cooling or heating mode. Operation – Using the Remote Control All the control panel functions can also be set with the remote control.
Maintenance – Water Drainage This portable air conditioner is designed to exhaust most or all water dehumidified from the air. In high humidity situations, the internal water reservoir may fill. If the reservoir is full, both the compressor and motor will stop and the unit will buzz a warning (you can press any button to stop the buzzing). The “Water” indicator will flash to show you that the reservoir is full. The unit will not operate until you drain the water.
Maintenance – Extending the Drain Tube The drain tube may be extended by adding an extension tube and using a suitable connector. Drain tube FIG.14 Please note: 1. The drain must be at or below the outlet level. 2. Flashing Comp / Water indicator will not function in this mode of drainage. 3. This unit will not shut off when an external drain pan/tray is filled. FIG.15 4. If you want to extend the water tube, you can connect it with another tube (Diameter: 0.71”).
Maintenance – Cleaning the Unit Always unplug the air conditioner from the power outlet before cleaning. Clean the air conditioner regularly to maximize performance and efficiency. Cleaning the unit Use a soft damp cloth to wipe the body clean. Use a soft bristle brush to clean between the control panel’s buttons. Never use abrasive chemicals, gasoline, detergents, chemically treated cloths, or other cleaning solvents that may damage the cabinet exterior.
Optimizing Performance For Maximum Performance and Efficiency: 1. Do not cover the exhaust air outlet (exhaust) while in use. 2. Do not place the unit in front of curtains or drapes- to ensure they do not obstruct the air inlet. 3. Minimize the length of the exhaust hose. 4. Make sure the exhaust hose is as straight as possible. 5. Keep curtains, blinds or drapes closed during the sunniest part of the day. 6. Use the timer to operate the unit before it is needed.
Troubleshooting My air conditioner is not functioning at all. - The air conditioner may not be receiving electrical power. Make sure the unit is plugged in. - Press the test/reset buttons on the LCDI power cord. - Move the air conditioner to another outlet that is able to provide sufficient power. Check your circuit breaker. (Refer to the rating label on the back of the unit to determine the Amperage draw). Check to see if the Compressor/ Water indicators are flashing. Drain the unit and restart.
Specifications Description of Product Model EdgeStar Portable Air Conditioner AP420HS Voltage / Frequency 115 V, 60 Hz Power / Ampere Consumption 1230W / 9.2 A Maximum Dehumidifying Capacity 55 pints/day Refrigerant R22/15.2OZ Fan speeds 2 (High and Low) Timer 1- 24 hours Net Weight 64 lbs. Dimensions 29 1/3” x 14 1/3” x 15 1/2” (HxWxD) Notice: Electrical products should not be disposed with household waste.
EdgeStar Limited Warranty This EdgeStar product is warranted to be free from defective workmanship and materials for the first year following the date of original purchase. Replacement parts will be supplied free of charge for the first year following the date of original purchase. Labor will be performed free of charge for the first 90 days following the date of original purchase.
For product guides, additional troubleshooting resources, and up to date information, visit us on the web at: http://www.edgestar.