Combo Washer/Dryer CWD1510W Owner’s Manual For more information on other great EdgeStar products on the web, go to http://www.edgestar.
Important Safety Information Improper handling can cause serious damage to the EdgeStar combo and/or injury to the user. This combo washer/dryer is designed for domestic indoor use only. Do not use the unit for industrial or commercial use. Any other use may invalidate the warranty. Please review the ratings label located on the rear panel of the unit for electrical and other technical data related to this unit. The unit must be used in a properly grounded wall outlet.
General Safety EdgeStar Washer/Dryer Combo Do not wash articles that have been previously cleaned in, washed in, soaked in, or spotted with gasoline, dry-cleaning solvents, or other flammable or explosive substances, as they give off vapors that could ignite or explode. Do not add gasoline, dry-cleaning solvents, or other flammable or explosive substances to the wash water. These substances give off vapors that could ignite or explode.
Disconnect power and water supply after operation. Pull out its plug and cut off water supply after the operation. Please check whether the water inside the drum has been drained before opening its door. Please do not open the door if there is any water visible. Do not try to repair any internal components by yourself, contact a qualified service technician for non-user repair issues.
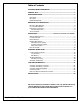
Table of Contents IMPORTANT SAFETY INFORMATION.....................................................................I INTRODUCTION ................................................................................................... 1 PARTS IDENTIFICATION ....................................................................................... 2 FRONT VIEW ............................................................................................................2 BACK VIEW ......................................
Introduction Thank you for purchasing this EdgeStar combo washer/dryer. We are glad you chose us. We believe that your purchase of this product opens a relationship between you and EdgeStar. We will provide the customer support needed to nurture that relationship. This manual contains important information regarding the proper installation, use and maintenance of your combo. Following this manual will ensure that your product will work at its peak performance and efficiency.
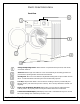
Parts Identification Front View Detergent Dispensing Drawer- There is three compartments for prewash, main wash, and fabric softener. Glass Door- Extra-large door with lock. Door automatically locks during operation to prevent door opening before water level has lowered. Leveling Feet- The unit comes with four adjustable leveling feet for spaces with uneven floors. Combo Washer should always be level to efficiently operate.
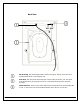
Back View Hot Cold Electrical Plug- This unit is supplied with a three prong plug. Please check electrical requirements before connecting the unit. Drain Hose- The drain hose directs the flow of water after the wash cycle. The drain hose should always be properly secured to avoid risk of flooding and/or property damage. Water Inlet Valve- There are two water inlet valves: The left side is hot and the right side is cold. Connect the two hoses bundled with the unit to the tap connection.
Detergent Dispenser Your washing machine is designed for use with only High-Efficiency (HE) detergents. They are formulated specifically for front-load washers and contain suds-reducing agents. Using a regular detergent that is not High-Efficiency may cause oversudsing and may affect the unit’s performance. Release Tab‐ To remove the dispenser drawer from unit, push down on the release tab and pull drawer out.
Preparation for Installation Electrical Requirements Failure to follow electrical requirements can cause personal injury, fire, or electrical shock. Install the combo washer/dryer according to the manufacturer’s instructions and local codes. To reduce the risk of severe injury or death, follow all installation instructions. Save these instructions even after installation is complete. Note: When you plan to dispose of this machine in the future, please comply with the local waste disposal regulations.
Installation clearances The location must be large enough to allow the washer door to be fully opened. Additional spacing should be considered for ease of installation and servicing. The door opens more than 90°, and it is not reversible. Additional clearances might be required for wall, door, and floor moldings.
Tools and Parts Water Hoses (2) Gather the required tools and accessories (Water hoses (2) and Transportation “Shipping” Plugs are supplied with unit) before starting installation. The accessories supplied are located in the washer drum. Transportation “Shipping” Plugs NOTE: As you unpack your unit you may find some residual water in the drum and/or coin trap as we test all of our units for quality assurance.
Installation Connect inlet pipe Connect the inlet pipe as indicated in the figure below. Connect the hot inlet valve to the hot water tap and cold inlet valve to the cold water tap. Install inlet pipe Connect the elbow to the inlet valve at the backside of washing machine and fasten it turning clockwise. Connect the other end of inlet pipe to the tap and fasten the pipe tightly clockwise. Note: After connection, if there is any leakage from hose, then repeat the steps to connect inlet pipe.
Drain System Options: Standpipe drain system - wall or floor (views A & B) - The standpipe drain requires a minimum diameter standpipe of 2" (50 mm). The minimum carry-away capacity can be no less than 17 gal. (64 L) per minute. The top of the standpipe must be at least 24” high and no higher than 39” from the bottom of the washer. Laundry tub drain system (view C) - The laundry tub needs a minimum 20 gal. (76 L) capacity. The top of the laundry tub must be at least 24” above the floor.
Level the washer When positioning the washer/dryer combo, please first check if the legs are closely attached to the cabinet. If not, please turn them to their original positions by hand or with wrench and tighten the nuts with wrench. After positioning the washing machine, apply pressure on each corner of the combo in sequence. If the unit is unstable when being pressed, the legs must be adjusted to level the machine. Ensure the positioning status of the machine.
Electrical Connection 11 As the maximum current through the unit is 12A when you are using its heating function, please make sure the power supply system (current, power voltage and wire) at your home can meet the normal loading requirements of the electrical appliances. Please connect the power to a socket which is correctly installed and properly grounded. Make sure the power supply voltage is compatible with the machine’s rating label.
OPERATING INSTRUCTIONS Please read the operation instructions carefully to avoid unnecessary service calls and damages to clothes. Control Panel Overview Control Knob Power- Press to start the display panel. If the display is active, press to put the washer into standby mode. Start/Pause- Press to start desired wash cycle. If the washer is running, pressing it once will pause the washer. Press again to restart the wash cycle.
Hand Wash/ Wool: Select this option to wash the wool textiles labeled with “Machine Wash” only. It is suggested to wash only small loads and with wool-safe detergent. In this cycle the tumble action will agitate less and will be at a lower spin speed. Baby Wear- Select this option for baby clothes and people with skin allergies. The wash cycle will automatically have an extra rinse. Self-Clean- Run the self-clean regularly to remove detergent buildup and other residue from the machine itself.
LED Display Soil Level Indicator‐ indicates soil level chosen (See Button 10) Cycle Indicator‐ Indicates at what stage of the wash/dry cycle machine is in: ‐ Prewash ‐ Wash ‐ Rinse ‐ Spin ‐ Dry Wash/Cycle Lifecycle Indicator‐ Reflects time left until end of cycle Feature Indicator‐ Indicates features that are active: ‐ Machine is locked for duration of cycle. ‐ Child Lock is on for control panel.
Spin Speed- Press to increase spin speed time, the washer drum spins at a speed up to 1200RPM. This reduces drying time and saves energy. Press the button until desired speed is lit, speed increases in increments of 200, 400-1200 rpm. Some fabrics such as delicates require a slower spin speed. Soil Level- Press to increase time for heavier soiled items. There are three soil levels, each bar increases the base wash time by five minutes.
Tips before Washing Check for colorfastness. Before washing any new garment you should always check to see if the color will bleed to avoid damaging other items in the same wash cycle. Checking for colorfastness is easy. Simply wet one corner of the fabric and let it set for a few minutes. Get a white cloth and press down on the wet part of the garment/item. If any color comes off onto the white cloth, you know the item is not colorfast and will run in the wash cycle.
NOTE: It is normal if you clothes feel slightly damp to the touch even though they are dry. This is entirely normal in the selfcondensing drying process. All you have to do is just shake them out a little bit to allow any residual humidity to dissipate (it takes only a few seconds). Then you can fold or hang them as normally. 17 Secure fasteners, zips should be zipped close and buttons or hooks should be fastened. Any loose ribbons or ties should be tied together.
Washing/Drying Capacity: Do not overload the unit; otherwise it may diminish the washing effects. Please confirm the maximum affordable washing quantity according to the following table. DO NOT WASH ANY SINGLE LARGE ITEM AS IT WILL DAMAGE UNIT.
Operating the Washer Before washing clothes for the first time, the washing machine should be run through a full cycle with detergent without articles of clothing. Once you have loaded the washer and added laundry products, you are now ready to wash! Start up washing machine Make sure the unit is connected to power and ensure water lines are connected properly; the tap should be opened completely. Place your already sorted wash load into the drum. Press the “Power” button.
Cycle Guide EdgeStar Washer/Dryer Combo 20
Care and Maintenance Periodic cleaning and proper maintenance will ensure efficiency, top performance, and long life and is recommended. Disconnect plug from outlet and close water tap before performing any cleaning/maintenance to your combo washer/dryer. Cleaning the exterior of the unit Never use solvent based, abrasive cleaners, harsh chemicals or steel wool to clean your unit as they can damage the finish.
Clean inlet filter If tap is fully opened and there is an insufficient amount of water coming through the hose you may need to clean your Inlet filter. Wall Connection 1. Close the tap entirely before cleaning. 2. Select any procedure on control knob and press the “Start/Pause” button and let run for about 40 seconds. 3. Remove the inlet pipe from tap which is connected on the wall. 4. Run warm water to run through filter and reconnect inlet pipe to hose. Unit Connection 1.
TROUBLESHOOTING TIPS Before Calling for Service If the unit appears to be malfunctioning, the issue could be solved by following the suggestions in the “Solution” column.
Troubleshooting Tips Continued… Care Label Appendix EdgeStar Washer/Dryer Combo 24
Specifications Description of product Combo Washer/Dryer Model CWD1510W Voltage/Frequency AC 115V~60Hz Rated Current 12A Color White cabinet with chrome door Washing Capacity/ Dry Capacity 15 lbs. / 7.7 lbs. Drum Size 2.0 cu. ft. Standard Water Pressure 0.05MPa-1MPa Weight 165 lbs. Note: Technical data and performance information provided for reference only. Specifications are subject to change. Check the rating label on the ice maker for the most accurate information.
Limited Warranty: Full One-Year Parts and Labor This product is warranted by EdgeStar and is subject to any conditions set forth as follows: WHAT IS COVERED: For a period of ONE (1) YEAR from the date of original retail purchase, EdgeStar will repair or replace any part free of charge including labor that fails due to a defect in materials or workmanship.
EdgeStar Products 500 N. Capital of TX Hwy, Bldg 5 Austin, TX 78746 Toll Free: 1-866-319-5473 Web: http://www.edgestar.com E-mail: service@edgestar.com Register your product, download owner’s manuals, access additional troubleshooting resources, and obtain more information on other great EdgeStar products on the web at: http://www.edgestar.com Product contents and specifications may change without notice. Copyright © 2011 Living Direct, Inc. All rights reserved.