Built-In Wine Refrigerator CWR1552DD Owner’s Manual For more information on other great EdgeStar products on the web, go to http://www.edgestar.com To use the EdgeStar self-diagnostic tool, go to https://support.edgestar.com V2.
Important Safety Information Improper handling can cause serious damage to the EdgeStar wine refrigerator and / or injury to the user. This wine refrigerator is designed for domestic indoor use only. Do not use the unit for industrial or commercial use. Any other use may invalidate the warranty. Please review the ratings label located on the rear panel of the unit for electrical and other technical data related to this unit. The unit must be used in a properly grounded wall outlet.
General Safety To prevent back and other types of injuries, use at least two people to move and install the wine refrigerator. This appliance is not intended for use by persons, including children, with reduced physical, sensory or mental capabilities, unless they have been given supervision or instruction concerning the use of the appliance by the person(s) responsible for their safety.
Table of Contents IMPORTANT SAFETY INFORMATION .................................................................................................................I TABLE OF CONTENTS ...................................................................................................................................... III FIRST TIME OPERATING INSTRUCTIONS ..................................................................................................................... 4 INTRODUCTION ..........................
First Time Operating Instructions Before use, make sure all packaging labels and materials are removed from the unit. Be sure to keep track of all included parts and pieces before discarding the packaging materials. It is advised that you keep the original box and packaging materials in case you ever need to move or ship the appliance in the future. Let the unit stand for at least 24 hours before you use it; this allows the cooling components time to settle from transit.
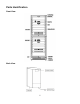
Parts Identification Front View Back View 5
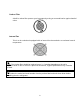
Carbon Filter A built-in carbon filter protects your beverages by acting as a natural barrier against harmful odors. Internal Fan This is an air-cooled unit equipped with an internal fan that maintains a consistent internal temperature. Note: The Carbon filter should be replaced every 3 - 6 months depending on the unit’s exposure level to odor. If the unit is placed in the kitchen, regular replacement every 3 months is ideal.
Installing the Wine Refrigerator The wine refrigerator should be installed in accordance with local electrical code requirements. The wine refrigerator should also be placed in a location that is strong enough to support its total weight, keeping in mind that it will weigh substantially more when fully loaded than when empty. Before you plug the wine refrigerator into a power supply, be sure to let it stand upright for at least 24 hours to allow the compressor’s oils to settle.
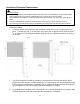
Installation Clearance Requirements Important Notes: Choose a location that has ambient temperatures above 50° F and below 95° F. Operation outside these temperatures may result in lowered efficiency or cause other adverse effects. This unit MUST be installed in an area protected from the elements, e.g. wind, rain, water spray or drips. The wine refrigerator should not be located next to ovens, grills, or other high heat sources.
Electrical Requirements ELECTRIC SHOCK HAZARD! Plug into a grounded 3-prong outlet. Never remove the grounding prong from the plug. Never use an adapter to bypass the grounding prong. DO NOT use an extension cord. Failure to follow these instructions can result in fire, electrical shock, or death.
Installing the Door Handle To install the door handle: 1. Open the door and carefully pull the door gasket around the area where the handle is to be installed. 2. Carefully remove the two pre-installed decorative plugs from the front of the door. Please refer to the “Removing and Installing Decorative Plugs” section for more information. 3. Insert each Phillips head screw through the gasket side of the door until the screw passes through the door. 4.
Removing and Installing Decorative Plugs Follow the instructions below to remove the decorative plugs from the door. Important: Before you begin, unplug the refrigerator. 1. Open the door and carefully pull the door gasket from the top left corner until you have exposed the two holes which correspond with the decorative plugs. Note: A small Flathead screwdriver is required. 2. Insert the Flathead screwdriver through the gasket side of the door into the decorative plug slot.
Note: Be careful not to remove the housing that the decorative plastic caps insert into when attempting to remove the decorative cap. If the housing is removed then the decorative plastic cap will not be able to be reinserted. Operation Installation Check List Before Operation 1. 2. 3. 4. 5.
Using the Temperature Control Panel The dual zone wine refrigerator has a temperature range from 40°F to 65°F in the upper and lower zones. Up Button : Press the button on the control panel to increase the temperature by 1 degree increments. Down Button : Press the button on the control panel to lower the temperature by 1 degree increments. RUN LIGHT: When lit, the unit is in cooling mode Light Button : Press the button to turn the inner light on or off. Power Button 3 seconds).
Normal Sounds Your new wine refrigerator may make sounds that are not familiar to you. Most of the new sounds are normal. Hard surfaces like the floor and walls can make the sounds seem louder than they actually are. The following describes the kinds of sounds that might be new to you and what may be making them. Rattling noises may come from the flow of the refrigerant or the water line. Items stored on top of the wine refrigerator can also make noises.
Preparing the Wine refrigerator for Storage If the wine refrigerator will not be used for a long time, or is to be moved to another place, it will be necessary to defrost the unit and dry the interior. 1. Disconnect the wine refrigerator from the power supply by removing the power plug from the wall socket. 2. Leave the door open to allow for air circulation and to prevent mold, mildew, and unpleasant smells. Caution: Store the unit out of reach from children.
Troubleshooting Before Calling for Help If the unit appears to be malfunctioning, read through the “Operation” section of this manual first. If the problem persists, check the Troubleshooting Guide below and on the following page. The problem may be something that can easily be solved or explained. Symptoms The wine refrigerator turns on and off frequently. Possible Causes The room temperature is higher than the recommended ambient environment. The door is being opened too often.
Symptoms The body of the wine refrigerator is electrified. Possible Causes The unit is not grounded properly. Frost is forming in the wine refrigerator. The environment is humid. The ambient temperature is too low. The door is being opened too frequently. The door will not shut properly. The refrigerator is not level. The door gasket is dirty. The door gasket is not installed correctly. The shelves are incorrectly installed.
Specifications Note: Technical data and performance information are provided for reference only. Specifications are subject to change. Check the rating label on the wine refrigerator for the most accurate information. Description of product Built-in Wine refrigerator Model CWR1552DD Voltage / Frequency AC 115V~60Hz Amperage 2.5 A Input Power 220 W Color Black Cabinet; Stainless Steel Door Storage Capacity 141 Bottles* Refrigerant R600a, 50g / 1.77 oz.
Edgestar Limited Warranty Full One-Year Parts and Labor WHAT IS COVERED: This product is warranted by EdgeStar and is subject to any conditions set forth as follows: For a period of ONE (1) YEAR from the date of original retail purchase, EdgeStar will repair or replace any part free of charge including labor that fails due to a defect in materials or workmanship.