Full Size Ice Maker IB650SS Owner’s Manual For more information on other great EdgeStar products on the web, go to http://www.edgestar.com To use the EdgeStar self-diagnostic tool, go to https://support.edgestar.com V2.
ii
Important Safety Information Improper handling can cause serious damage to the EdgeStar ice maker and/or injury to the user. This ice maker is designed for domestic indoor use only. Do not use the unit for industrial or commercial use. Any other use may invalidate the warranty. Please review the ratings label located on the rear panel of the unit for electrical and other technical data related to this unit. The unit must be used in a properly grounded wall outlet.
General Safety • • • • • • • • • • • • • • • • • • • • To prevent back and other types of injuries, use at least two people to move and install the ice maker. Install the ice maker in a well ventilated area where the ambient temperature is above 55°F and below 90°F. This unit is designed to be installed indoors, and protected from rain, sleet, snow, etc. This unit is not intended to be used by children. Children should be supervised to ensure that they do not play with this product.
Table of Contents IMPORTANT SAFETY INFORMATION............................................. II TABLE OF CONTENTS ................................................................... IV INTRODUCTION ................................................................................ 1 PARTS IDENTIFICATION .................................................................. 2 INSTALLING THE ICE MAKER ......................................................... 3 UNPACKING THE ICE MAKER .................................
Introduction Thank you for purchasing this EdgeStar full size ice maker. We hope that this purchase will be the beginning of a lasting and rewarding relationship between you and EdgeStar. We will provide the customer support and exemplary products necessary to nurture that relationship. This manual contains important information regarding the proper installation, use and maintenance of your ice maker. Following this manual will ensure that your product will work at its peak performance and efficiency.
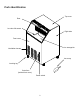
Parts Identification Top cover Door Ice cube full sensor Right side Front cover Ice storage bin Ventilation louvers Ice scoop Leveling leg Cotrol box (behind front cover) Power switch 2
Installing the Ice Maker The ice maker should be installed by a licensed plumber in accordance with local electrical and plumbing code requirements. Before you plug the ice maker in to a power supply, be sure to let it stand upright for at least 24 hours to allow the compressor’s oils to settle. Unpacking the Ice Maker Warning: Use two or more people to move and install the ice maker. Failure to do so can result in back or other injury. Carefully remove the packaging materials.
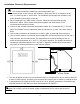
Installation Clearance Requirements Note: This icemaker should be installed by a licensed plumber only. • To ensure proper service access and ventilation, allow more than 4” of clearance at the rear, 1/2” at the top and 1/2” at the sides. The installation should allow the icemaker to be pulled forward for servicing if necessary. • When installing the ice maker under a counter, follow the recommended spacing dimensions shown.
Electrical Requirements Electrical Shock Hazard • Plug into a grounded 3-prong outlet. • Never remove the grounding prong from the plug. • Never use an adapter. • Never use an extension cord. • Failure to follow these instructions can result in fire, electrical shock, or death Before you move your icemaker into its final location, it is important to make sure you have the proper electrical connection: A standard electrical supply (115 V, 60Hz.
Connecting the Water Line 1. Turn off the main water supply. Turn on the nearest faucet long enough to clear the line of water. 2. Find a 1/2” to 3/4” vertical cold water pipe near the installation location. The distance should be less than 9 feet. The water supply hose provided with the ice maker is about 9 feet long. 3. A shut-off valve must be installed to the main water supply. If the water pipe has a plain piece of copper tubing, attach a 1/4" O.D. compression union to the tubing and remove the nut. 4.
Operation Final Check List before Operation 1. Have all packing materials and tape been removed from the interior and exterior of the ice maker? 2. Did you clean the ice storage bin and water trough? 3. Have the installation instructions been followed, including connecting the machine to water and electricity? Does the unit have proper drainage? 4. Has the machine been leveled? 5.
How the machine Makes Ice Turn the power switch to the ON position. The machine will automatically start the ice making stage. There are two distinct cycles: freeze and harvest. During the freeze cycle, water is sprayed against the evaporator surface. In the harvest cycle, the ice is released and water enters the machine. A complete cycle can take 20 to 40 minutes, depending on temperature and operating conditions.
Normal Sounds Your new icemaker may make sounds that are not familiar to you. Most of the new sounds are normal. Hard surfaces like the floor and walls can make the sounds seem louder than they actually are. The following describes the kinds of sounds that might be new to you and what may be making them. • Ratting noises may come from the flow of the refrigerant or the water line. Items stored on top of the icemaker can also make noises.
Note: Never keep anything in the ice storage bin that is not ice: objects like wine or beer bottles are not only unsanitary, but the labels may slip off and plug up the drain. What Should be Kept Clean? There are 5 things to keep clean: 1. The exterior 2. The interior 3. The condenser 4. Water distribution tube 5. The ice-making system Warning: Before proceeding with cleaning and maintenance operations, make sure the power line of the unit is disconnected and the water line is shut off.
Cleaning the Sprinkler Important Note: The sprinkler should only be cleaned when you find that some of the ice cubes are improperly shaped during ice making. Cleaning the ice making system should follow any cleaning of the sprinkler. 1. Disconnect power to the unit and open the door. 2. Take out the row of flake covers by snapping one end up and pulling forward. 3. Remove the slideway from the water sump.
4. Find the sprinkler arm and raise it. Disconnect it from the water tube which is connected at the back of the sprinkler arm. 5. A de-scaling solution can be prepared in a plastic basin with Nu-Calgon Nickel-Safe Ice machine Cleaner. Mix 4 ounces of the ice machine cleaner per gallon of warm water. 6. Remove the sprinkler arm from the interior.
Ice Making System Cleaning Minerals that are removed from water during the freezing cycle will eventually form a hard scaly deposit in the water system. Cleaning the system regularly helps remove the mineral scale buildup. How often you need to clean the system depends upon how hard your water is or how effective your filtration may be. With hard water of 15 to 20 grains/gallon (4 to 5 grains/liter), you may need to clean the system as often as every 6 months. 1. Turn off the power to the ice maker.
Clean 0 000 Control Panel (Behind Front Panel) Ice-full 0 Adjust 0 Ice-making Mode Ice-harvest 1. Ice Full (Red) LED: Ice Full indicator light. When this LED is lit, the ice storage bin is full of ice or there is something obstructing the ice full sensor. The unit will stop producing ice. When ice cubes are removed from the ice storage bin, clearing the ice full sensor, the red LED will keep flashing for 3 minutes. Then the unit will restart and return to the ice making mode. 2.
Major Functions 1. This unit runs a completely automatic operation. 2. The different colors of the LED display indicate various operating modes. 3. The fan motor responds to the ambient temperature. If it is cold, the motor will stop working to keep the cooling system in good working condition. 4. Ice cube size is adjustable. 5. A sensitive probe and accurate timer enhance the performance of the ice maker. 6. There is a built-in compressor protection system.
Troubleshooting Continued Issue Possible Cause Solution The ice cubes are partially formed or are white at the bottom. There is not enough water in the water bin. Noise during operation. The feet are not level. Check if the water supply pressure is below 15 psi Check the water supply. The filter may be restricted. Check for a water leak in the water trough. Level the feet. Certain sounds are normal. The icemaker stops suddenly while making ice. The electricity is off.
Specifications Note: Technical data and performance information are provided for reference only. Description of product Full Size Ice Maker Model IB650SS Voltage / Frequency AC 115V~60Hz Ice-Making / Ice-Harvest rated current 6.7 A / 11.2 A Color Stainless Steel; Black Door Type of Ice Bullet Ice Storage capacity 25 lbs. maximum Ice-making capability 75 lbs. / day * Refrigerant R134a, 6.35 oz.
EdgeStar Limited Warranty Full One-Year Parts and Labor WHAT IS COVERED: This product is warranted by EdgeStar and is subject to any conditions set forth as follows: For a period of ONE (1) YEAR from the date of original retail purchase, EdgeStar will repair or replace any part free of charge including labor that fails due to a defect in materials or workmanship.
PN:1866824503 19