IP210 Portable Ice Maker Owner ’s Manual This owner ’s manual provides instructions on safe installation, use and maintenance. Please read it carefully and save it for reference.
TABLE OF CONTENTS IMPORTANT SAFETY INSTRUCTIONS 2 PREPARING YOUR ICE MAKER FOR USE 3 IMPORTANT SAFETY TIPS 3 GETTING TO KNOW YOUR UNIT 4 OPERATING PROCEDURES & MAINTENANCE 5 UNPACKING YOUR ICE MAKER 5 CONNECTING YOUR ICE MAKER 5 CLEANING AND MAINTAINING YOUR ICE MAKER 5 USING YOUR ICE MAKER 6 TROUBLESHOOTING 6 TECHNICAL PARAMETERS & CIRCUIT DIAGRAM 7 WARRANTY 8 1
TABLE OF CONTENTS IMPORTANT SAFETY INSTRUCTIONS Your safety and the safety of others are very important. We have provided many important safety messages manual and your appliance. Always read and obey all safety massages. This is the safety alert symbol: ! All safety messages will follow the safety alert symbol and the word “DANGER” or “WARNING”. DANGER WARNING These words mean: You can be killed or seriously injured if you don’t follow immediate instructions.
PREPARING YOUR ICE MAKER FOR USE IMPORTANT SAFETY TIPS When using electrical appliances, basic safety precautions should be followed to reduce the risk of fire, electric shock, and injury to persons or property. Read all instructions before using any appliance. Do not operate this or any other appliance with a damaged cord. Connect to properly polarized outlets only. No other appliance should be plugged into the same outlet. Be sure that the plug is fully inserted into the receptacle.
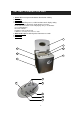
GETTING TO KNOW YOUR UNIT 1. Cover: With a transparent window to allow interior visibility 2. Ice scoop 3. Ice shovel 4. Control Panel: Easy to use, visible functions touch display setting A. Selected ice size displaying: Small, Medium, and Large B. No water in the water reservoir displaying: Ask you to add water C. Ice Full displaying D. Power indicator E. Button to turn on/off the unit F. Button to select the size of the ice cube 5. Water drain cap: For draining water from water reservoir 6.
OPERATING PROCEDURES & MAINTENANCE UNPACKING YOUR ICE MAKER 1. Remove the exterior and interior packaging. Check that ice basket and ice scoop is included. If any parts are missing, please contact our customer service. 2. Clean the interior with lukewarm water and a soft cloth. Take out the ice basket and clean it 3. Find a location for your ice maker that is protected from direct sunlight and other sources of heat (i.e.: stove, furnace, radiator). Place the ice maker on a level surface.
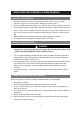
USING YOUR ICE MAKER 1. Select the size of the ice cube by pressing the “Select” button. If the room temperature is lower than 60℉, it is recommended to select the small or medium ice sign button in order to avoid ice sticking together. 2. Open the cover, remove the ice basket and pour water into tank. Keep water level below the level mark. 3. Press “Power” button on the control panel to begin the ice making cycle. 4.
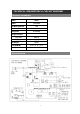
TECHNICAL PARAMETERS & CIRCUIT DIAGRAM TECHNICAL PARAMETERS Model IP210 Power 115V/60Hz Ice Making Current 1.9A Ice Harvest Current 2.7A Refrigerant R134a/65g Design Pressure High Side 290Psig Low Side 88Psig Net Weight Size (HxWxD) 23.
EdgeStar Limited Warranty One (1) Year Parts & Ninety (90) Days Labor This product is warranted by EdgeStar to be free from defective workmanship and materials, subject to any conditions set forth as follows: WHAT IS COVERED: LABOR: For a period of NINETY (90) DAYS from the date of original purchase, labor will be performed free of charge at an authorized EdgeStar repair facility.
EdgeStar Products 500 N. Capital of TX Hwy, Bldg 5 Austin, TX 78746 Toll Free: 1-866-319-5473 Web: http://www.edgestar.com E-mail: service@edgestar.com Register your product, download owner’s manuals, access additional troubleshooting resources, and obtain more information on other great EdgeStar products on the web at: http://www.edgestar.com Product contents and specifications may change without notice. Copyright © 2014 Living Direct, Inc. All rights reserved.