
USB Audio Interface/ MIDI Keybroad Controller PC-80 Owner's Manual


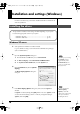
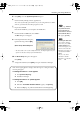
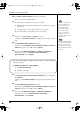

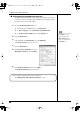
Table Of Contents
- USING THE UNIT SAFELY
- Important Notes
- Contents
- Contents of the package
- Names of things and what they do
- Setup
- Operation
- Appendix
- Using the PC-80 as a MIDI controller keyboard
- Basic connection example and signal flow
- The PC-80’s basic operating modes
- Transmitting various MIDI messages from the PC-80
- Setting the MIDI transmit channel
- Selecting sounds—Transmitting Program Change and Bank Select Massages
- Starting/stopping playback data—Transmitting a Start/Stop/Continue message
- Transmitting messages to an external MIDI sound module
- Setting the split points
- Using the VALUE encoder to transmit values for a specified parameter
- Using the PC-80 as a MIDI interface
- Using the PC-80 as an audio interface
- System settings for the PC-80
- PC-80 driver settings
- Troubleshooting
- Driver-related problems (Windows)
- Can’t record or play back audio or MIDI/No sound
- Noise or pops are heard when recording/playing on your computer
- Noise or distortion occurs when the PC-80 is not connected to your computer
- The sound is too weak
- Problems with the PC-80 Software Synthesizer
- Won’t start up
- The menu does not appear correctly (can’t select it)
- No sound
- Sound is too loud/too soft
- Clicks, pops, or noise occurs in the sound
- Sounds you play from the keyboard are delayed
- Can’t control sounds or parameters from the PC-80
- Can’t play back song data/Playback is incorrect
- Can’t use the PC-80 software synthesizer from other software
- Uninstalling the PC-80 software synthesizer
- MIDI implementation
- Main specifications
- Index
- Using the PC-80 as a MIDI controller keyboard

16
Installation and settings (Windows)
In order to use the PC-80, you’ll need to install both the driver and the PC-80
software synthesizer.
1
Start up Windows with the PC-80 disconnected.
Log on to Windows using a user name that has administrative privileges
(such as Administrator).
2
Open the
System Properties
dialog box.
1.
From the Windows
start
menu, choose
Control Panel
.
2.
In
“Pick a category,”
click
Performance and Maintenance
.
3.
In
“or pick a Control Panel icon,”
click the
System
icon.
fig.signature
3
Click the
Hardware
tab, then click
[Driver
Signing]
.
The
Driver Signing Options
dialog box
will open.
4
In the
Driver Signing Options
dialog box, make sure that
“Ignore”
is
selected.
If
“Ignore”
is selected, simply click
[OK]
. If this is not set to
“Ignore,”
make
a note of the current setting (“Warn” or “Block”), change the setting to
“Ignore
,
”
then click
[OK]
Installing the driver
Windows XP users
The procedure for installation and settings will differ depending on your system.
Proceed to the appropriate section for your system.
• Windows XP users ................................................................... (p. 16)
• Windows 2000 users ................................................................ (p. 21)
Depending on your setup,
the System icon may
appear directly in the
Control Panel (Classic
view). If so, double-click
the System icon.
If you’ve changed the
“Driver Signing
Options,” return the
setting to its original state
after you’ve finished
installing the driver.
PC-80_e.book 16 ページ 2005年11月10日 木曜日 午前11時34分