
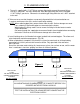
Installation guide


IMPORTANT
BEFORE SWITCHING “ON” THE POWER AT THE MAIN CIRCUIT BREAKER PANEL
MAKE SURE THAT THE HOT WATER CIRCUIT IS FREE OF AIR POCKETS OR ELSE
PREMATURE FAILURE OF THE ELEMENT WILL OCCUR. TO DO THIS OPEN ALL HOT
WATER OUTLETS ONE AT A TIME FOR A MINUTE OR TWO UNTIL THE WATER FLOW
IS CONTINUOUS AND FREE FROM “GULPING” AND FREE FROM VISIBLE AIR POCKETS.
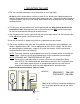
1) Open fully both inlet and outlet valves at the heater.
2) Open any hot water outlet in the system. If the outlet is a “single lever” mixer type turn to the
hottest position. Run for one minute to clear all the air from the system.
3) Slowly close OUTLET ball valve until the water flow from the faucet just starts to reduce.
NOTE: This process has two effects. One, any air in the system will be purged out. Two, the
heater units will be pressurized at the supply pressure. This will prevent the elements free from
air pockets while energized
4) At this point you may energize the hot water heater. Unit has 2 separate circuit breakers.
Once energized the Thermostatic control touch pad display on the front cover will
illuminate. This is where and when you will program your desired temperature.
Note: Control boards have a 3 second delay for the time the flow requirement is reached and
activation.
NOTE
Unit will display the programmed temperature, not the actual outlet temperature
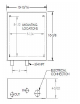
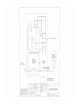
IV COMMISSIONING YOUR HEATER
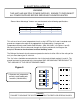
8
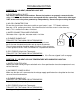
F/C
140 F
Increase temperature Decrease temperature Fahrenheit / Celsius
To trouble shoot the display board, shut off power to the unit. Press and hold all three buttons.
While buttons are depressed, re-energize the unit. If display board is working properly, the word
“Yes” will display. If the board has a fault it will display “No”. Call technical support for a
replacement.