BA S E for use with Smoke & Heat Alarms User Manual Contains vital information on the products operation and installation. Read and retain carefully. If you are just installing this product the manual MUST be given to the householder.
CONTENTS Page 1. QUICK INSTALLATION GUIDE 1 2. INTRODUCTION 2 3. INSTALLATION 3 4. ACTIVATING THE REPEATER FUNCTION 7 5. TROUBLESHOOTING RF LINK 8 6. LIMITATIONS OF RADIO COMMUNICATIONS 10 7. CHECKING & MAINTAINING YOUR SMOKE ALARM SYSTEM 11 8. GETTING YOUR RadioLINK BASE SERVICED 13 9. FIVE YEAR GUARANTEE 13 10. TECHNICAL SPECIFICATION 14 11.
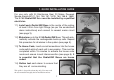
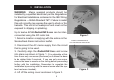
1. QUICK INSTALLATION GUIDE For use only with Ei Electronics Easi Fit Mains Powered Smoke Alarms Ei141, 144, 146, 161, 161R, 164, 166 & 166R. The Ei168 RadioLINK Base must be installed by a qualified electrician. 1.1) Install each RadioLINK Base in the centre of the ceiling at least 0.30m from light fittings (as per the smoke/heat alarm instructions) and connect to nearest mains circuit (see page 3). 1.2) Slide alarm on to the Ei168 RadioLINK Base.
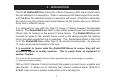
2. INTRODUCTION The Ei168 RadioLINK Base transmits a Radio Frequency (RF) alarm signal when the unit attached to it senses fire. When it receives an RF alarm signal from another Ei168 Base, the attached smoke or heat alarm will sound. It therefore eliminates the need to run long interconnect wires between all the smoke alarms on different floors and in different rooms. It is designed for use with the Easi Fit range of Mains Powered Smoke/Heat Alarms.
3. INSTALLATION WARNING: Mains operated products should be installed by a qualified electrician per the Regulations for Electrical Installations contained in the IEE Wiring Regulations — British Standard 7671. Failure to install this unit correctly may expose the user to shock or fire hazards. This unit is not waterproof and must not be exposed to dripping or splashing. Up to twelve Ei168 RadioLINK Bases can be interconnected using the RF radio link. 1.
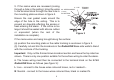
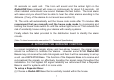
5. If the mains wires are recessed (coming through a hole in the ceiling), bring the wires to the terminal block through the rear hole in the mounting plate as shown in figure 3. L - LIVE IC - INTERCONNECT TERMINAL SCREWS (IF USED) N - NEUTRAL Ensure the rear gasket seals around the edge of the hole in the ceiling. This is to prevent air draughts affecting the smoke or heat entering the alarm.
IC: (Hardwire Interconnect- normally not used except to hardwire interconnect to mains smoke alarms which don’t have an Ei168 RadioLINK Base) The alarm does not need to be earthed. However the earth terminal is provided for the convenience of the installers so that any earth wire or cable coloured green or green & yellow, can be safety terminated. Note: House wiring should not be bunched up in the area of the alarms but quickly directed away. This will minimize their effect on the radio aerial.
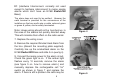
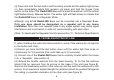
depleted so leave the unit on mains power for 2 hours to charge and test again. INSERT SCREWDRIVER TO TURN ON HOUSE CODE SWITCH AMBER LIGHT Similarly, install all the other Smoke/Heat Alarms with their Ei168 RadioLINK Bases. 10. Press and hold the House Code switch on the side of any one of the RadioLINK Bases as shown in figure 6 with a small screwdriver until the amber light turns on. Release the switch and the light will flash quickly a few times. The amber light will then flash every 5 seconds.
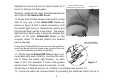
20 seconds on each unit. The horn will sound and the amber light on the RadioLINK Base sidewall will come on continuously for about 3.5 seconds. All other installed units should now sound. Release the test button. The local alarm will cease and you should then be able to hear the other alarms sounding in the distance. (If any of the alarms do not sound see section 5). 13. The units will automatically exit the house code mode after 15 minutes.
(ii) Press and hold the test button until the alarm sounds and the amber light comes on, then immediately (while light remains on) press and hold the House Code switch on the side of the RadioLINK Base with a small screwdriver until the amber light flashes slowly. Release switch. The amber light will flash slowly to indicate that the RadioLINK base is in Repeater Mode. Although, any Ei168 RadioLINK Base can be converted into a Repeater Base.
Figure 8 Figure 9 (iv) Re-locate/rotate the units. There are a number of reasons why the radio link signals may not reach all the smoke alarms in your system (see section 6 on Limitations of Radio Frequency Signals ). Try rotating the units or re-locating the units (e.g. move them away from metal surfaces or wiring) as this can significantly improve signal reception.
6. LIMITATIONS OF RADIO COMMUNICATIONS Ei Electronics radio communication systems are very reliable and are tested to high standards. However, due to their low transmitting power and limited range (required by regulatory bodies) there are some limitations to be considered: (i) Radio equipment, such as the Ei168 RadioLINK Base, should be tested regularly at least weekly. This is to determine whether there are sources of interference preventing communication.
(i) Re-orientate or re-locate the unit (ii) Increase the distance between the Ei 168 and the device being affected (iii) Connect the device being affected to a mains outlet on a circuit different from the one that supplies the Ei168 transceiver (iv) Consult the supplier or an experienced radio/television technician. 7. CHECKING & MAINTAINING YOUR SMOKE ALARM SYSTEM 7.1 Inspection & Testing Procedure We recommend that a weekly check is made of your Alarm System as below.
WARNING: DO NOT TEST WITH FLAME. (This can set fire to the Alarm and damage the house). We do not recommend testing with smoke or heat as the results can be misleading unless special apparatus is used. Check for any sign of contamination such as cobwebs or dust and if necessary clean the alarm as described in the smoke alarm instruction leaflet. 7.
If the interconnect fails to operate or the amber light continues to flash every 10 seconds (even after (i) above) then it is defective and must be replaced (see getting your RadioLINK Base serviced as per section 8 below). Further instructions are given in the instruction leaflet supplied with the Smoke / Heat Alarm regarding their maintenance and checking of their back-up supplies. 7.
guarantee only applies to normal conditions of use and service, and does not include damage resulting from accident, neglect, mis-use, unauthorized dismantling, or contamination howsoever caused. This guarantee excludes incidental and consequential damage. This guarantee does not cover costs associated with the removal and/or installation of units.
Range: 150 meters (minimum) in free space. RF RECEPTION Alarm Signal Reception: Turns on horn without red light flashing for 60 seconds unless it receives an alarm cancel signal within that period. Duration of House Code Mode: 15 minutes RF VISUAL INDICATOR (Amber) On Transmission: Amber LED lights continuously for 1.5 to 3.5 seconds while messages are being transmitted. The amber light also flashes after receipt of an alarm cancel signal. Low Battery Indication: Amber light flashes every 10 second.
Clearing House Codes: The house codes memorised can be deleted (i.e. the RadioLINK Bases can be uncoded) by pressing and holding the House Code switch on for about 6 seconds. The amber light will come on and then flash slowly to indicate the smoke alarm has been returned to the default factory settings. (this also clears the Repeater function). Repeater Function: The RadioLINK Base receives and then re-broadcasts the varoius RF signals, so effectively boosting the signal range.
11. RadioLINK ACCESSORIES Ei410 - RadioLINK REMOTE CONTROLLER The Remote Control Ei410 allows you to test, hush or locate RF linked Smoke/Heat Alarms. Ei411 - RadioLINK REMOTE TEST & LOCATE SWITCH This wall mounted switch allows you to test or locate RF linked Smoke/Heat Alarms. Ei428 - RadioLINK RELAY MODULE This module is a device that switches a relay upon receipt of an alarm signal from a suitable Ei smoke/heat alarm.
Aico Ltd. Mile End Business Park, Maesbury Road, Oswestry, Shropshire SY10 8NN, U.K. Telephone: 0870 7584000 www.aico.co.uk Ei Electronics Shannon Industrial Estate, Shannon, Co. Clare, Ireland. Telephone: +353 61 471277 www.eielectronics.