
Measurement Guide


PAGE 95
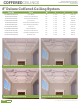
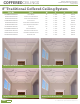
Miterless Coffered Ceiling Systems
Molded Components for Easy Installation
Factory Primed
COFFEREDCEILINGS
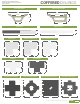
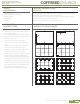
Power Grab Adhesive
Utility Knife, Circular Saw, or Table Saw
Paint Brush or Roller
Measuring Tape
Sand Paper
STEP BY STEP
INSTRUCTIONS
TOOLS
& MATERIALS
SPECIAL INSTRUCTIONS
& NOTES
EXAMPLE
INSTALLATION DIAGRAMS
Thoroughly read through the installation instructions to familiarize yourself before beginning.
Acclimate the products for 24 hours to the room before installing.
It is recommended that a complete layout be planned before cutting or installing. Take into
consideration vents, xtures, re sprinklers, lighting, etc.
Before installing ensure the product is free of any debris or dust.
1. Prepare installation surface with sandpaper by removing
excessive bumps or texture. Wipe clean & apply primer
to ensure proper adhesion.
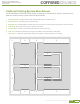
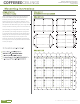
2. Mark center points on each side of the ceiling. (Fig. A)
3. Measure from the center to mark placement of the
perimeter tee pieces. (Fig. B)
4. Connect each mark using a chalk line. (Fig. C)
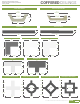
5. Install corner pieces using adhesive & nishing nails.
(Fig. D)
6. Install perimeter tees using adhesive & nishing nails,
centering them on the chalk markings. (Fig. E)
7. Install intersection piece using adhesive & nishing
nails, centering on the chalk markings. (Fig. F)
8. When installing perimeter beams make sure to measure
for each space & cut according to that space, then
install using adhesive & nishing nails. Apply adhesive to
the backs & ends of the perimeter beam pieces. (Fig. G)
9. When installing inner beams make sure to measure for
each space & cut according to that space, then install
using adhesive & nishing nails. Apply adhesive to the
backs & ends of the inner beam pieces. (Fig. H)
10. Once installed, paint your coffered ceiling as desired.
Fig. A
Fig. C
Fig. E
Fig. G
Fig. B
Fig. D
Fig. F
Fig. H
tel: 1-888-573-3768 |www.architecturaldepot.com