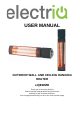
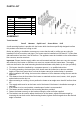
USER MANUAL OUTDOOR WALL AND CEILING HANGING HEATER eiQEWMR Thank you for choosing electriQ Please read the manual before using this heater and keep it safe for future reference. Visit our page www.electriQ.co.
CONTENTS SAFETY INSTRUCTIONS 3 PARTS LIST 5 ASSEMBLY 5 INSTALLATION DIAGRAMS 6 OPERATION 7 REMOTE CONTROL 7 TROUBLESHOOTING 8 CLEANING AND MAINTENANCE 8 TECHNICAL SPECIFICATIONS 9 SUPPORT 9 2
SAFETY INSTRUCTIONS IMPORTANT • • • • • • • • • • • • • • • • • • • • • • • • • Carefully read the instructions before operating this unit. This appliance is for outdoor use only. Rating: This unit must be only connected to a 220-240 V / 50 Hz earthed outlet. Installation must be in accordance with the regulations of the country where the unit is used. If you are in any doubt about the suitability of your electrical supply have it checked and, if necessary, modified by a qualified electrician.
• Keep the heater clean. Do not allow any object to enter the ventilation or exhaust opening as this may cause electric shock, fire, or damage to the heater. • Do not use the appliance for anything other than its intended use. • There may be a trace of odour during the first few minutes of initial use, or after a period of storage. This is normal and will quickly disappear. • This appliance has hot and arcing or sparking parts inside.
PARTS LIST PARTS PART NO. 1 2 3 4 5 6 7 PART NAME QTY L shape bracket Wall plugs Screws PA5mm*25mm Screws M6mm*12mm 4 4 4 M6mm locking nut Washer M6mm*12mm screw 2 2 2 ASSEMBLY Tools Needed: Pencil Hammer Spirit Level Screw Driver Drill A wall mounting bracket is provide with the heater which has been specifically designed to allow this product to be fitted to a ceiling or wall.
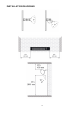
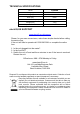
INSTALLATION DIAGRAMS 6
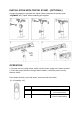
INSTALLATION WITH TRIPOD STAND - (OPTIONAL) Contact the supplier to purchase the tripod. Please reference the product code “eiQEWMR” and “Tripod” when contacting the supplier. OPERATION 1. Plug the unit into a plug socket, make sure the power supply is the same as rated. 2. Press the power button on the right side of heater, control the power level by function switch.
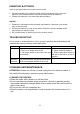
INSERTING BATTERIES Insert 2 AAA type batteries into your remote control 1. Flip the backside of your remote control and pull out battery cover. Insert the batteries in accordance with the instructions and polarity the batteries. 2. Change the batteries in the same way depicted above. NOTICE: 1. Replace the old batteries with the same type batteries. Otherwise, your heater may not function well. 2.
TECHNICAL SPECIFICATIONS Model Voltage(V) Wattage(W) eiQEWMR 220-240V AC 1500W/2000W Hertz (Hz) 50/60 Dimensions W×H×D(mm) 67.5*10.5*7.2cm Weight (KG) 1.7kg Tripod dimensions 1.1-1.8m electriQ UK SUPPORT www.electriQ.co.uk/support Please, for your own convenience, make these simple checks before calling the service line. If the unit still fails to operate call: 0330 390 3061 or complete the online form 1. Is the unit plugged into the mains? 2. Is the fuse OK? 3.