ÖKO_FAVORIT 40250 i Dishwasher User Instructions
Dear customer, Please read these user instructions carefully. Please observe the safety instructions on the first few pages ofthese user instructions! Please keep these user instructions for later reference. Pass them on to any subsequent owner of the appliance. 1 0 The warning triangle and/or specific words (Warning!, Caution!, Important!) are used to highlight instructions that are important for your safety or for the function of the appliance. It is imperative that these instructions are observed.
Contents CONTENTS Operating Instructions .................................... 5 Safety Instructions . . . . . . . . . . . . . . . . . . . . . . . . . . . . . . . . . . . . . . . . . . . . 5 Disposal . . . . . . . . . . . . . . . . . . . . . . . . . . . . . . . . . . . . . . . . . . . . . . . . . . . . . . 7 Economical and Ecological Dishwashing . . . . . . . . . . . . . . . . . . . . . . . . . . 7 Appliance Features and Control Panel . . . . . . . . . . . . . . . . . . . . . . . . . . .
Contents 4 Installation and Connection Instructions . . . . . . . . . . . . . . . . 28 Installing the Dishwasher . . . . . . . . . . . . . . . . . . . . . . . . . . . . . . . . . . . . . . . Dishwashers That Can Be Integrated . . . . . . . . . . . . . . . . . . . . . . . . . . . . Built-In Dishwasher . . . . . . . . . . . . . . . . . . . . . . . . . . . . . . . . . . . . . . . . . . Free-Standing Appliances . . . . . . . . . . . . . . . . . . . . . . . . . . . . . . . . . . . . .
Operating Instructions OPERATING INSTRUCTIONS 1 Safety Instructions The safety aspects of AEG electrical appliances comply with accepted technical standards and the German Appliance Safety Law. Nevertheless, as a manufacturer we consider it our obligation to make you aware of the following safety information: Installation, Connection and Placing into Operation • The dishwasher may only be transported upright. • Check the dishwasher for transport damage.
Operating Instructions • Never place the dishwasher in operation if the mains cable, water inlet or drain hose is damaged; or the control panel, work top or plinth area is damaged such that the inside of the appliance is freely accessible. • If the mains lead is damaged, or is to be replaced for a longer lead, the cable (obtainable from AEG Service Force) must be replaced by a service engineer authorised by AEG. • Never unplug the appliance by pulling on the cable, always pull the plug.
Operating Instructions • In the event of a fault, first close the tap, then switch off the appliance and unplug it from the mains. If the appliance is permanently wired to the mains: remove the fuse. 2 Disposal Disposing of the Packaging Material Dispose of the dishwasher packaging material correctly. All the packaging materials used are harmless to the environment and can be recycled. • Plastic parts are marked with standard international abbreviations: – >PE< for polyethylene, e.g.
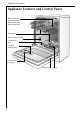
Operating Instructions Appliance Features and Control Panel Rubber Seal for Connecting the Water Feed to the Upper Spray Arm Spray Arms Water Hardness Switch Container for Salt Container for Rinse Aid Container for Detergent Rating Plate 8 Filters
Operating Instructions Control Panel Power Indicator light Door Handle Program Selector Programme Switch Set the point at which the wash programme is to start using the programme switch. The programme switch rotates during the wash programme and indicates the position that has been reached in the programme. Switch on the dishwasher and start a wash programme using the programme selector.
Operating Instructions Adjust the Water Softener To prevent the build up of scale on dishes and in the dishwasher, the dishes must be washed with soft, i.e. low lime content water. For this reason the dishwasher is fitted with a water softener in which tap water from a hardness of 4 °d (German degrees) is softened with the aid of special salt. 3 Your local water authority can advise you on the hardness of the water in your area. The water softener has 4 settings.
Operating Instructions Filling with Salt for the Water Softener 1 Use only salt designed for dishwashers. Never fill the salt container with any another type of salt (e.g. culinary salt) or dishwasher detergent, as this would irreparably damage the water softener. Prior to filling with salt, please check each time that you really do have a packet of dishwasher salt in your hand.
Operating Instructions Filling with Rinse Aid Rinse aid is automatically added during the last rinse, ensuring thorough rinsing, spot and streak free drying. 1 Only use rinse aid specifically designed for domestic dishwashers. Never fill the rinse aid container with any other substance as this would damage the appliance. 12 ax 6 5 4 1 32 3. Fill with rinse aid, up to the broken line as a maximum; this line corresponds to a quantity of approx. 150 ml 4.
Operating Instructions Adjusting Rinse Aid Dosing The dose should be adjusted according to the finish and drying results obtained. The dose is factory set at 4, and can adjusted from 1 to 6. Gradually increase the dose if there are drops of water or lime spots on the dishes after washing. Reduce if it there are sticky whitish streaks on the dishes. 0 1. Turn the lid of the container ¼ of a turn anticlockwise and remove. 2. Adjust the dose setting with a tea spoon. 3.
Operating Instructions In Daily Use • Check the salt and rinse aid levels. • Load cutlery and dishes into the dishwasher • Fill with dishwasher detergent • Select a wash programme suitable for the cutlery and dishes • Start the wash programme Loading Cutlery and Dishes 1 Sponges, household cloths and any object that can absorb water should not be washed in the dishwasher.
Operating Instructions – To avoid damage to glasses, they must not touch – Do not lay small objects (e.g. lids) in the cutlery rack Loading Cutlery 1 Long bladed knives stored in an upright position are a potential hazard. 1 Long and/or sharp items of cutlery such as carving knives must be positioned horizontally in the upper basket. Take care when loading or unloading sharp items such as knives. To ensure that all items of cutlery are completely washed, you should 1.
Operating Instructions Loading Pans, Frying Pans and Large Plates Load large and heavily soiled dishes in the lower rack. To ease the loading of large items at some dishwasher-models the two rows of prongs for the right-hand plate insert can be folded down: 0 1. Slightly lift the right plate insert. 3 2. Fold the plate insert to the left.
Operating Instructions Loading Cups, Glasses and Coffee Services Load small, delicate items and long pointed cutlery in the upper rack. • Arrange items of crockery on the folding cups racks so that they are offset from each other and water can reach all items. • The cup racks can be folded up out of the way for tall items. • Lay or hang wine, champagne, and brandy glasses in the cut outs on the cup racks. • Glasses, beakers, etc. can also be placed on the two rows of prongs on the left of the upper rack.
Operating Instructions Filling with Detergent 1 Use only dishwasher detergent. Fill with Detergent: – Prior to the start of a wash programme (not for the Pre Wash programme). The detergent is released into the wash water during the programme. Please observe the manufacturer’s dosing and storage recommendations given on the detergent packaging. The detergent dispenser is on the inside of the door. 0 1. If the lid is closed: Press the latching lever (1) forwards. The lid springs open. 2 2 1 2.
Operating Instructions Bio Wash Programmes and Concentrated Detergents Based on their chemical composition, dishwasher detergents can be split into two basic types: – Conventional, alkaline detergents with caustic components – Weak alkaline concentrated detergents with natural enzymes.
Operating Instructions Selecting the Wash Programme (Programme Table) Choose the most suitable wash programme with the aid of this table: Type of Dishes Dinner Service and Cooking Utensils In Addition Type of Soiling • heavily soiled • dried leftovers with non-temperature resistant dishes • normally soiled Dessert Dishes and Coffee Service All Dish Types with delicate glasses - • lightly soiled particularly suited to the use of concentrated detergents. NORMAL NORMAL BIO ECON.
Operating Instructions Starting the Wash Programme 0 1. Check that when the dishes and cutlery are loaded into the dishwasher the spray arms are free to rotate. 2. Open the tap fully. 3. Close dishwasher door. 4. Turn the programme selector clockwise to A, or B or C (see “Programme Table“). For interference suppression reasons, only operate the programme selector with the dishwasher switched off. It is also possible that the automated addition of detergent will be triggered. 5.
Operating Instructions Interrupting the wash programme by opening the door of the dishwasher Hot steam may escape when the door is opened. Open the door carefully. 0 1. Open the door of the dishwasher. The wash programme stops. 2. Shut the door. The wash programme continues. 1 Switching Off the Dishwasher When the wash programme is finished: 0 1. Turn the program selector to the I position. Power indicator light goes out.
Operating Instructions Cleaning the Filter The filters should be checked and cleaned regularly. Blocked filters will give poor wash results. 0 1. Open the door, remove the lower rack. 2. The dishwasher filter system comprises a coarse/fine filter, microfilter and a flat filter. Unlock the filter system using the handle on the microfilter, and remove. 3. Turn the handle about ¼ a turn anticlockwise and remove. 4.
Operating Instructions What to do, if ... Try to rectify minor faults on the dishwasher with the aid of the instructions given here. If you call an engineer to resolve a of fault listed here, or to repair a fault caused by incorrect use or installation, a charge will be made even if the appliance is in guarantee. ...there are problems with the operation of the dishwasher. Symptom Possible Cause The drain pump in the dishwasher runs conThe anti-flood system has tinuously - even with been triggered.
Operating Instructions ...the wash result is unsatisfactory. The dishes are still dirty. – The wrong wash programme was selected. – The dishes were arranged in such a manner that water has not reached all parts. The dish racks must not be overloaded. – The filter in the base of the washing compartment is dirty or incorrectly positioned. – Detergent was not used or too little was used.
Operating Instructions Technical Data Capacity: 12 place settings including serving dishes Permitted Water Pressure: 1-10 bar (=10-100 N/cm2 = 0.1-1.0 MPa) Electrical Connection: Information on the electrical connection is given on the rating plate on the inner edge of the dishwasher door on the right. Dishwasher: Free-Standing Appliances Dimensions: 850 x 600 x 600 (H x B x D in mm) Max.
Operating Instructions Notes for Test Institutes The salt container for the water softener and the rinse aid container must be completely full prior to the test. Test Standard: EN 5O 242 Comparative Programme: Normal BIO 50 °C for full and half load Full Load: 12 place settings incl. serving dishes Detergent Dosing: 30g (Type B) in the detergent container Half Load: 6 place settings incl.
Installation and Connection Instructions INSTALLATION AND CONNECTION INSTRUCTIONS Installing the Dishwasher • The dishwasher must be installed on a firm floor and adjusted such that it is stable and level. • To compensate for unevenness in the floor and to match the height of the appliance to that of surrounding units extend the threaded feet by unscrewing. Depending on the design of the threaded feet use either – an open-end spanner or – a screwdriver.
Installation and Connection Instructions • Depending on type, the dishwasher is to be installed as follows: Dishwashers That Can Be Integrated (see installation template supplied) 3 The door of the appliance can be fitted with a wooden/facing panel with the following dimensions: Width 587mm 591 – 594 mm Thickness: 16 – 24 mm Height: dependent on (variable) – Aperture height – Plinth height – The adjustment so that the unit matches the height of the adjoining units The exact height of the adjoining
Installation and Connection Instructions • If the dishwasher is installed underneath a kitchen work surface, the original work surface of the dishwasher is to be removed as follows: – Unscrew the screws (1) from the elbows on the back side. – Slide the work surface approx. 1cm to the rear (2) , lift at the front (3) and remove. – Press the work surface retaining brackets at the position shown in the diagram (4) and remove the bracket at an angle to the rear (5).
Installation and Connection Instructions Connecting the Dishwasher Water Connection The dishwasher is fitted with safety devices that prevent the return of wash water into the drinking water system and comply with the applicable plumbing regulations. • The dishwasher should be connected to a cold water supply. • The dishwasher should not be connected to a hot water supply.
Installation and Connection Instructions Water drain Drain hose 1 The drain hose must not be kinked, crushed or entangled. • Connecting the drain hose: – Maximum permitted height: 1 metre. – Minimum required height 30 cm above the lower edge of the machine. Extension hoses • Extension hoses are available from AEG Service Force. The internal diameter of the extension hoses must be 19 mm to ensure that the function of the appliance is not impeded.
Installation and Connection Instructions Leak Prevention System For protection from damage due to water leaks, the dishwasher is equipped with a leak prevention system, the AQUA CONTROL SYSTEM. In the event of a fault, the drain pump switches on. By this means water can neither escape nor overflow. The remaining water in the appliance is automatically pumped out. 1 The AQUA CONTROL SYSTEM also works when the appliance is switched off – the appliance must however not be disconnected from the mains.
Installation and Connection Instructions Electrical Connection Any electrical work required to install this appliance should be carried out by a qualified electrician or competent person. 1 WARNING - This appliance must be earthed. The manufacturer declines any responsibility should these safety measures not be observed. Before switching on make sure the electricity supply voltage is the same as that indicated on the appliance rating plate. To isolate the dishwasher from the mains, remove the mains plug.
Installation and Connection Instructions Connections The water inlet and drain hoses, as well as the mains cable must be connected beside the dishwasher as there is insufficient space behind the appliance. The plumbing and electrical installation example given below can only be regarded as a recommendation.
Guarantee Conditions GUARANTEE CONDITIONS 1. 2. 3. 4. 5. 6. Guarantee Conditions AEG offer the following guarantee to the first purchaser of this appliance. The guarantee is valid for 12 months commencing when the appliance is handed over to the first retail purchaser, which must be verified by purchase invoice or similar documentation. The guarantee does not cover commercial use. The guarantee covers all parts or components which fail due to faulty workmanship or faulty materials.
Service & Spare parts SERVICE & SPARE PARTS If you wish to purchase spare parts or require an engineer, contact your local AEG Service Force Centre by telephoning: 08705 929 929 Your telephone call will be automatically routed to the Service Centre covering your post code area. When you contact the Service Centre they will need the following information: 1. Your name & address, including post code. 2. Your telephone number 3. Clear and concise details of the fault. 4.
AEG Hausgeräte GmbH Postfach 1036 D-90327 Nürnberg http://www.aeg.hausgeraete.