IRIS MOST IMPORTANT THAT THIS INSTRUCTION BOOK SHOULD BE RETAINED WITH THE APPLIANCE FOR FUTURE REFERENCE, SHOULD THE APPLIANCE BE SOLD OR TRANSFERRED TO ANOTHER OWNER, OR SHOULD YOU MOVE HOUSE AND LEAVE THE APPLIANCE, ALWAYS ENSURE THAT THE BOOK IS SUPPLIED WITH THE APPLIANCE IN ORDER THAT THE NEW OWNER CAN BE ACQUAINTED WITH THE FUNCTIONING OF THE APPLIANCE AND THE RELEVANT WARNINGS.
Under no circumstances should you open the door whilst the appliance is in operation. Built-in dishwashers only: The appliance must be secured 1o the underside of the kitchen work surface using the bracket over the door opening. Failure to do this could result in an unstable appliance which may Cause damage or injury. Under no circumstances should you attempt to repair the appliance yourself. Repairs carried oul by inexperienced persons may cause injury or moire serious malfunctioning.
Warnings & Specific Notes Installation Location Connecting 1o the Mains As a general guide to fitting any plug Recommended drainage connections Water & drain connections Gullet hose & drain Infer water connection Specifications Getting to know your dishwasher Preparing your dishwasher Filling the salt container for the water softener Adjusting the softener Using your dishwasher Special programmed Case and cleaning Additional features Adjusting the worktop installing under a work surface Fitting a decor pane
In order that your new dishwasher will operate correctly and give you the best possible results it must be instated in accordance with the following instructions. Aay local regulations conceding connections 1o the electricity and wale supplies and drainage must also be complied with. LOCATION Your dishwasher can be placed in any suitable position providing the water, drain and electrical connections are accessible.
The fuse cover/carrier must be of the same color as that of the ca loured insert in the base of the plug. Under no circumstances must the plug be used without & correct fuse irrecoverable fitted. If the plug supplied on the mains lead is not suitable for the socket outlet in your home it should be cut off and disposed of safely, or destroyed, 1o avoid any possible shock hazard resulting from the plug being inserted anti a 13 amp socket elsewhere in the house.
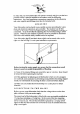
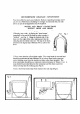
RECOMMENDED DRAINAGE CONNECTIONS You must abide by any Local Authority Bylaws regarding drainage and if you live in 3 Multi Store building we strongly recommend that you seek advice as special arrangements may be required. WATER AND DRAIN CONNECTIONS OUTLET HOSE AND DRAIN Alternative methods of discharging 1o the drains are as follows:1 Directly into a sink by fitting the hose former” (supplied) to the end of the hose in order 1o make it “hooked" see Fig. 3.
INLET WATER CONNECTION The dishwasher can be connected 1o the hot or clad water supply. IT MUST NEVER 8E CONNECTED TO A MIXER TAP. It should, preferably. be connected to the cold water supply in order 10 obtain the best wash results. However, if you decide o use a hot water connection, the temperature must not exceed 70C (158°F). The pressure of ;}we water supply should be between 50 kn* 800 kNAn® (7 116 tb fin’ 3. The warier infer hose has a 3/4" B.S.P.
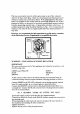
This section is designed to help you become familiar with the various features of your new dishwasher. 1. Mains on/off button Push the on/off button in to operate the machine. The mains on indicator Jap (2) will illuminate when the machine is switched on. To stop the making, push the button in and release it. 2.. Mains o indicator damp ‘When the machine is switched off, the indicator lamp will go out, 3.
7. Programmer chart ‘The programmed are Hated on the control panel of your dishwasher, They correspond with the programmer selector dial and are explained in more detail on page 16 under ‘Programmer and Sequence Chan’, 8. Upper dish rack The upper dish rack is for cups, glassware, small plates, bowls and the like. it fiats two less of wheels which enable it to be placed in the dishwasher in one of two alternative positions, depending on the articles to be washed.
15. and 16, Spray arms Water is pumped at high pressure through holes in these arms (o spray over the dirty dishes. Iris the spraying that is the mechanical action in the washing process. The spray also causes Ihe arms to rotate so that all pants of the wash chamber are covered. Otis important therefore that the holes are kept clear by regularly removing the arms from the wash chamber and rinsing them under 2 Lap.
28. Water Softener To prevent the build up of white deposits on dishes and glasses which could occur where hardness is present in the wares, your dishwasher incorporates its ows water softener. This softener uses special resins to remove the hardness and these are automatically regenerated during the last past of cache wash cycle using regeneration salt. Thus the water softener is ready to do its job again fusing the next wash.
FILLING THE SALT CONTAINER FOR THE WATER SOFTENER Remove the lower dish rack 10 give access to the salt container filler cap. Having removed the cap, place a funnel over the opening and pour in about water softener granular or regeneration salt. This is available from larger hardware shops or builders merchants.
1. Scrape pistes can of large pieces of waste food, hones ete. 2. Loading “The dish racks should be puled forward gently on their wheels 10 make the sacks more accessible for goading, Typical loading for each of the racks are shown in the illustrations on Page 10. The upper dish rack s for cups. saucers, glassware, small plates and bowls etc. Cups. glasses and bowls. should be placed upside down. The rack has a flap which is used for loading the cups.
8. After the wash When the washing programmer has finished, the machine will stop but the mains on indicator will remain illuminated. You should then switch off the machine, and also tum off the water supply stopcock. Do not turn off the water before the programmer has finished, as water is needed for the regeneration of the water softener which takes place during the drying cycle. Frailly. remember to inspect the filters regularly and, if necessary. rinse them under a tap.
ADDICTION Adjusting the worktop The worktop can be adjusted either forwards or backwards, up to 25mm, to enable i 1o be aligned with kitchen furniture. Using a Philips screwdriver, remove the two securing screws from the front of the worktop (as shown if Figure 103, Adjust the worktop to the required position, then replace the securing screws, fig 10 fa stalling under a work surface Your dishwashers can be installed under a work surface or under 1 sink.
Fitting # decor panel Model BW450 is supplied in white with a decor frame around the main door and forward pancaked {see Fig,12). To fit the pane! proceed as follows.1. Remove the 3 screws on each side and four screws on the dower edge of the door, 2. Remove the decor panel 3. Cover this panel with a sheet of laminated plastic so that it co-ordinates with your kitchen. 4. Replace the decor panel and replace the screws in the frame.
Generally speaking. crockery and cutlery which can normally be washed by hand can alas be washed in the machine, although pans, casserole dishes, etc., which have food burnt on, cannot always be expected to be completely clean. Somme materials are not suitable for machine washing, or require special treatment, therefore, to avoid any disappointment, we suggest the following information is carefully studied.
=5 ™y 151 the event of your machine developing a fault, you should quickly run through this check list before calling your local Electrolyte Service Center. If your wash is not satisfactory. 1. Check that the crockery or cutlery has been properly loaded. 2. Check that the spray arms, or holes in the arms, have not become obstructed o blocked. 3. Check that the filer is clean. 4. Check that the programmer selected was the correct one. 5. Check that the correct amount of detergent was used 6.
This Guarantee is offered 10 you as an extra benefit and does not affect your feral rights. Electrolyte produces are carefully designed, manufactured, tested and inspected and in consequence we undertake to replace or repute any pant found 10 be defective in material or workmanship, within ane year of delivery to the original purchaser, free of charge.
NORTHERN DIVISION Electrolyte Service PO, Box 19 Al sham Lane Alt ham HARRINGTON BBS $XX Aberdeen 0224 696569 Alt ham 0282 74621/2/3/4 Belfast 1232 746591 Birmingham 021 358 7076/5051 Edinburgh 031 557 8383 Hogshead 091493 2028 Glasgow 041 647 4381 Leeds 0532 608511 Leicester 0333515131 Liverpool 0SE254 1724 SOUTHERN DIVISION Electrotype Service Libertine Road, Hillside, PORTSMOUTH PO3 513 Brighton 0273 694341 Bristol 0272211876 Cardiff 0222 460131 Newton Abbot 0626 65909 Oxford 0993 704411 Portsmouth 0705