user manual Freezer CI 800 FA
electrolux Electrolux. Thinking of you. Share more of our thinking at www.electrolux.
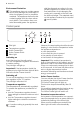
electrolux 3 • It is dangerous to alter the specifications or modify this product in any way. Any damage to the cord may cause a short-circuit, fire and/or electric shock. Warning! Any electrical component (power cord, plug, compressor) must be replaced by a certified service agent or qualified service personnel. 1. Power cord must not be lengthened. 2. Make sure that the power plug is not squashed or damaged by the back of the appliance. A squashed or damaged power plug may overheat and cause a fire. 3.
electrolux shall be disposed according to the applicable regulations to obtain from your local authorities. Avoid damaging the cooling unit, especially at the rear near the heat exchanger. The materials used on this appliance marked by the symbol are recyclable. Environment Protection This appliance does not contain gasses which could damage the ozone layer, in either its refrigerant circuit or insulation materials. The appliance shall not be discarded together with the urban refuse and rubbish.
electrolux 5 First use Cleaning the interior Before using the appliance for the first time, wash the interior and all internal accessories with lukewarm water and some neutral soap so as to remove the typical smell of a brandnew product, then dry thoroughly. Important! Do not use detergents or abrasive powders, as these will damage the finish. Daily use Freezing fresh food The freezer compartment is suitable for freezing fresh food and storing frozen and deep-frozen food for a long time.
electrolux • • • • • make it possible subsequently to thaw only the quantity required; wrap up the food in aluminium foil or polythene and make sure that the packages are airtight; do not allow fresh, unfrozen food to touch food which is already frozen, thus avoiding a rise in temperature of the latter; lean foods store better and longer than fatty ones; salt reduces the storage life of food; water ices, if consumed immediately after removal from the freezer compartment, can possibly cause the skin to
electrolux 7 In order to speed up the defrosting process, place a pot of warm water in the freezer compartment. In addition, remove pieces of ice that break away before defrosting is complete. 4. When defrosting is completed, dry the interior thoroughly and keep the scraper for future use. 5. Switch on the appliance. 6. After two or three hours, reload the previously removed food into the compartment. Warning! Never use sharp metal tools to scrape off frost from the evaporator as you could damage it.
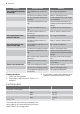
electrolux Problem The compressor operates continually. The temperature in the freezer is too low. The temperature in the freezer is too high. There is too much frost. Possible cause Solution The temperature is not set correctly. Set a higher temperature. The door is not closed correctly. Refer to "Closing the door". The door has been opened too frequently. Do not keep the door open longer than necessary. The product temperature is too high.
electrolux 9 Installation Read the "Safety Information" carefully for your safety and correct operation of the appliance before installing the appliance.
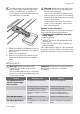
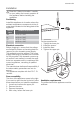
electrolux Open the door. Put the lower hinge cover in position. 2 50-min. cm 200 min. 2 cm 200 4mm 44mm Installing the appliance Caution! Make sure that the mains cable can move freely. Do the following steps: 1. Install the appliance in the niche. Push the appliance in the direction of the arrows (1) until the upper gap cover stops against the kitchen furniture. Make sure that the distance between the appliance and the cupboard front-edge is 44 mm.
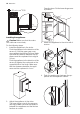
electrolux 11 5. Remove the correct part from the hinge cover (E). Make sure to remove the part DX, in the case of right hinge, SX in opposite case. Ha Hb Hc Hd 8. Install the part (Ha) on the inner side of the kitchen furniture. ca. 50 mm 6. Attach the covers (C, D) to the lugs and the hinge holes. Install the vent grille (B). Attach the hinge covers (E) to the hinge. 90° 21 mm 90° D C ca. 50 mm E E 21 mm 9. Push the part (Hc) on the part (Ha). B Ha 7.
electrolux Put together the appliance door and the furniture door and mark the holes. 8 mm Hb Ha 13. Press the part (Hd) on the part (Hb). Hb 11. Remove the brackets and mark a distance of 8 mm from the outer edge of the door where the nail must be fitted (K). 8 mm Hb Hd K Ha 12. Place the small square on the guide again and fix it with the screws supplied. Align the kitchen furniture door and the appliance door by adjusting the part Hb.
electrolux 13
electrolux
electrolux 15
www.electrolux.