EC4230AOW1 ................................................ NL VRIESKIST EN CHEST FREEZER FR CONGÉLATEUR COFFRE IT CONGELATORE A POZZO ES ARCÓN CONGELADOR .............................................
www.electrolux.com INHOUD 1. 2. 3. 4. 5. 6. 7. 8. 9. 10. 11. 12. VEILIGHEIDSVOORSCHRIFTEN . . . . . . . . . . . . . . . . . . . . . . . . . . . . . . . . . . . . . . . . . . . . . 3 BESCHRIJVING VAN HET PRODUCT . . . . . . . . . . . . . . . . . . . . . . . . . . . . . . . . . . . . . . . . . 6 BEDIENING . . . . . . . . . . . . . . . . . . . . . . . . . . . . . . . . . . . . . . . . . . . . . . . . . . . . . . . . . . . . . 7 BEDIENINGSPANEEL . . . . . . . . . . . . . . . . . . . . . . . . . . . . . . .
NEDERLANDS 1. 3 VEILIGHEIDSVOORSCHRIFTEN In het belang van uw veiligheid en om een correct gebruik te kunnen waarborgen is het van belang dat u, alvorens het apparaat te installeren en in gebruik te nemen, deze gebruiksaanwijzing, inclusief de tips en waarschuwingen, grondig doorleest. Om onnodige vergissingen en ongevallen te voorkomen is het belangrijk ervoor te zorgen dat alle mensen die het apparaat gebruiken, volledig bekend zijn met de werking ervan en de veiligheidsvoorzieningen.
www.electrolux.com • Het is gevaarlijk om wijzigingen aan te brengen in de specificaties of dit product op enigerlei wijze te modificeren. Een beschadigd netsnoer kan kortsluiting, brand en/of een elektrische schok veroorzaken. WAARSCHUWING! Alle elektrische onderdelen (netsnoer, stekker, compressor) mogen om gevaar te voorkomen uitsluitend worden vervangen door een erkende onderhoudsdienst of gekwalificeerd onderhoudspersoneel. 1. • • • • Het netsnoer mag niet verlengd worden. 2.
NEDERLANDS ventilatie te verkrijgen de instructies met betrekking tot de installatie opvolgen. • Het apparaat mag niet vlakbij radiatoren of kooktoestellen geplaatst worden. • Zorg ervoor dat de stekker na installatie van het apparaat toegankelijk is. 1.6 Onderhoud • Alle elektrotechnische werkzaamheden die noodzakelijk zijn voor het uitvoeren van onderhoud aan het apparaat, dienen uitgevoerd te worden door een gekwalificeerd elektricien of competent persoon.
www.electrolux.com 2.
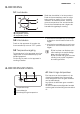
NEDERLANDS 7 3. BEDIENING 3.1 Inschakelen A B Steek dan de stekker in het stopcontact. Draai de thermostaatknop naar de volgeladen positie en wacht 24 uur voordat u voedsel in de koelkast plaatst, zodat de correcte temperatuur kan worden bereikt. Pas de thermostaatknop aan volgens de hoeveelheid opgeslagen voeding. C A Thermostaatknop B Halfgeladen positie C Volgeladen positie 3.2 Uitschakelen Draai om het apparaat uit te zetten de thermostaatknop naar de “OFF”-positie. 3.
www.electrolux.com 5. HET EERSTE GEBRUIK 5.1 De binnenkant schoonmaken Voordat u het apparaat voor de eerste keer gebruikt, wast u de binnenkant en de interne accessoires met lauwwarm water en een beetje neutrale zeep om de typi- sche geur van een nieuw product weg te nemen. Droog daarna grondig af. Gebruik geen oplosmiddelen of schuurmiddelen. Deze beschadigen de lak. 6. DAGELIJKS GEBRUIK 6.
NEDERLANDS 9 6.4 Opslagmanden A 606 Hang de manden aan de bovenrand van de vriezer (A) of plaats ze in de vriezer (B). Draai de handvaten voor deze twee posities zoals getoond in de afbeelding en zet ze vast B 806 946 1061 230 1201 1336 1611 De manden schuiven in elkaar De onderstaande afbeeldingen tonen hoeveel manden in de verschillende vriezermodellen kunnen worden geplaatst U kunt extra manden kopen bij uw plaatselijke klantenservice 7. NUTTIGE AANWIJZINGEN EN TIPS 7.
www.electrolux.com • Als voedsel eenmaal ontdooid is, bederft het snel en kan het niet opnieuw worden ingevroren. • Bewaar het voedsel niet langer dan de door de fabrikant aangegeven bewaarperiode. 8. ONDERHOUD EN REINIGING LET OP! Voordat u welke onderhoudshandeling dan ook verricht, de stekker uit het stopcontact trekken. Het koelcircuit van dit apparaat bevat koolwaterstoffen; onderhoud en herladen mag alleen uitgevoerd worden door bevoegde technici. 8.1 Periodieke reiniging 1. 2. 3. 4. 5. 6.
NEDERLANDS 8.3 Periodes dat het apparaat niet gebruikt wordt 4. 5. Als het apparaat gedurende lange tijd niet gebruikt wordt, neem dan de volgende voorzorgsmaatregelen: 1. Schakel het apparaat uit. 2. Trek de stekker uit het stopcontact. 3. Haal al het voedsel eruit. 11 Ontdooi het apparaat en toebehoren en maak alles schoon. Laat het deksel open om onaangename geurtjes te voorkomen.
www.electrolux.com Probleem Mogelijke oorzaak Oplossing De kist is kortgeleden aan- Raadpleeg "Alarm hoge gezet en de temperatuur is temperatuur". nog steeds te hoog. Er is te veel rijp en ijs. Het deksel sluit niet volledig. De producten zijn niet op de juiste wijze verpakt. Pak de producten beter in. Het deksel is niet goed dicht of niet strak genoeg gesloten. Controleer of het deksel goed sluit en dat de pakkingen onbeschadigd en schoon zijn. De temperatuur is niet goed ingesteld.
NEDERLANDS Probleem Mogelijke oorzaak 13 Oplossing In te vriezen producten zijn Plaats de producten zodate dicht bij elkaar genig dat koude lucht daarplaatst. tussen kan circuleren. Het deksel is te vaak geopend. Probeer het deksel niet te vaak te openen. Het deksel is lang open geweest. Laat het deksel niet langer open dan nodig is. Het is te koud in de vriezer. De temperatuur is niet goed ingesteld. Stel een hogere temperatuur in. Het apparaat werkt helemaal niet.
www.electrolux.com 10. MONTAGE 10.1 Opstelling WAARSCHUWING! Wanneer u een oud apparaat met een slot of een vergrendeling op het deksel afvoert, moet u ervoor zorgen dat dit onklaar wordt gemaakt om te voorkomen dat kleine kinderen erin opgesloten raken. De stekker van het apparaat moet na installatie toegankelijk zijn.
NEDERLANDS SSS RRR ! HISSS! OK BL SSSRRR! HISSS! BLUBB! SSSRRR! HISSS! BLUBB! UB B! CLICK! BRRR! CRACK! IC CL 15 K! BRRR! CR AC K! CLICK! BRRR! CRACK!
www.electrolux.com 12. TECHNISCHE GEGEVENS Afmetingen Hoogte x Breedte x Diepte (mm): 876 × 1336 × 665 Tijdsduur Overige technische informatie is vermeld op het typeplaatje aan de rechterkant aan de buitenkant van het apparaat. 31 uur 13. MILIEUBESCHERMING Recycle de materialen met het symbool . Gooi de verpakking in een geschikte elektronische apparaten. Gooi apparaten niet weg gemarkeerd met het symbool verzamelcontainer om het te recyclen.
ENGLISH 17 CONTENTS 1. 2. 3. 4. 5. 6. 7. 8. 9. 10. 11. 12. SAFETY INSTRUCTIONS . . . . . . . . . . . . . . . . . . . . . . . . . . . . . . . . . . . . . . . . . . . . . . . . . PRODUCT DESCRIPTION . . . . . . . . . . . . . . . . . . . . . . . . . . . . . . . . . . . . . . . . . . . . . . . . OPERATION . . . . . . . . . . . . . . . . . . . . . . . . . . . . . . . . . . . . . . . . . . . . . . . . . . . . . . . . . . . CONTROL PANEL . . . . . . . . . . . . . . . . . . . . . . . . . . . . . . . . . . . . .
www.electrolux.com 1. SAFETY INSTRUCTIONS In the interest of your safety and to ensure the correct use, before installing and first using the appliance, read this user manual carefully, including its hints and warnings. To avoid unnecessary mistakes and accidents, it is important to ensure that all people using the appliance are thoroughly familiar with its operation and safety features.
ENGLISH 1. • • • • Power cord must not be lengthened. 2. Make sure that the power plug is not squashed or damaged by the back of the appliance. A squashed or damaged power plug may overheat and cause a fire. 3. Make sure that you can come to the mains plug of the appliance. 4. Do not pull the mains cable. 5. If the power plug socket is loose, do not insert the power plug. There is a risk of electric shock or fire. 6.
www.electrolux.com circuit or insulation materials. The appliance shall not be discarded together with the urban refuse and rubbish. The insulation foam contains flammable gases: the appliance shall be disposed according to the applicable regulations to obtain from your local authorities. Avoid damaging the cooling unit, especially at the rear near the heat exchanger. The materials used on this appliance marked by the symare recyclable. bol 2.
ENGLISH 21 3. OPERATION 3.1 Switching on A B C Insert the plug into the wall socket. Turn the Temperature Regulator to the Full Loaded position and let the appliance run for 24 hours to allow the correct temperature to be reached before placing food inside. Adjust the Temperature Regulator according to the quantity of the stored foods. A Temperature Regulator B Half Loaded position C Full Loaded position 3.2 Switching off To turn off the appliance, turn the Temperature Regulator to the “OFF” position.
www.electrolux.com 5. FIRST USE 5.1 Cleaning the interior Before using the appliance for the first time, wash the interior and all internal accessories with lukewarm water and some neutral soap so as to remove the typical smell of a brand-new product, then dry thoroughly. Do not use detergents or abrasive powders, as these will damage the finish. 6. DAILY USE 6.1 Freezing fresh food 6.
ENGLISH 606 806 946 1061 230 1201 1336 1611 23 The baskets will slide into each other. The following pictures show how many baskets can be placed inside the various freezer models. You can purchase additional baskets from your local Service Centre. 7. HELPFUL HINTS AND TIPS 7.1 Hints for freezing To help you make the most of the freezing process, here are some important hints: • the maximum quantity of food which can be frozen in 24 hrs.
www.electrolux.com 3. 4. 5. 6. Regularly clean the appliance and the accessories with warm water and neutral soap. Clean the lid seal carefully. Fully dry the appliance. Connect the mains plug to the mains socket. Switch on the appliance. CAUTION! Do not use detergents, abrasive products, highly perfumed cleaning products or wax polishes to clean the inner side of the appliance. Prevent damage to the cooling system. There is no need to clean the compressor area.
ENGLISH 25 9. WHAT TO DO IF… CAUTION! Before troubleshooting, disconnect the power supply. Only a qualified electrician or competent person must do the troubleshooting that is not in this manual. There are some sounds during normal use (compressor, refrigerant circulation). Problem Possible cause Solution The appliance is noisy. The appliance is not supported properly. Check if the appliance stands stable (all the four feet should be on the floor).
www.electrolux.com Problem Possible cause Solution The lid gaskets are dirty or sticky. Clean the lid gaskets. Food packages are blocking the lid. Arrange the packages in the right way, see the sticker in the appliance. The lid gaskets are dirty or sticky. Clean the lid gaskets. The valve is blocked. Check the valve. The lamp does not work. The lamp is defective. Refer to "Replacing the lamp". It is too warm in the freezer. The temperature is not set correctly. Set a lower temperature.
ENGLISH Problem Possible cause Solution There is no voltage in the mains socket (try to connect another appliance into it). Call an electrician. 9.1 Customer Service If your appliance is still not working properly after making the above checks, contact the nearest service centre.
www.electrolux.com 10.2 Electrical connection 10.3 Ventilation requirements Before plugging in, ensure that the voltage and frequency shown on the rating plate correspond to your domestic power supply. The appliance must be earthed. The power supply cable plug is provided with a contact for this purpose. If the domestic power supply socket is not earthed, connect the appliance to a separate earth in compliance with current regulations, consulting a qualified electrician.
ENGLISH HISSS! BLUBB! HISSS! BLUBB! BRRR! CRACK! 29 BRRR! CRACK! 12. TECHNICAL DATA Dimensions Rising Time Height × Width × Depth (mm): Further technical information are situated in the rating plate on 876 × 1336 × 665 the external right side of the ap31 hours pliance. 13. ENVIRONMENT CONCERNS Recycle the materials with the symbol . Put the packaging in applicable and electronic appliances. Do not dispose appliances marked with the symbol containers to recycle it.
www.electrolux.com SOMMAIRE 1. 2. 3. 4. 5. 6. 7. 8. 9. 10. 11. 12. INSTRUCTIONS DE SÉCURITÉ . . . . . . . . . . . . . . . . . . . . . . . . . . . . . . . . . . . . . . . . . . . . DESCRIPTION DE L'APPAREIL . . . . . . . . . . . . . . . . . . . . . . . . . . . . . . . . . . . . . . . . . . . . FONCTIONNEMENT . . . . . . . . . . . . . . . . . . . . . . . . . . . . . . . . . . . . . . . . . . . . . . . . . . . . . BANDEAU DE COMMANDE . . . . . . . . . . . . . . . . . . . . . . . . . . . . . . . . . . . .
FRANÇAIS 1. 31 INSTRUCTIONS DE SÉCURITÉ Pour votre sécurité et garantir une utilisation correcte de l'appareil, lisez attentivement cette notice, y compris les conseils et avertissements, avant d'installer et d'utiliser l'appareil pour la première fois. Pour éviter toute erreur ou accident, veillez à ce que toute personne qui utilise l'appareil connaisse bien son fonctionnement et ses fonctions de sécurité. Conservez cette notice avec l'appareil.
www.electrolux.com ATTENTION Respectez la chaîne de froid dès l'acquisition d'un aliment jusqu'à sa consommation pour exclure le risque d'intoxication alimentaire. Veuillez maintenant lire attentivement cette notice pour une utilisation optimale de votre appareil. 1.
FRANÇAIS 1. • • • • Ne branchez pas le cordon d'alimentation à une rallonge. 2. Assurez-vous que la prise n'est pas écrasée ou endommagée par l'arrière de l'appareil. Une prise de courant écrasée ou endommagée peut s'échauffer et causer un incendie. 3. Vérifiez que la prise murale de l'appareil est accessible. 4. Ne débranchez pas l'appareil en tirant sur le câble. 5. Si la prise murale n'est pas bien fixée, n'introduisez pas de prise dedans. Risque d'électrocution ou d'incendie. 6.
www.electrolux.com 1.6 Maintenance • Les branchements électriques nécessaires à l'entretien de l'appareil doivent être réalisés par un électricien ou par une personne qualifiée. • Cet appareil ne doit être entretenu et réparé que par votre service après vente, exclusivement avec des pièces d'origine. 1.7 Protection de l'environnement Le système frigorifique et l'isolation de votre appareil ne contien- nent pas de C.F.C. contribuant ainsi à préserver l'environnement.
FRANÇAIS 35 2.
www.electrolux.com 3. FONCTIONNEMENT 3.1 Mise en marche A B Insérez la fiche dans la prise murale. Placez le thermostat sur la position Charge pleine et attendez 24 heures pour que la température à l'intérieur de l'appareil soit bonne avant d'y placer les aliments. Ajustez le thermostat selon la quantité d'aliments entreposés dans l'appareil. C A Thermostat B Position Demi-charge C Position Charge pleine 3.2 Mise à l'arrêt Pour éteindre, tournez le thermostat sur la position “OFF”. 3.
FRANÇAIS 37 5. PREMIÈRE UTILISATION 5.1 Nettoyage intérieur que du "neuf" puis séchez soigneusement. Avant d'utiliser l'appareil pour la première fois, nettoyez l'intérieur et tous les accessoires internes avec de l'eau tiède savonneuse pour supprimer l'odeur caractéristi- N'utilisez pas de produits abrasifs, poudre à récurer, éponge métallique pour ne pas abîmer la finition. 6. UTILISATION QUOTIDIENNE 6.
www.electrolux.com 6.4 Paniers de rangement A 606 Accrochez les paniers sur le bord supérieur du congélateur (A) ou placez-les à l'intérieur (B). Tournez et bloquez les poignées en fonction de ces deux positions, comme indiqué. B 806 946 1061 230 1201 1336 1611 Les paniers s'emboîtent l'un dans l'autre. Les figures suivantes vous indiquent les différentes possibilités de chargement en fonction du type d'appareil.
FRANÇAIS • éviter d'ouvrir trop souvent le couvercle du congélateur et ne le laisser ouvert que le temps nécessaire. • une fois décongelés, les aliments se détériorent rapidement et ne peuvent pas être recongelés. 39 • respecter la durée de conservation indiquée par le fabricant. 8. ENTRETIEN ET NETTOYAGE ATTENTION débrancher l'appareil avant toute opération d'entretien.
www.electrolux.com N'utilisez en aucun cas de couteau ou tout autre objet tranchant, d'objet métallique pour gratter la couche de givre, vous risquez de détériorer irrémédiablement l'évaporateur. N'utilisez aucun autre dispositif mécanique ou moyen artificiel que ceux qui sont recommandés par le fabricant pour accélérer le dégivrage de votre appareil. Une élévation de la température des denrées congelées, pendant la décongélation, peut réduire leur durée de conservation.
FRANÇAIS Anomalie Cause possible Solution Trop de produits frais ont été introduits dans l'appareil. Attendez quelques heures et vérifiez de nouveau la température. 41 Les aliments introduits Laissez refroidir les aliments dans l'appareil étaient trop à température ambiante chauds. avant de les stocker. La température ambiante du local où est installé l'appareil est trop élevée pour permettre un fonctionnement optimal. Le voyant Alarme haute température est allumé. Il y a trop de givre.
www.electrolux.com Anomalie Cause possible Solution L'ampoule ne fonctionne pas. L'ampoule est défectueuse. Consultez le paragraphe "Remplacement de l'ampoule d'éclairage". La température à l'intérieur du congélateur est trop élevée. La température n'est pas bien réglée. Choisissez une température plus basse. Le couvercle ne ferme pas Vérifiez que le couvercle hermétiquement ou n'est ferme correctement et que pas correctement fermé. le joint est en bon état et propre.
FRANÇAIS Anomalie Cause possible Solution Le dispositif de réglage de température n'est pas sur une position de fonctionnement. Mettez l'appareil en marche. 43 La prise n'est pas alimen- Faites appel à un électricien tée (essayez de brancher qualifié. un autre appareil sur la prise). 9.
www.electrolux.com Classe Température ambiante climatique SN + 10 °C à + 32 °C N + 16 °C à + 32 °C ST + 16 °C à + 38 °C T + 16 °C à + 43 °C 10.2 Branchement électrique Votre appareil ne peut être branché qu'en 230 V monophasé. Vérifiez que le compteur électrique est peut supporter l'intensité absorbée par votre appareil compte tenu des autres appareils déjà branchés. Calibre des fusibles en ligne (un par phase) : 10 A à 230 V.
FRANÇAIS SSSRRR! SSSRRR! HISSS! HISSS! BLUBB! BLUBB! CLICK! BRRR! CRACK! 45 CLICK! BRRR! CRACK! 12. CARACTÉRISTIQUES TECHNIQUES Dimensions Hauteur × Largeur × Profondeur (mm) : 876 × 1336 × 665 Temps de montée en température 31 heures Les caractéristiques techniques détaillées figurent sur la plaque signalétique située sur le côté droit à l'extérieur de l'appareil.
www.electrolux.com 13. EN MATIÈRE DE PROTECTION DE L'ENVIRONNEMENT Recyclez les matériaux portant le symbole . Déposez les emballages dans les électroniques. Ne jetez pas les appareils avec les ordures portant le symbole conteneurs prévus à cet effet. Contribuez à la protection de l'environnement et à votre sécurité, recyclez vos produits électriques et ménagères. Emmenez un tel produit dans votre centre local de recyclage ou contactez vos services municipaux.
ITALIANO 47 INDICE 1. 2. 3. 4. 5. 6. 7. 8. 9. 10. 11. 12. ISTRUZIONI DI SICUREZZA . . . . . . . . . . . . . . . . . . . . . . . . . . . . . . . . . . . . . . . . . . . . . . . DESCRIZIONE DEL PRODOTTO . . . . . . . . . . . . . . . . . . . . . . . . . . . . . . . . . . . . . . . . . . . . USO DELL'APPARECCHIO . . . . . . . . . . . . . . . . . . . . . . . . . . . . . . . . . . . . . . . . . . . . . . . . PANNELLO DEI COMANDI . . . . . . . . . . . . . . . . . . . . . . . . . . . . . . . . . . . . . . . . .
www.electrolux.com 1. ISTRUZIONI DI SICUREZZA Per garantire un impiego corretto e sicuro dell'apparecchio, prima dell'installazione e del primo utilizzo leggere con attenzione il libretto istruzioni, inclusi i suggerimenti e le avvertenze. Per evitare errori e incidenti, è importante garantire che tutte le persone che utilizzano l'apparecchio ne conoscano il funzionamento e le caratteristiche di sicurezza.
ITALIANO AVVERTENZA! Tutti i componenti elettrici (cavo di alimentazione, spina, compressore) devono essere sostituiti da un tecnico certificato o da personale d'assistenza qualificato al fine di evitare di correre rischi. 1. • • • • Non collegare prolunghe al cavo di alimentazione. 2. Evitare che il lato posteriore dell'apparecchiatura possa schiacciare o danneggiare la spina, causandone il surriscaldamento con un conseguente rischio di incendio. 3.
www.electrolux.com • L'apparecchiatura non deve essere collocata vicino a termosifoni o piani di cottura. • Installare l'apparecchiatura in modo che la presa rimanga accessibile. 1.6 Assistenza tecnica • Gli interventi elettrici sull'apparecchiatura devono essere eseguiti esclusivamente da elettricisti qualificati o da personale competente. • Gli interventi di assistenza devono essere eseguiti esclusivamente da tecnici autorizzati e utilizzando solo ricambi originali. 1.
ITALIANO 51 2.
www.electrolux.com 3. USO DELL'APPARECCHIO 3.1 Accensione A B C Inserire la spina nella presa a muro. Ruotare il regolatore di temperatura in posizione Pieno Carico e lasciare l'apparecchiatura in funzione per 24 ore affinché raggiunga la corretta temperatura prima di conservare gli alimenti all'interno. Impostare il regolatore di temperatura in base alla quantità di cibi conservati. A Regolatore di Temperatura B Posizione Mezzo carico C Posizione Pieno Carico 3.
ITALIANO 53 5. PRIMO UTILIZZO dei prodotti nuovi, quindi asciugare accuratamente. 5.1 Pulizia dell'interno Prima di utilizzare l'apparecchio per la prima volta, lavare l'interno e gli accessori interni con acqua tiepida e un po' di sapone neutro in modo a togliere il tipico odore Non usare detergenti corrosivi o polveri abrasive che danneggiano le finiture. 6. UTILIZZO QUOTIDIANO 6.
www.electrolux.com 606 806 946 1061 230 1201 1336 1611 I cestelli possono scorrere l'uno nell'altro. Le figure seguenti mostrano il numero di cestelli che è possibile collocare nei vari modelli del congelatore. È possibile acquistare cestelli aggiuntivi presso il centro di assistenza locale. 7. CONSIGLI E SUGGERIMENTI UTILI 7.
ITALIANO 8.1 Pulizia periodica 1. 2. 3. 4. 5. 6. Spegnere l'apparecchiatura. Estrarre la spina dalla presa di corrente. Lavare periodicamente l'apparecchiatura e gli accessori con acqua tiepida e sapone neutro. Pulire accuratamente la guarnizione del coperchio. Asciugare perfettamente l'apparecchiatura. Inserire la spina nella presa. Accendere l'apparecchiatura. ATTENZIONE Non usare detersivi, prodotti abrasivi, prodotti con forti profumazioni o cere lucidanti per pulire l'interno dell'apparecchiatura.
www.electrolux.com 9. COSA FARE SE… ATTENZIONE Prima della ricerca guasti, estrarre la spina dalla presa. Le operazioni di ricerca guasti non descritte nel presente manuale devono essere eseguite esclusivamente da elettricisti qualificati o da personale competente. Durante l'uso, alcuni rumori di funzionamento (come quelli del compressore o del circuito refrigerante) sono da considerarsi normali. Problema Possibile causa Soluzione L'apparecchiatura è rumorosa.
ITALIANO Problema 57 Possibile causa Soluzione Il coperchio non è perfettamente chiuso. Controllare che il coperchio si chiuda perfettamente e che le guarnizioni siano integre e pulite. La temperatura non è regolata correttamente. Impostare una temperatura superiore. Il tappo dello scarico dell'acqua non è posizionato correttamente. Posizionare il tappo correttamente. Lo strato di brina è troppo spesso. Eliminare la brina in eccesso. Le guarnizioni del coperchio sono sporche.
www.electrolux.com Problema La temperatura all'interno del congelatore è troppo bassa. Possibile causa Soluzione Il coperchio viene aperto frequentemente. Limitare il più possibile l'apertura del coperchio. Il coperchio è rimasto aperto a lungo. Limitare il più possibile il tempo di apertura del coperchio. La temperatura non è regolata correttamente. Impostare una temperatura superiore. L'apparecchiatura La spina non è inserita non funziona. Non si correttamente nella presa.
ITALIANO 59 10. INSTALLAZIONE 10.1 Luogo d'installazione AVVERTENZA! Qualora occorra ritirare dall'uso un'apparecchiatura con serratura, si raccomanda di rendere quest'ultima inservibile per evitare che i bambini possano chiudersi all'interno. La spina dell'apparecchiatura deve essere accessibile dopo l'installazione.
www.electrolux.
ITALIANO 61 12. DATI TECNICI Dimensioni Altezza x Larghezza x Profondità (mm): 876 × 1336 × 665 Tempo di salita Ulteriori dati tecnici sono riportati sulla targhetta del modello applicata sul lato esterno destro dell'apparecchiatura. 31 ore 13. CONSIDERAZIONI AMBIENTALI Riciclare i materiali con il simbolo . Buttare l'imballaggio negli appositi contenitori per il riciclaggio.
www.electrolux.com ÍNDICE DE MATERIAS 1. 2. 3. 4. 5. 6. 7. 8. 9. 10. 11. 12. INSTRUCCIONES DE SEGURIDAD . . . . . . . . . . . . . . . . . . . . . . . . . . . . . . . . . . . . . . . . . . DESCRIPCIÓN DEL PRODUCTO . . . . . . . . . . . . . . . . . . . . . . . . . . . . . . . . . . . . . . . . . . . FUNCIONAMIENTO . . . . . . . . . . . . . . . . . . . . . . . . . . . . . . . . . . . . . . . . . . . . . . . . . . . . . PANEL DE MANDOS . . . . . . . . . . . . . . . . . . . . . . . . . . . . . . . . . . . .
ESPAÑOL 1. 63 INSTRUCCIONES DE SEGURIDAD Por su seguridad y para garantizar el funcionamiento correcto del aparato, antes de instalarlo y utilizarlo por primera vez lea atentamente este manual del usuario, incluidos los consejos y advertencias. Para evitar errores y accidentes, es importante que todas las personas que utilicen el aparato estén perfectamente al tanto de su funcionamiento y de las características de seguridad.
www.electrolux.com cuito, un incendio o una descarga eléctrica. ADVERTENCIA Los componentes eléctricos (cable de alimentación, enchufe, compresor) debe sustituirlos un técnico autorizado o personal de reparaciones profesional a fin de evitar riesgos. 1. • • • • El cable de alimentación no se debe prolongar. 2. Compruebe que la parte posterior del aparato no aplaste ni dañe el enchufe. Un enchufe aplastado o dañado puede recalentarse y provocar un incendio. 3.
ESPAÑOL • Asegúrese de que el enchufe de red sea accesible una vez instalado el aparato. no, ni en el circuito de refrigerante ni en los materiales aislantes. El aparato no se debe desechar junto con los residuos urbanos. La espuma aislante contiene gases inflamables: el aparato se debe desechar de acuerdo con la normativa vigente, que puede solicitar a las autoridades locales. No dañe la unidad de refrigeración, en especial la parte trasera, cerca del intercambiador de calor.
www.electrolux.com 1 Asa de la tapa 4 Desagüe del agua de descongelación 2 Placa de características 5 Válvula: reapertura fácil de la tapa 3 Panel de control y regulador de temperatura 6 Luz 3. FUNCIONAMIENTO 3.1 Encendido A B C A Regulador de temperatura B Posición de media carga C Posición de carga completa 3.2 Apagado Para apagar el aparato, gire el regulador de temperatura a la posición “OFF”. 3.
ESPAÑOL No coloque alimentos en el congelador mientras dure la fase de alarma. 67 Cuando se restablezcan las condiciones normales, la luz de alarma se apagará de manera automática. 5. PRIMER USO 5.1 Limpieza de las partes internas No utilice detergentes ni polvos abrasivos, ya que podrían dañar el acabado Antes del empleo limpiar todas las partes internas con agua tibia y jabón neutro, a fin de eliminar el característico olor de nuevo y secarlas luego cuidadosamente. 6. USO DIARIO 6.
www.electrolux.com 6.4 Cestos de almacenamiento A 606 Cuelgue los cestos del borde superior del congelador (A) o colóquelos dentro del mismo (B). Gire y fije las empuñaduras para cada una de estas dos posiciones según se indica en la figura. B 806 946 1061 230 1201 1336 1611 Los cestos están diseñados para acoplarse entre sí. Las figuras siguientes indican la cantidad de cestos que pueden introducirse en los distintos modelos de congelador.
ESPAÑOL • procurar que los alimentos congelados pasen de la tienda al congelador en el menor tiempo posible; • evitar la apertura frecuente de la tapa o dejarla abierta más tiempo del estrictamente necesario; • una vez descongelados, los alimentos se deterioran con rapidez y no pueden congelarse otra vez; 69 • no supere el tiempo de almacenamiento indicado por el fabricante de los alimentos. 8. MANTENIMIENTO Y LIMPIEZA PRECAUCIÓN Antes de realizar tareas de mantenimiento, desenchufe el aparato.
www.electrolux.com No utilice herramientas metálicas afiladas para retirar la escarcha; podría dañar el aparato. No utilice dispositivos mecánicos ni medios artificiales para acelerar el proceso de derretimiento del hielo, excepto los recomendados por el fabricante. La elevación de la temperatura de los paquetes de alimentos congelados, durante la descongelación, puede acortar la duración de su almacenamiento.
ESPAÑOL Problema Causa posible 71 Solución Se han introducido granEspere varias horas y vueldes cantidades de alimen- va a comprobar la temperatos para congelar al mistura. mo tiempo. Los alimentos introducidos Deje que los alimentos se en el aparato estaban de- enfríen a temperatura ammasiado calientes. biente antes de almacenarlos. La temperatura de la habi- Trate de reducir la temperatación donde está el apa- tura de la habitación donde rato es demasiado alta y esté el aparato.
www.electrolux.com Problema Causa posible Solución La temperatura del congelador es demasiado alta. La temperatura no se ha ajustado correctamente. Seleccione una temperatura más baja. La tapa no cierra correcta- Asegúrese de que la puerta mente o no está bien cecierra correctamente y de rrada. que la junta esté sin daños y limpia. El aparato no se ha enfriado lo suficiente antes de empezar a congelar. Deje que el aparato se enfríe lo suficiente.
ESPAÑOL 9.1 Atención al cliente Si después de las comprobaciones anteriores el aparato no funciona correctamente, póngase en contacto con el centro de servicio técnico más cercano. Para agilizar el servicio, anote el modelo específico y el número de serie del apara- 73 to y facilítelos al personal técnico. Los números se encuentran en el certificado de garantía o en la placa de datos técnicos situada en el costado exterior derecho del aparato. 9.2 Cambio de la bombilla 1.
www.electrolux.com después de consultar a un electricista profesional. El fabricante rechaza toda responsabilidad si no se toman las precauciones antes indicadas. Este aparato es conforme con las directivas de la CEE. 10.3 Requisitos de ventilación 1. Coloque el congelador en posición horizontal sobre una superficie firme. El aparato debe apoyarse correctamente sobre sus cuatro patas. 2. Asegúrese de que queda una separación de 5 cm entre el aparato y la pared trasera. 3.
ESPAÑOL BLUBB! BRRR! HISSS! HISSS! CRACK! BLUBB! 75 BRRR! CRACK! 12. DATOS TÉCNICOS Medidas Alto x Ancho x Fondo (mm): 876 × 1336 × 665 Tiempo de 31 horas estabilización La información técnica se encuentra en la chapa de régimen situada en el lateral exterior derecho del aparato. 13. ASPECTOS MEDIOAMBIENTALES Recicle los materiales con el símbolo Coloque el material de embalaje en los contenedores adecuados para su reciclaje.
804180561-A-202013 www.electrolux.