EN FRONT LOAD DRYER FR SÉCHEUSE Á CHARGEMENT FRONTAL ES SECADORA DE CARGA FRONTAL USE & CARE GUIDE GUIDE D’UTILISATION ET D’ENTRETIEN GUÍA DE USO Y CUIDADO A07020201C February 2017
Finding Information Please read and save this guide Thank you for choosing Electrolux, the premium brand in home appliances. This Use & Care Guide is part of our commitment to customer satisfaction and product quality throughout the life of your new appliance. We view your purchase as the beginning of a relationship. To ensure our ability to continue serving you, please use this page to record important product information.
Safety Important Safety Instructions Recognize safety symbols, words and labels Your safety and the safety of others is very important. We have provided many important safety messages in the Use and Care Guide, Installation Instructions and on your appliance. Always read and obey all safety messages.
Safety 240 v Electric Dryer 10-30R 3-wire (fused 30 amp) 14-30R 4-wire 120 v Gas Dryer Grounding type wall receptacle UL-approved service cord must be installed on electric dryers (not provided with unit except those manufactured for sale in Canada). Do not, under any circumstances, cut, remove, or bypass the grounding prong. (fused 30 amp) Power cord with 3-prong grounded plug Avoid fire hazard or electrical shock.
Safety Important Safety Instructions, continued PROTECT CHILDREN ●●Do not allow children to play on or in the dryer. Close supervision of children is necessary when the dryer is used near children. As children grow, teach them the proper, safe use of all appliances. ●●Destroy the carton, plastic bag and other packing materials after the dryer is unpacked. Children might use them for play. Cartons covered with rugs, bedspreads or plastic sheets can become airtight chambers.
Features Cycle Selector LED Display Control Lock 3 Drum Vanes (2 tumbling) (1 mixing) Wide-Angle Door Hinge Drum Light (on select models) Reversible Door Front-Mounted Moisture Sensor Door Latch Door Strike Exhaust Channel Outlet Adjustable Leveling Legs Lint Filter Optional Heavy Duty Collapsible Drying Rack* Optional Stacking Kit for Mounting on Matching Washer* *Not included with initial purchase. May be purchased as accessory.
Operating Instructions Normal Operating Sounds You may or may not hear the following sounds from your new dryer: A. WATER VALVE (Steam models only.) The flow of water is controlled by electric solenoids. During operation there may be a clicking sound as the valve opens and closes to control the water flow. D. GAS VALVE (Gas models only.) The flow of gas is controlled by electric solenoids. During operation there may be a clicking sound as the valve opens and closes to control the gas flow. B.
Operating Instructions Before Operating Your Dryer Read the important instructions in this section of the Use and Care Guide before operating your dryer. ●●Be sure buckles, buttons and trim are heatproof and won’t damage the drum finish. Close zippers; fasten hooks and Velcro®-like fasteners. Tie strings and sashes to prevent snagging and tangling.
Operating Instructions 4. Select the appropriate cycle and settings for each load. 5. NOTE Over-drying can cause wrinkles, shrinkage, lint, harshness and a build up of static electricity. ●●Press the power button turn to on the unit. ●●Turn the cycle selector ring (on some models) in either direction or repeatedly press the cycles button (on other models) to scroll to the desired cycle. The indicator for that cycle will be illuminated.
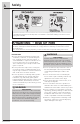
Operating Instructions Cycle Selection 300 Series 1 2 3 4 5 6 7 8 9 400 Series 1 2 3 4 5 6 7 8 9 500 Series 1 2 3 4 5 6 7 8 9 600 Series 1 1 4 7 power temperature options/set 2 5 8 2 3 cycle status display dryness level cancel 4 3 6 9 5 6 7 cycle selector drying time start/pause This manual covers many models and not all cycles, options, or features listed are available on every model. Consoles shown above for reference only. Your model may differ.
Operating Instructions SELECTING THE RIGHT CYCLE TO SAVE ENERGY This dryer has been specifically designed with options to help you save energy and at the same time utilize the optimal drying setting for your clothing. The normal cycle was used to rate the dryer for energy efficiency. The normal cycle defaults to normal temperature setting, normal dryness level and eco mode option (if available) on. Some cycles save more energy than others. Cycles that use the least amount of heat save the most energy.
Operating Instructions Cycle Settings Drying Temperature Dryness Level (Auto Dry) To change the temperature, press the temp button to scroll to the desired setting. The appropriate dryness level will automatically be indicated when an auto dry cycle is selected. To change the preset level, press the dry level button to scroll to the degree of dryness desired. For best results Follow the fabric care label instructions on items to be dried.
Operating Instructions Cycle Options To add an option, press options until the indicator for the desired option flashes, then press set. The indicator will be illuminated when the option has been selected. Follow the same steps to delete an option. To protect your fabrics, not all options are available with every cycle. If an option is not available for a cycle, the indicator will not light.
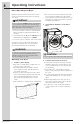
Operating Instructions Other Features Chime (press & hold set button) A signal will sound at the end of the cycle (and periodically during extended tumble or wrinkle release) if this option is activated. Optional Drying Rack (not included) Use the drying rack for items which should not be tumble dried. Extend the collapsed drying rack and insert the rack into the dryer drum. Place the front legs into the front air grill and lower the rear of the rack onto the back of the dryer drum.
Operating Instructions Setting Chart - 300 Series Dryer heavy duty towels normal high normal air dry delicates time dry (30-60) These temperature, dryness levels and options are available with the following cycles: temp dry level high normal damp options wrinkle release eco lock press & hold chime = Available selections. = Factory presets. = Non-modifiable presets.
Operating Instructions Setting Chart - 400 Series Dryer low air dry delicates normal towels normal 20min fast dry high mixed load heavy duty These temperature, dryness levels and options are available with the following cycles: time dry (30-60) 16 temp dry level less damp high normal options perfect steam™ eco wrinkle release delay start lock
Operating Instructions Setting Chart - 500 Series Dryer normal low air dry instant refresh delicates casual towels high 18min fast dry heavy duty sanitize normal time dry (30-75) These temperature, dryness levels and options are available with the following cycles: temp dry level max high normal less damp options perfect steam™ anti-static eco wri
Operating Instructions Setting Chart - 600 Series Dryer instant refresh delicates casual 15min fast dry towels normal heavy duty allergen These temperature, dryness levels and options are available with the following cycles: time dry (30-75) 18 temp sanitize high normal low air dry dry level max high normal less damp options perfect steam™ anti-static
Care & Cleaning WARNING To reduce risk of fire or serious injury to persons or property, comply with the basic warnings listed in the Important Safety Instructions and those listed below. ●● Before cleaning the dryer drum interior, unplug the electrical power cord to avoid electrical shock hazards. ●● Do not use any type spray cleanser when cleaning the dryer interior. Hazardous fumes or electrical shock could occur. WARNING FIRE HAZARD A clothes dryer produces combustible lint.
Care & Cleaning Water Inlet Hose Inspection (Steam Models Only) Periodically inspect all water inlet hoses for water leaks, wear, cuts, corrosion and bulges. Replace all hoses, if any sign of the above is visible. All hoses should be replaced every 5 years to reduce the risk of hose failures. When replacing hoses, refer to the Installation Instructions for proper installation. Do not overtighten or cross thread the fittings. Do not allow the hose to rub against sharp objects.
Solutions to Common Inquiries Common Drying Inquiries Many drying problems involve poor cleaning results, poor soil and stain removal, residues of lint and scum, and fabric damage. For satisfactory drying results, follow these suggestions provided by The Soap and Detergent Association. PROBLEM POSSIBLE CAUSES SOLUTIONS PREVENTIVE MEASURES Greasy, oily stains • Fabric softener sheet. • Rub fabric softener stains with bar soap. Rinse and rewash.
Solutions to Common Inquiries Service Prevention Checklist Before calling for service, review this list. It may save both time and expense. The list includes common occurrences that are not the result of defective workmanship or materials in this dryer. OCCURRENCE POSSIBLE CAUSE SOLUTION Dryer does not start. Electrical power cord is not securely plugged in or plug may be loose. Make sure the plug fits tightly in wall outlet. House fuse blown or circuit breaker tripped.
Solutions to Common Inquiries Service Prevention Checklist, continued Drying cycle takes too long, outside of the dryer feels too hot or smells hot. Lint filter is clogged with lint. Make sure all lint has been removed from the dryer lint filter before starting each cycle. Exhaust duct requirements have not been met. Exhaust duct must be at least 4 inches in diameter and made of rigid or semi-rigid metal.
Warranty Information For the applicable warranty period as set forth below, as measured from your original date of purchase, Electrolux will repair or replace any parts of this appliance that prove to be defective in materials or workmanship when such appliance is installed, used and maintained in accordance with the provided instructions. Warranty Periods: ●● All parts — One year including labor. In addition, your appliance is covered by a one year, parts only, limited warranty.