EHF6547FOK NL EN FR Kookplaat Hob Table de cuisson Gebruiksaanwijzing User Manual Notice d'utilisation 2 19 35
www.electrolux.com INHOUDSOPGAVE 1. VEILIGHEIDSINFORMATIE............................................................................... 2 2. VEILIGHEIDSVOORSCHRIFTEN...................................................................... 5 3. MONTAGE .........................................................................................................7 4. BESCHRIJVING VAN HET PRODUCT..............................................................8 5. DAGELIJKS GEBRUIK....................................
NEDERLANDS 3 Bewaar de instructies altijd op een veilige en toegankelijke plaats voor toekomstig gebruik. 1.
www.electrolux.com • • • • • • • • • WAARSCHUWING: Zonder toezicht koken op een kookplaat met vet of olie kan gevaarlijk zijn en brandgevaar opleveren. Probeer brand NOOIT met water te blussen, maar schakel in plaats daarvan het apparaat uit en bedek de vlam bijv. met een deksel of blusdeken. LET OP: Er dient toezicht te worden gehouden op het bereidingsproces. Een kort bereidingsproces moet onder constant toezicht staan. WAARSCHUWING: Brandgevaar: Bewaar geen voorwerpen op de kookplaten.
NEDERLANDS 5 2. VEILIGHEIDSVOORSCHRIFTEN 2.1 Installatie WAARSCHUWING! Alleen een erkende installatietechnicus mag het apparaat installeren. WAARSCHUWING! Gevaar voor letsel of schade aan het apparaat. • • • • • • • • • • • Verwijder alle verpakkingsmaterialen. Installeer en gebruik geen beschadigd apparaat. Volg de installatie-instructies op die zijn meegeleverd met het apparaat. Houd de minimumafstand naar andere apparaten en units in acht.
www.electrolux.com • • • • • Steek de stekker pas in het stopcontact als de installatie is voltooid. Zorg ervoor dat het netsnoer na installatie bereikbaar is. Sluit de stroomstekker niet aan op een losse stroomaansluiting. Trek niet aan het netsnoer om het apparaat los te koppelen. Trek altijd aan de stekker. Gebruik alleen de juiste isolatieapparaten: stroomonderbrekers, zekeringen (schroefzekeringen moeten uit de houder worden verwijderd), aardlekschakelaars en contactgevers.
NEDERLANDS • • • • Schakel het apparaat uit en laat het afkoelen voordat u het schoonmaakt. Trek voor onderhoudswerkzaamheden de stekker uit het stopcontact. Gebruik geen waterstralen of stoom om het apparaat te reinigen. Reinig het apparaat met een vochtige zachte doek. Gebruik alleen neutrale reinigingsmiddelen. Gebruik geen schuurmiddelen, schuursponsjes, oplosmiddelen of metalen voorwerpen. 2.5 Servicedienst • Neem contact op met een erkende servicedienst voor reparatie van het apparaat.
www.electrolux.com 3.5 Beveiligingsdoos min. 28 min. 12 min. 12 mm min. 60 mm Als u een beveiligingsdoos (een additioneel toebehoren) gebruikt, is de beschermingsvloer onder het fornuis niet noodzakelijk. De beveiligingsdoos is als toebehoren niet in elk land verkrijgbaar. Neem contact op met uw plaatselijke leverancier. U kunt de beveiligingsdoos niet gebruiken als u de kookplaat boven een oven installeert. 4. BESCHRIJVING VAN HET PRODUCT 4.
NEDERLANDS 9 4.2 Indeling bedieningspaneel 1 2 3 4 5 12 6 7 11 10 8 9 Gebruik de tiptoetsen om het apparaat te bedienen. De displays, indicatielampjes en geluiden tonen welke functies worden gebruikt. Tip‐ toets Functie Opmerking 1 AAN/UIT De kookplaat in- en uitschakelen. 2 Blokkering / Kinderbevei‐ Het bedieningspaneel vergrendelen/ liging van de oven ontgrendelen. 3 Pauze De functie in- en uitschakelen. - Het in- en uitschakelen van de buitenste ring.
www.electrolux.com Display Beschrijving Pauze werkt. Automatisch opwarmen werkt. + cijfer Er is een storing. / OptiHeat Control (3-staps restwarmte-indicatie): doorgaan met koken / warmhoudstand / restwarmte. / Blokkering /Kinderbeveiliging van de oven werkt. Automatisch uitschakelen werkt. 4.4 OptiHeat Control (3-staps restwarmte-indicatie) WAARSCHUWING! / / Er bestaat verbrandingsgevaar door restwarmte.
NEDERLANDS Kookstand ,1-3 De kookplaat wordt uitgescha‐ keld na 6 uur 4-7 5 uur 8-9 4 uur 10 - 14 1,5 uur 5.3 De kookstand Voor het instellen of wijzigen van de kookstand: Raak de bedieningsstrip aan bij de juiste kookstand of beweeg uw vinger langs de bedieningsstrip totdat u de jusite kookstand heeft bereikt. 11 Als u de zone inschakelt maar niet de buitenste ring inschakelt, dan kan het licht van de zone de buitenste ring bedekken. Dit betekent niet dat de buitenste ring is ingeschakeld.
www.electrolux.com Op het display wordt de resterende tijd weergegeven. De functie inschakelen: Raak Om het juiste tijdstip van de dag te wijzigen: selecteer de kookzone met Raak of . aan. en raak aan. De kookzone in met resterende tijd telt af naar 00. Het indicatielampje van de kookzone gaat uit. Als de tijd verstreken is, klinkt er een geluidssignaal en knippert 00. De kookzone wordt uitgeschakeld. Het geluidssignaal stopzetten: Raak aan.
NEDERLANDS Om de functie in te schakelen: schakel de kookplaat in met . Stel geen kookstand in. Raak 4 seconden aan. gaat aan. Schakel de kookplaat uit met . Om de functie uit te schakelen: schakel de kookplaat in met geen kookstand in. Raak aan. uit met . Stel 4 seconden gaat aan. Schakel de kookplaat . De functie gedurende één kooksessie onderdrukken: zet de kookplaat aan met . gaat aan. Raak 4 seconden aan. Stel de kookstand in binnen 10 seconden. U kunt de kookplaat bedienen.
www.electrolux.com Verwar‐ mingsstand Gebruik om: Tijd (min) Tips Bereide gerechten warmhou‐ zoals den. nodig Een deksel op het kookgerei doen. 1-3 Hollandaisesaus, smelten: boter, chocolade, gelatine. 5 - 25 Van tijd tot tijd mengen. 1-3 Stollen: luchtige omeletten, gebakken eieren. 10 - 40 Met deksel bereiden. 3-5 Zachtjes aan de kook bren‐ 25 - 50 gen van rijst en gerechten op melkbasis, reeds bereide ge‐ rechten opwarmen.
NEDERLANDS • de speciale schraper op de glazen plaat en verwijder resten door het blad over het oppervlak te schuiven. Verwijder nadat de kookplaat voldoende is afgekoeld: kalk- en waterkringen, vetspatten en metaalachtig glanzende verkleuringen. Reinig de kookplaat met een vochtige doek en een beetje • 15 niet-schurend reinigingsmiddel. Droog de kookplaat na reiniging af met een zachte doek.
www.electrolux.com Storing Mogelijke oorzaak oplossing De kookplaat schakelt uit. U hebt iets op de tiptoets Verwijder het object van de tiptoets. geplaatst. De restwarmte-indicator gaat niet aan. De zone is niet heet, om‐ dat hij slechts kortstondig is bediend of de sensor be‐ schadigd is. Als de kookzone lang ge‐ noeg in werking is geweest om heet te zijn, neemt u contact op met de klanten‐ service. Automatisch opwarmen werkt niet. De zone is heet. Laat de zone voldoende afkoelen.
NEDERLANDS 17 Storing Mogelijke oorzaak oplossing U kunt een constant piep‐ geluid horen. De elektrische aansluiting is onjuist. Trek de stekker van de kookplaat uit het stopcon‐ tact. Laat de installatie controleren door een er‐ kende elektricien. De tweede fase van de stroomtoevoer ontbreekt. Controleer of de kookplaat goed is aangesloten op het lichtnet. Verwijder de zeke‐ ring, wacht een minuut, en plaats de zekering weer te‐ rug. gaat branden. 8.2 Als u het probleem niet kunt oplossen...
www.electrolux.com 10. ENERGIEZUINIGHEID 10.
ENGLISH 19 CONTENTS 1. SAFETY INFORMATION..................................................................................19 2. SAFETY INSTRUCTIONS................................................................................21 3. INSTALLATION................................................................................................ 23 4. PRODUCT DESCRIPTION.............................................................................. 25 5. DAILY USE................................................
www.electrolux.com instructions in a safe and accessible location for future reference. 1.1 Children and vulnerable people safety • • • • • • • • This appliance can be used by children aged from 8 years and above and persons with reduced physical, sensory or mental capabilities or lack of experience and knowledge if they have been given supervision or instruction concerning the use of the appliance in a safe way and understand the hazards involved.
ENGLISH • • • • • • • 21 CAUTION: The cooking process has to be supervised. A short term cooking process has to be supervised continuously. WARNING: Danger of fire: Do not store items on the cooking surfaces. Metallic objects such as knives, forks, spoons and lids should not be placed on the hob surface since they can get hot. Do not use a steam cleaner to clean the appliance. If the glass ceramic surface / glass surface is cracked, switch off the appliance and unplug it from the mains.
www.electrolux.com • • The bottom of the appliance can get hot. Make sure to install a separation panel made from plywood, kitchen carcass material or other nonflammable materials under the appliance to prevent access to the bottom. The separation panel has to cover the area under the hob completely. 2.2 Electrical Connection WARNING! Risk of fire and electric shock. • • • • • • • • • • • • • All electrical connections should be made by a qualified electrician. The appliance must be earthed.
ENGLISH WARNING! Risk of fire and explosion • • • • Fats and oil when heated can release flammable vapours. Keep flames or heated objects away from fats and oils when you cook with them. The vapours that very hot oil releases can cause spontaneous combustion. Used oil, that can contain food remnants, can cause fire at a lower temperature than oil used for the first time. Do not put flammable products or items that are wet with flammable products in, near or on the appliance.
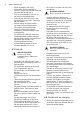
www.electrolux.com 3.3 Connection cable • • The hob is supplied with a connection cable. To replace the damaged mains cable, use the cable type: H05V2V2-F which withstands a temperature of 90°C or higher. Speak to your local Service Centre. min. 12 mm min. 60 mm 3.4 Assembly 3.5 Protection box min. 500mm min. 50mm If you use a protection box (an additional accessory), the protective floor directly below the hob is not necessary. The protection box accessory may not be available in some countries.
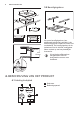
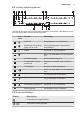
ENGLISH 25 4. PRODUCT DESCRIPTION 4.1 Cooking surface layout 1 1 Cooking zone 2 Control panel 1 265 mm 145 mm 170 mm 120/175/210 mm 1 145 mm 1 2 4.2 Control panel layout 1 2 3 4 5 12 6 7 11 10 8 9 Use the sensor fields to operate the appliance. The displays, indicators and sounds tell which functions operate. Sen‐ sor field Function Comment 1 ON / OFF To activate and deactivate the hob. 2 Lock / Child Safety De‐ vice To lock / unlock the control panel.
www.electrolux.com Sen‐ sor field Function Comment 8 - To activate and deactivate the outer ring. 9 - To select the cooking zone. - To increase or decrease the time. Automatic Heat Up To activate and deactivate the function. Control bar To set a heat setting. / 10 11 12 - 4.3 Heat setting displays Display Description The cooking zone is deactivated. The cooking zone operates. - Pause operates. Automatic Heat Up operates. + digit There is a malfunction.
ENGLISH 27 5. DAILY USE WARNING! Refer to Safety chapters. 5.1 Activating and deactivating Touch for 1 second to activate or deactivate the hob. 5.2 Automatic Switch Off 5.4 Activating and deactivating the outer rings The function deactivates the hob automatically if: You can adjust the surface you cook to the dimension of the cookware.
www.electrolux.com 5.6 Timer Count Down Timer You can use this function to set how long the cooking zone should operate for a single cooking session. The indicator of the cooking zone starts to flash quickly. The display shows how long the zone operates. To deactivate the function: set the cooking zone with and touch or First set the heat setting for the cooking zone then set the function. . The indicator of the cooking zone goes out.
ENGLISH 29 You can operate the hob. When you To deactivate the function: touch . The previous heat setting comes on. deactivate the hob with operates again. When you deactivate the hob, you also deactivate this function. the function 5.9 Child Safety Device 5.10 OffSound Control (Deactivating and activating the sounds) This function prevents an accidental operation of the hob. Deactivate the hob. Touch for 3 seconds. The display comes on and To activate the function: activate the goes out.
www.electrolux.com Heat setting -1 Use to: Time (min) Hints Keep cooked food warm. as nec‐ Put a lid on the cookware. essary 1-3 Hollandaise sauce, melt: but‐ 5 - 25 ter, chocolate, gelatine. Mix from time to time. 1-3 Solidify: fluffy omelettes, baked eggs. 10 - 40 Cook with a lid on. 3-5 Simmer rice and milkbased dishes, heat up readycooked meals. 25 - 50 Add at least twice as much liquid as rice, mix milk dishes halfway through the procedure. 5-7 Steam vegetables, fish, meat.
ENGLISH 31 8. TROUBLESHOOTING WARNING! Refer to Safety chapters. 8.1 What to do if... Problem Possible cause Remedy You cannot activate or op‐ erate the hob. The hob is not connected to an electrical supply or it is connected incorrectly. Check if the hob is correct‐ ly connected to the electri‐ cal supply. Refer to the connection diagram. The fuse is blown. Make sure that the fuse is the cause of the malfunc‐ tion. If the fuse is blown again and again, contact a qualified electrician.
www.electrolux.com Problem Possible cause You cannot activate the outer ring. There is a dark area on the multiple zone. The sensor fields become hot. First, activate the inner ring by changing the heat set‐ ting. It is normal that there is a dark area on the multiple zone. The cookware is too large Put large cookware on the or you put it too near to the rear zones if possible. controls. There is no sound when The sounds are deactiva‐ you touch the panel sensor ted. fields. comes on.
ENGLISH 33 9. TECHNICAL DATA 9.1 Rating plate Model EHF6547FOK Typ 60 HAD 56 AO PNC 949 596 005 03 220 - 240 V 50 - 60 Hz Made in Germany 7.1 kW Ser.Nr. ................. ELECTROLUX 9.
www.electrolux.com EN 60350-2 - Household electric cooking appliances - Part 2: Hobs - Methods for measuring performance • 10.2 Energy saving • You can save energy during everyday cooking if you follow below hints. • • • • When you heat up water, use only the amount you need. If it is possible, always put the lids on the cookware. • Before you activate the cooking zone put the cookware on it. The cookware bottom should have the same diameter as the cooking zone.
FRANÇAIS 35 TABLE DES MATIÈRES 1. INFORMATIONS DE SÉCURITÉ..................................................................... 35 2. CONSIGNES DE SÉCURITÉ........................................................................... 38 3. INSTALLATION................................................................................................ 40 4. DESCRIPTION DE L'APPAREIL...................................................................... 41 5. UTILISATION QUOTIDIENNE.................................
www.electrolux.com utilisation. Conservez toujours les instructions dans un lieu sûr et accessible pour vous y référer ultérieurement. 1.
FRANÇAIS • • • • • • • • • • 37 Ne faites pas fonctionner l'appareil avec un minuteur externe ou un système de commande à distance. AVERTISSEMENT : Il peut être dangereux de laisser chauffer de la graisse ou de l'huile sans surveillance sur une table de cuisson car cela pourrait provoquer un incendie. N'essayez JAMAIS d'éteindre un feu avec de l'eau. Éteignez l'appareil puis couvrez les flammes, par exemple avec un couvercle ou une couverture ignifuge. ATTENTION : Toute cuisson doit être surveillée.
www.electrolux.com 2. CONSIGNES DE SÉCURITÉ 2.1 Installation AVERTISSEMENT! L'appareil doit être installé uniquement par un professionnel qualifié. AVERTISSEMENT! Risque de blessure corporelle ou de dommages matériels. • • • • • • • • • • • Retirez l'intégralité de l'emballage. N'installez pas et ne branchez pas un appareil endommagé. Suivez scrupuleusement les instructions d'installation fournies avec l'appareil. Respectez l'espacement minimal requis par rapport aux autres appareils et éléments.
FRANÇAIS • • • • Si la prise de courant est lâche, ne branchez pas la fiche d'alimentation secteur. Ne tirez jamais sur le câble d'alimentation pour débrancher l'appareil. Tirez toujours sur la fiche. N'utilisez que des systèmes d'isolation appropriés : des coupecircuits, des fusibles (les fusibles à visser doivent être retirés du support), un disjoncteur différentiel et des contacteurs. L'installation électrique doit être équipée d'un dispositif d'isolement à coupure omnipolaire.
www.electrolux.com que celui pour lequel il a été conçu, à des fins de chauffage par exemple. 2.4 Entretien et nettoyage • • • • • Nettoyez régulièrement l'appareil afin de maintenir le revêtement en bon état. Éteignez l'appareil et laissez-le refroidir avant de le nettoyer. Débranchez l’appareil de l'alimentation électrique avant toute opération de maintenance. Ne pulvérisez pas d'eau ni de vapeur pour nettoyer l'appareil. Nettoyez l'appareil avec un chiffon doux humide.
FRANÇAIS 41 3.5 Enceinte de protection min. 28 min. 12 min. 12 mm Si vous utilisez une enceinte de protection (accessoire supplémentaire), le fond de protection installé directement sous la table de cuisson n'est plus nécessaire. L'enceinte de protection n'est pas disponible dans tous les pays. Veuillez contacter votre revendeur local. min. 60 mm Vous ne pouvez pas utiliser l'enceinte de protection si vous installez la table de cuisson au-dessus d'un four. 4. DESCRIPTION DE L'APPAREIL 4.
www.electrolux.com 4.2 Description du bandeau de commande 1 2 3 4 5 12 6 7 11 10 8 9 Les touches sensitives permettent de faire fonctionner l'appareil. Les affichages, les voyants et les signaux sonores indiquent les fonctions activées. Tou‐ Fonction che sensi‐ tive MARCHE/ARRÊT 1 Commentaire Pour allumer et éteindre la table de cuis‐ son. 2 Verrou. / Dispositif de sé‐ Pour verrouiller ou déverrouiller le ban‐ curité enfants deau de commande.
FRANÇAIS 43 4.3 Indicateurs de niveau de cuisson Écran d'afficha‐ ge Description La zone de cuisson est désactivée. La zone de cuisson est activée. - Pause est activée. Démarrage automatique de la cuisson est activée. + chiffre Une anomalie de fonctionnement s'est produite. / OptiHeat Control (Voyant de chaleur résiduelle à 3 niveaux) : continuer la cuisson / maintien au chaud / chaleur résiduelle. / Verrou. /Dispositif de sécurité enfants est activée. Arrêt automatique est activée. 4.
www.electrolux.com • vous ne désactivez pas la zone de cuisson ou ne modifiez pas le niveau de cuisson. Au bout de quelques instants, s'allume et la table de cuisson s'éteint. La relation entre le niveau de cuisson et la durée après laquelle la table de cuisson s'éteint : Niveau de cuis‐ son ,1-3 La table de cuis‐ son s'éteint au bout de 6 heures 4-7 5 heures 8-9 4 heures 10 - 14 1,5 heure 5.
FRANÇAIS durée (de 00 à 99 minutes). Lorsque le voyant de la zone de cuisson commence à clignoter lentement, le décompte commence. Pour voir le temps restant : sélectionnez la zone de cuisson à l'aide de . Le voyant de la zone de cuisson clignote rapidement. L'affichage indique la durée restante. Pour modifier la durée : sélectionnez la zone de cuisson à l'aide de sur ou . Appuyez . sélectionnez la zone de cuisson avec et appuyez sur . Le temps restant est décompté jusqu'à 00.
www.electrolux.com Pour activer la fonction : appuyez sur . s'affiche pendant 4 secondes.Le minuteur reste activé. Pour désactiver la fonction : appuyez sur . Le niveau de cuisson précédent s'allume. Lorsque vous éteignez la table de cuisson, cette fonction est également désactivée. cuisson en appuyant sur . s'allume. Appuyez sur pendant 4 secondes. Réglez le niveau de cuisson dans les 10 secondes qui suivent. Vous pouvez utiliser la table de cuisson.
FRANÇAIS fonctionnement dépend du niveau et de la durée de cuisson. Niveau de cuisson -1 47 6.3 Exemples de cuisson Les données du tableau sont fournies à titre indicatif uniquement. Utilisation : Durée (min) Conseils Conservez les aliments cuits au chaud. au be‐ soin Placez un couvercle sur le récipient. 1-3 Sauce hollandaise, faire fon‐ 5 - 25 dre : beurre, chocolat, gélati‐ ne. Mélangez de temps en temps. 1-3 Solidifier : omelettes, œufs cocotte. 10 - 40 Couvrez pendant la cuisson.
www.electrolux.com • • • Les rayures ou les taches sombres sur la surface n'ont aucune incidence sur le fonctionnement de la table de cuisson. Utilisez un nettoyant spécialement adapté à la surface de la table de cuisson. Utilisez un racloir spécial pour la vitre. • 7.2 Nettoyage de la table de cuisson • Enlevez immédiatement : le plastique fondu, les feuilles de plastique, le sucre et les aliments contenant du sucre car la saleté peut endommager la table de cuisson. Veillez à ne pas vous brûler.
FRANÇAIS Problème Cause probable 49 Solution Il y a de l'eau ou des ta‐ Nettoyez le bandeau de ches de graisse sur le ban‐ commande. deau de commande. Un signal sonore retentit et Vous avez posé quelque Retirez l'objet des touches la table de cuisson s'éteint. chose sur une ou plusieurs sensitives. Un signal sonore retentit touches sensitives. lorsque la table de cuisson est éteinte. La table de cuisson s'éteint.
www.electrolux.com Problème et un chiffre s'affichent. Cause probable Solution Une erreur s'est produite dans la table de cuisson. Éteignez la table de cuis‐ son et rallumez-la au bout de 30 secondes. Si s'af‐ fiche à nouveau, débran‐ chez la table de cuisson de la prise électrique. Au bout de 30 secondes, rebran‐ chez la table de cuisson. Si le problème persiste, contactez le service aprèsvente agréé. Un bip constant se déclen‐ Le branchement électrique Débranchez l'appareil de che.
FRANÇAIS 51 9.2 Caractéristiques des zones de cuisson Zone de cuis‐ son Puissance nominale (niveau de cuisson max.) [W] Diamètre de la zone de cuis‐ son [mm] Avant gauche 800 / 1600 / 2300 120 / 175 / 210 Arrière gauche 1200 145 Avant droite 1200 145 Arrière droite 1500 / 2400 170 / 265 Pour des résultats de cuisson optimaux, utilisez des récipients qui ne dépassent pas le diamètre de la zone de cuisson. 10. RENDEMENT ÉNERGÉTIQUE 10.
www.electrolux.com • • • Si possible, couvrez toujours les récipients de cuisson avec un couvercle pendant la cuisson. Activez toujours la zone de cuisson après avoir posé le récipient dessus. Le fond du récipient doit avoir le même diamètre que la zone de cuisson. • • • Placez les plus petits récipients sur les plus petites zones de cuisson. Posez directement le récipient au centre de la zone de cuisson.
FRANÇAIS 53
www.electrolux.
FRANÇAIS 55
867349359-A-292018 www.electrolux.