EHL7640FOK ................................................ NL KOOKPLAAT EN HOB FR TABLE DE CUISSON DE KOCHFELD .............................................
www.electrolux.com INHOUD 1. 2. 3. 4. 5. 6. 7. 8. 9. VEILIGHEIDSINFORMATIE . . . . . . . . . . . . . . . . . . . . . . . . . . . . . . . . . . . . . . . . . . . . . . . . . 3 VEILIGHEIDSVOORSCHRIFTEN . . . . . . . . . . . . . . . . . . . . . . . . . . . . . . . . . . . . . . . . . . . . . 4 BESCHRIJVING VAN HET PRODUCT . . . . . . . . . . . . . . . . . . . . . . . . . . . . . . . . . . . . . . . . . 6 DAGELIJKS GEBRUIK . . . . . . . . . . . . . . . . . . . . . . . . . . . . . . . . . . . . . . . . . .
NEDERLANDS 3 1. VEILIGHEIDSINFORMATIE Lees zorgvuldig de meegeleverde instructies voor installatie en gebruik van het apparaat. De fabrikant is niet verantwoordelijk voor letsel en schade veroorzaakt door een foutieve installatie. Bewaar de instructies van het apparaat voor toekomstig gebruik. 1.1 Veiligheid van kinderen en kwetsbare mensen WAARSCHUWING! Gevaar voor verstikking, letsel of permanente invaliditeit.
www.electrolux.com • Zonder toezicht koken op een kookplaat met vet of olie kan gevaarlijk zijn en brandgevaar opleveren. • Probeer brand nooit met water te blussen, maar schakel in plaats daarvan het apparaat uit en bedek de vlam, d.w.z. met een deksel of blusdeken. • Bewaar geen voorwerpen op de kookplaten. • Gebruik geen stoomreiniger om het apparaat schoon te maken.
NEDERLANDS Aansluiting aan het elektriciteitsnet WAARSCHUWING! Gevaar voor brand en elektrische schokken. • Alle elektrische aansluitingen moeten door een gediplomeerd elektromonteur worden gemaakt. • Dit apparaat moet worden aangesloten op een geaard stopcontact. • Verzeker u ervan dat de stekker uit het stopcontact is getrokken, voordat u welke werkzaamheden dan ook uitvoert. • Gebruik de juiste stroomkabel. • Voorkom dat de stroomkabels verstrikt raken.
www.electrolux.com • Laat geen voorwerpen of kookgerei op het apparaat vallen. Het oppervlak kan beschadigen. • Activeer de kookzones niet met leeg kookgerei of zonder kookgerei erop. • Geen aluminiumfolie op het apparaat leggen. • Pannen van gietijzer, aluminium of met beschadigde bodems kunnen krassen veroorzaken in het glaskeramiek. Til deze voorwerpen altijd op als u ze moet verplaatsen op de kookplaat. 2.3 Onderhoud en reiniging WAARSCHUWING! Risico op schade aan het apparaat.
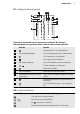
NEDERLANDS 3.1 Indeling bedieningspaneel 9 10 11 8 7 1 6 2 3 5 4 Gebruik de tiptoetsen om het apparaat te bedienen. De displays, indicatielampjes en geluiden tonen welke functies worden gebruikt. tiptoets functie Het apparaat in- en uitschakelen. 1 Een kookstanddisplay 2 Voor het weergeven van de kookstand. 3 De Powerfunctie inschakelen. 4 De brugfunctie inschakelen. Een bedieningsstrip 5 Voor het instellen van een kookstand. De tijd verlengen of verkorten. / 6 Kookzone instellen.
www.electrolux.com Display Beschrijving De Powerfunctie is in werking. + cijfer Er is een storing. / OptiHeat Control (3 staps restwarmte-indicatie): door gaan met koken / warmhouden / restwarmte. / Slot/kinderbeveiliging is in werking. Het kookgerei is niet geschikt of te klein, of er is geen kookgerei op de kookzone geplaatst. De functie Automatische uitschakelen is in werking getreden. 3.
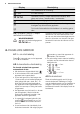
NEDERLANDS 9 12 11 10 9 8 7 6 5 4 3 2 1 0 4.4 Brugfunctie De brugfunctie verbindt twee kookzones en ze werken samen als één kookzone. Stel eerst de warmteinstelling in voor één kookzone. / aan om de brugfunctie te Raak activeren voor de kookzones links/rechts. Raak een van de besturingsensoren links/ rechts aan om de kookstand in te stellen of te wijzigen. Om de brugfunctie uit te schakelen, raakt / aan. De kookzones werken onu afhankelijk van elkaar. 4.
www.electrolux.com 4.8 Timer Timer met aftelfunctie Gebruik de timer met aftelfunctie om in te stellen hoe lang de kookzone op dat moment moet werken. Stel de timer met aftelfunctie in nadat de kookzone is geselecteerd. U kunt de kookstand voor of na het instellen van de timer selecteren. • Kookzone instellen:raak meerdere malen aan tot het lampje van de gewenste kookzone brandt. • De timer met aftelfunctie activeren: raak van de timer aan om de tijd in te stellen ( 00 - 99 minuten).
NEDERLANDS Raak om deze functie te stoppen aan. De kookstand die u eerder hebt ingesteld, wordt weergegeven. Als u het apparaat stopt, stopt deze functie ook. 4.11 De kinderbeveiliging Deze functie voorkomt dat het apparaat onbedoeld wordt gebruikt. De kinderbeveiliging inschakelen • Schakel het apparaat in met . Stel geen kookstand in. • Raak 4 seconden aan. Het symbool gaat branden. • Schakel het apparaat uit met . De kinderbeveiliging uitschakelen • Schakel het apparaat in met . Stel geen kookstand in.
www.electrolux.com Plaats de pannen op het kruis dat op het oppervlak staat waarop u kookt. Dek het kruis volledig af. Het magnetische gedeelte van de bodem van de pan dient minimaal 125 mm te zijn. Inductiekookzones passen zich tot op zekere hoogte automatisch aan de afmeting van het kookgerei aan. U kunt met grote pannen op twee kookzones tegelijkertijd koken. 5.3 Lawaai tijdens gebruik Als u dit hoort: • krakend geluid: de pan is gemaakt van verschillende materialen (sandwichconstructie).
NEDERLANDS Te Te gebruiken voor: mp era tuu rinste llin g Tijd 13 Tips Nominaal stroomverbruik 13 Hollandaise saus, boter 5 - 25 min smelten, chocolade, gelatine Meng het geheel van tijd tot tijd.
www.electrolux.com temperaturen gaar te laten worden en de gerechten niet te veel te bruinen. 6. ONDERHOUD EN REINIGING Reinig het apparaat telkens na gebruik Gebruik altijd kookgerei met een schone bodem. Krassen of donkere vlekken in de glaskeramiek hebben geen invloed op de werking van het apparaat. Vuil verwijderen: – Verwijder direct:gesmolten plastic, gesmolten folie en suikerhoudende gerechten. Anders kan het vuil het apparaat beschadigen. Gebruik een speciale schraper voor de glazen plaat.
NEDERLANDS Probleem Mogelijke 15 Oplossing De restwarmte-indicatie gaat niet aan. De kookzone is niet heet, omdat hij slechts kortstondig is gebruikt. Als het lang duurt alvorens de kookzone voldoende heet is, neem dan contact op met de klantenservice. De automatische opwarmfunctie start niet. Kookzone is heet. Laat de kookzone voldoende afkoelen. De hoogste kookstand is ingesteld. De hoogste kookstand heeft hetzelfde vermogen als de automatische opwarmfunctie.
www.electrolux.com Probleem gaat branden. Mogelijke Oplossing Er is een storing opgetreden in het apparaat, omdat er kookgerei is drooggekookt. De oververhittingsbeveiliging voor de kookzones en de Automatische uitschakeling zijn actief. Schakel het apparaat uit. Verwijder het hete kookgerei. Schakel na ongeveer 30 seconden de kookzone opnieuw in. Als het kookgerei het probleem was, dan moet het foutbericht van het display verdwijnen, maar de restwarmte-indicatie kan aanblijven.
NEDERLANDS 8.3 Assemblage min. 500mm min. 50mm min. 2mm B A min. 2 mm < 20 mm B A min. 2 mm > 20 mm min. 500 mm B A 12 mm 57 mm 28 mm 41 mm 38 mm 31 mm min 30 mm min. 500 mm B A 12 mm 57 mm 28 mm 41 mm 38 mm 31 mm min. 12 mm min. 2 mm R 5mm 55mm +1 490+1mm 680 mm min. 38 mm min.
www.electrolux.com Als u een beveiligingsdoos gebruikt (extra toebehoren1)), dan is de voorste ventilatieruimte van 2 mm en de beschermmat onder het apparaat niet nodig. U kunt de beschermdoos niet gebruiken als u het apparaat boven een oven installeert. 1) De beveiligingsdoos is als toebehoren niet in elk land verkrijgbaar. Neem contact op met uw plaatselijke leverancier. 9. TECHNISCHE INFORMATIE Modell EHL7640FOK Prod.Nr. 949 596 020 01 Typ 58 GDD D4 AU 220 - 240 V 50 - 60 Hz Induction 7.
ENGLISH 19 CONTENTS 1. 2. 3. 4. 5. 6. 7. 8. 9. SAFETY INFORMATION . . . . . . . . . . . . . . . . . . . . . . . . . . . . . . . . . . . . . . . . . . . . . . . . . . SAFETY INSTRUCTIONS . . . . . . . . . . . . . . . . . . . . . . . . . . . . . . . . . . . . . . . . . . . . . . . . . PRODUCT DESCRIPTION . . . . . . . . . . . . . . . . . . . . . . . . . . . . . . . . . . . . . . . . . . . . . . . . DAILY USE . . . . . . . . . . . . . . . . . . . . . . . . . . . . . . . . . . . . . . . . . . . . . . . . . .
www.electrolux.com 1. SAFETY INFORMATION Before the installation and use of the appliance, carefully read the supplied instructions. The manufacturer is not responsible if an incorrect installation and use causes injuries and damages. Always keep the instructions with the appliance for future reference. 1.1 Children and vulnerable people safety WARNING! Risk of suffocation, injury or permanent disability.
ENGLISH 21 • Never try to extinguish a fire with water, but switch off the appliance and then cover flame e.g. with a lid or a fire blanket. • Do not store items on the cooking surfaces. • Do not use a steam cleaner to clean the appliance. • Metallic objects such as knives, forks, spoons and lids should not be placed on the hob surface since they can get hot. • If the glass ceramic surface is cracked, switch off the appliance to avoid the possibility of electric shock.
www.electrolux.com • • • • • • pliance or hot cookware, when you connect the appliance to the near sockets Make sure the appliance is installed correctly. Loose and incorrect electricity mains cable or plug (if applicable) can make the terminal become too hot. Make sure that a shock protection is installed. Use the strain relief clamp on cable. Make sure not to cause damage to the mains plug (if applicable) or to the mains cable. Contact the Service or an electrician to change a damaged mains cable.
ENGLISH cleaning pads, solvents or metal objects. 23 • Contact your municipal authority for information on how to discard the appliance correctly. • Disconnect the appliance from the mains supply. • Cut off the mains cable and discard it. 2.4 Disposal WARNING! Risk of injury or suffocation. 3. PRODUCT DESCRIPTION 1 2 1 Induction cooking zone 2 Induction cooking zone 3 Control panel 6 3 4 Induction cooking zone 5 Induction cooking zone 6 Control panel 5 4 3.
www.electrolux.com sensor field function To activate the Bridge function. 4 A control bar 5 To set a heat setting. To increase or decrease the time. / 6 To set a cooking zone. 7 8 The timer display To show the time in minutes. 9 Timer indicators of cooking zones To show for which cooking zone you set the time. 10 To lock/unlock the control panel. 11 To activate and deactivate the STOP+GO function. 3.2 Heat setting displays Display Description The cooking zone is deactivated.
ENGLISH 25 4.2 Automatic Switch Off The function deactivates the appliance automatically if: • All cooking zones are deactivated ( ). • You do not set the heat setting after you activate the appliance. • You spill something or put something on the control panel for more than 10 seconds, (a pan, a cloth, etc.). An acoustic signal sounds some time and the appliance deactivates. Remove the object or clean the control panel. • The appliance becomes too hot (e.g. when, a saucepan boils dry).
www.electrolux.com 4.8 Timer 12 11 Count Down Timer 10 9 8 7 6 5 4 3 2 1 0 1 2 3 4 5 6 7 8 9 10 11 12 13 14 4.6 Power function The Power function makes more power available to the induction cooking zones. The Power function can be activated for a limited period of time ( see Technical Information chapter). After that, the induction cooking zone automatically sets back to highest heat setting. To activate, touch , comes on. To deactivate, change the heat setting. 4.
ENGLISH The display switches between and counted time (minutes). • To see how long the cooking zone operates: set the cooking zone with . The indicator of the cooking zone starts to flash quickly. The display shows the time that the cooking zone operates. • To deactivate the CountUp Timer: and touch set the cooking zone with or to deactivate the timer. The indicator of the cooking zone goes out. Minute Minder You can use the timer as a Minute Minder while the cooking zones do not operate. Touch .
www.electrolux.com onds. comes on, because the sound , comes on. The is off. Touch sound is on. 5. HELPFUL HINTS AND TIPS INDUCTION COOKING ZONES For induction cooking zones a strong electro-magnetic field creates the heat in the cookware very quickly. 5.1 Cookware for induction cooking zones Use the induction cooking zones with correct cookware. Cookware material • correct: cast iron, steel, enamelled steel, stainless steel, the bottom made of multi-layer (with correct mark from a manufacturer).
ENGLISH 5.6 The Examples of cooking applications The relation between the heat setting and the cooking zone consumption of power is not linear. When you increase the heat setting it is not proportional to the increase of the cooking zone consumption of power. He Use to: at set tin g 1 Keep warm the food you cooked 29 It means that the cooking zone with the medium heat setting uses less than a half of its power. The data in the table is for guidance only.
www.electrolux.com lowest temperatures and do not brown food too much. 6. CARE AND CLEANING Clean the appliance after each use. Always use cookware with clean bottom. Scratches or dark stains on the glass-ceramic cause no effect on how the appliance operates. To remove the dirt: – Remove immediately: melted plastic, plastic foil, and food with sugar. If not, the dirt can cause damage to the appliance. Use a special scraper for the glass . Put the scraper on the glass surface at 1. 2. 3.
ENGLISH Problem The Automatic Heat Up function does not operate. The heat setting changes between two levels. Possible 31 Remedy The cooking zone is hot. Let the cooking zone become sufficiently cool. The highest heat setting is set. The highest heat setting has the same power as the Automatic Heat Up function. The Power management is activated. Refer to “Power management”. The sensor fields become The cookware is too large Put large cookware on hot.
www.electrolux.com Problem comes on Possible Remedy There is an error in the appliance because a cookware boils dry. The overheating protection for the cooking zones and the Automatic Switch Off operates. Deactivate the appliance. Remove the hot cookware. After approximately 30 seconds, activate the cooking zone again. If the cookware was the problem, the error message goes out of the display, but the residual heat indicator can stay.
ENGLISH 8.3 Assembly min. 500mm min. 50mm min. 2mm B A min. 2 mm < 20 mm B A min. 2 mm > 20 mm min. 500 mm B A 12 mm 57 mm 28 mm 41 mm 38 mm 31 mm min 30 mm min. 500 mm B A 12 mm 57 mm 28 mm 41 mm 38 mm 31 mm min. 12 mm min. 2 mm R 5mm 55mm +1 490+1mm 680 mm min. 38 mm min.
www.electrolux.com If you use a protection box (an additional accessory1)), the front airflow space of 2 mm and protective floor directly below the appliance are not necessary. You can not use the protection box if you install the appliance above an oven. 1) The protection box accessory may not be available in some countries. Please contact your local supplier. 9. TECHNICAL INFORMATION Modell EHL7640FOK Prod.Nr. 949 596 020 01 Typ 58 GDD D4 AU 220 - 240 V 50 - 60 Hz Induction 7.
FRANÇAIS 35 SOMMAIRE 1. 2. 3. 4. 5. 6. 7. 8. 9. CONSIGNES DE SÉCURITÉ . . . . . . . . . . . . . . . . . . . . . . . . . . . . . . . . . . . . . . . . . . . . . . . INSTRUCTIONS DE SÉCURITÉ . . . . . . . . . . . . . . . . . . . . . . . . . . . . . . . . . . . . . . . . . . . . DESCRIPTION DE L'APPAREIL . . . . . . . . . . . . . . . . . . . . . . . . . . . . . . . . . . . . . . . . . . . . UTILISATION QUOTIDIENNE . . . . . . . . . . . . . . . . . . . . . . . . . . . . . . . . . . . . . . . . . . . . . .
www.electrolux.com 1. CONSIGNES DE SÉCURITÉ Avant d'installer et d'utiliser cet appareil, lisez soigneusement les instructions fournies. Le fabricant ne peut être tenu pour responsable des dommages et blessures liés à une mauvaise installation ou utilisation. Conservez toujours cette notice avec votre appareil pour vous y référer ultérieurement. 1.1 Sécurité des enfants et des personnes vulnérables AVERTISSEMENT Risque d'asphyxie, de blessure ou d'invalidité permanente.
FRANÇAIS 37 • Ne faites pas fonctionner l'appareil avec un minuteur externe ou un système de commande à distance. • Il peut être dangereux de laisser chauffer de la graisse ou de l'huile sans surveillance sur une table de cuisson car cela pourrait provoquer un incendie. • N'essayez jamais d'éteindre un feu avec de l'eau. Mettez à l'arrêt l'appareil puis couvrez les flammes, par exemple avec un couvercle ou une couverture ignifuge. • N'entreposez rien sur les surfaces de cuisson.
www.electrolux.com • Le dessous de l'appareil peut devenir très chaud. Nous vous recommandons d'installer un panneau de séparation ignifuge sous l'appareil pour en bloquer l'accès. 2.2 Utilisation Branchement électrique • Utilisez cet appareil dans un environnement domestique. • Ne modifiez pas les caractéristiques de cet appareil. • Ne faites pas fonctionner l'appareil avec un minuteur externe ou un système de commande à distance.
FRANÇAIS inflammables à l'intérieur ou à proximité de l'appareil, ni sur celui-ci. • Ne tentez pas d'éteindre un incendie avec de l'eau. Débranchez l'appareil et couvrez les flammes à l'aide d'un couvercle ou d'une couverture à incendie. AVERTISSEMENT Risque d'endommagement de l'appareil. • Ne laissez pas de récipients chauds sur le bandeau de commande. • Ne laissez pas le contenu des récipients de cuisson s'évaporer complètement.
www.electrolux.com 3.1 Description du bandeau de commande 9 10 11 8 7 1 6 2 3 5 4 Appuyez sur les touches sensitives pour faire fonctionner l'appareil. Les affichages, les voyants et les signaux sonores indiquent quelles fonctions sont activées. touche sensitive fonction Pour allumer et éteindre l'appareil. 1 Affichage du niveau de cuisson Indique le réglage du niveau de cuisson. 2 3 Pour activer la fonction Booster. 4 Pour activer la fonction Bridge.
FRANÇAIS Affichage 41 Description La fonction de démarrage automatique de la cuisson est activée. La fonction Booster est activée. + chiffre Une anomalie de fonctionnement s'est produite. / OptiHeat Control (Voyant de chaleur résiduelle à trois niveaux) : continuer la cuisson / maintien au chaud / chaleur résiduelle. / Le dispositif de verrouillage/sécurité enfants est activé. Le récipient est inapproprié ou trop petit ou bien il n'y a pas de récipient sur la zone de cuisson.
www.electrolux.com cuisson souhaité n'est pas atteint. L'affichage indique le niveau de cuisson. 12 11 10 9 8 7 6 5 4 3 2 1 0 1 2 3 4 5 6 7 8 9 10 11 12 13 14 4.6 Fonction Booster 4.4 Fonction Bridge La fonction Bridge couple les deux zones de cuisson de telle façon qu'elles fonctionnent comme une seule zone de cuisson. Régler d'abord le niveau de cuisson de l'une des zone de cuisson. Pour activer la fonction Bridge pour les zones de cuisson gauche/droite appuyez / .
FRANÇAIS 4.8 Minuteur Minuteur (Décompte du temps) Utilisez le minuteur pour régler la durée de fonctionnement de la zone de cuisson pour cette cuisson uniquement. Réglez le minuteur après la sélection de la zone de cuisson. Le niveau de cuisson peut être défini avant ou après le réglage du minuteur. • Pour choisir la zone de cuisson : jusqu'à appuyez plusieurs fois sur ce que l'indicateur correspondant s'affiche.
www.electrolux.com • Pour désactiver cette fonction, appuyez sur . Le niveau de cuisson précédent s'allume. 4.10 Verrouillage Pendant l'utilisation des zones de cuisson, vous pouvez verrouiller le bandeau de commande, à l'exception de la touche . Ceci empêchera une modification involontaire du niveau de cuisson. Réglez tout d'abord le niveau de cuisson. Pour démarrer cette fonction, appuyez . Le symbole s'allume pendant sur 4 secondes. Le minuteur reste allumé. Pour mettre à l'arrêt cette fonction, ap.
FRANÇAIS 45 5. CONSEILS UTILES ZONES DE CUISSON À INDUCTION Sur les zones de cuisson à induction, un champ électromagnétique puissant chauffe les récipients très rapidement. 5.1 Récipients compatibles avec les zones de cuisson à induction Utilisez des récipients adaptés aux zones de cuisson à induction. Matériaux des ustensiles de cuisson • adaptés: fonte, acier, acier émaillé, acier inoxydable, fond multicouches (avec marque correcte d'un fabricant).
www.electrolux.com le signal du minuteur. La différence de temps de fonctionnement dépend du niveau et de la durée de cuisson. 5.6 Exemples de cuisson Le rapport entre le niveau de cuisson et la consommation énergétique de la zone de cuisson n'est pas linéaire. Lorsque vous augmentez le niveau de cuisson, l'augmentation énergétique de la Ni- Utilisation : vea u de cui ss on zone de cuisson n'est pas proportionnelle.
FRANÇAIS Ni- Utilisation : vea u de cui ss on Durée 47 Conseils Consommation énergétique nominale Retournez à la moitié du temps 45 – 64 % 12 13 Poêler à feu vif des 5 - 15 min pommes de terre rissolées, filets, steaks 14 Faire bouillir de l'eau, cuire des pâtes, griller la viande (goulasch, bœuf braisé), cuire des frites. 100 % Faire bouillir une grande quantité d'eau. Le gestionnaire de puissance est activé. 6. ENTRETIEN ET NETTOYAGE Nettoyez l'appareil après chaque utilisation.
www.electrolux.com Problème Possible Solution La fonction STOP+GO est activée. Reportez-vous au chapitre « Utilisation quotidienne ». Il y a de l'eau ou des taches de graisse sur le bandeau de commande. Nettoyez le bandeau de commande. Un signal sonore retentit Vous avez posé quelque et l'appareil est mis à l'ar- chose sur une ou plurêt. sieurs touches sensitives. Un signal sonore retentit lorsque l'appareil est à l'arrêt. Retirez l'objet des touches sensitives. L'appareil s'éteint.
FRANÇAIS Problème et un chiffre s'affichent. s'allume Possible 49 Solution Le récipient n'est pas adapté. Utilisez un récipient adapté. Le diamètre du fond du récipient est trop petit pour la zone de cuisson. Utilisez un récipient aux dimensions appropriées. Le récipient de cuisson ne recouvre pas la croix. Recouvrez complètement la croix / le carré. Une erreur s'est produite dans l'appareil. Débranchez l'appareil de l'alimentation électrique pendant quelques minutes.
www.electrolux.com 8. INSTRUCTIONS D'INSTALLATION AVERTISSEMENT Reportez-vous aux chapitres concernant la sécurité. Avant l'installation avoir été installés dans des meubles et sur des plans de travail homologués et adaptés. 8.2 Câble d'alimentation Avant l'installation de l'appareil, notez cidessous les informations figurant sur la plaque signalétique. La plaque signalétique se trouve au bas de l'enveloppe extérieure de l'appareil. • Modèle ........................... • PNC .........................
FRANÇAIS 51 min. 12 mm min. 2 mm R 5mm 55mm +1 490+1mm 680 mm min. 38 mm min. 2 mm Si vous utilisez une enceinte de protection (accessoire en option1)), l'espace de circulation d'air de 2 mm et le fond de protection installé directement sous l'appareil ne sont plus nécessaires. Vous ne pouvez pas utiliser le boîtier de protection si vous installez l'appareil audessus d'un four. 1) L'enceinte de protection n'est pas disponible dans tous les pays. Veuillez contacter votre revendeur local. 9.
www.electrolux.com Puissance des zones de cuisson Zone de cuisson Puissance Fonction nominale (ni- Booster activeau de cuis- vée [W] son max.) [W] Durée maximale de la fonction Booster [min] Diamètre minimal du récipient [mm] Arrière droit : 2300 W 3200 W 10 125 Avant droit : 2300 W 3200 W 10 125 Arrière gauche : 2300 W 3200 W 10 125 Avant gauche : 2300 W 3200 W 10 125 La puissance des zones de cuisson peut légèrement différer des données du ta- bleau.
DEUTSCH 53 INHALT 1. 2. 3. 4. 5. 6. 7. 8. 9. SICHERHEITSINFORMATIONEN . . . . . . . . . . . . . . . . . . . . . . . . . . . . . . . . . . . . . . . . . . . SICHERHEITSHINWEISE . . . . . . . . . . . . . . . . . . . . . . . . . . . . . . . . . . . . . . . . . . . . . . . . . GERÄTEBESCHREIBUNG . . . . . . . . . . . . . . . . . . . . . . . . . . . . . . . . . . . . . . . . . . . . . . . . TÄGLICHER GEBRAUCH . . . . . . . . . . . . . . . . . . . . . . . . . . . . . . . . . . . . . . . . . . . . . . . . .
www.electrolux.com 1. SICHERHEITSINFORMATIONEN Lesen Sie vor der Montage und Verwendung des Geräts sorgfältig die mitgelieferte Anleitung. Der Hersteller haftet nicht für Verletzungen oder Schäden, die durch eine fehlerhafte Montage entstehen. Bewahren Sie die Anleitung zum Nachschlagen auf. 1.1 Sicherheit von Kindern und schutzbedürftigen Personen WARNUNG! Es besteht Erstickungsgefahr, das Risiko von Verletzungen oder permanenten Behinderungen.
DEUTSCH 55 • Kochen mit Fett oder Öl auf einem unbeaufsichtigten Kochfeld ist gefährlich und kann zu einem Brand führen. • Versuchen Sie nicht einen Brand mit Wasser zu löschen, sondern schalten Sie das Gerät aus und bedecken Sie die Flamme mit einem Deckel oder einer Feuerlöschdecke. • Legen Sie keine Gegenstände auf dem Kochfeld ab. • Benutzen Sie zum Reinigen des Gerätes keinen Dampfreiniger.
www.electrolux.com gen, damit der Boden nicht zugänglich ist. Elektrischer Anschluss WARNUNG! Brand- und Stromschlaggefahr. • Die elektrischen Anschlüsse müssen von einem qualifizierten Elektriker ausgeführt werden. • Das Gerät muss geerdet sein. • Vor der Durchführung jeglicher Arbeiten muss das Gerät von der elektrischen Stromversorgung getrennt werden. • Stellen Sie sicher, dass Sie das richtige Kabel für den elektrischen Netzanschluss verwenden.
DEUTSCH im Gerät, auf dem Gerät oder in der Nähe des Geräts. • Löschen Sie eine Flamme nicht mit Wasser. Schalten Sie das Gerät aus und bedecken Sie die Flamme mit einem Deckel oder einer Feuerlöschdecke. WARNUNG! Das Gerät könnte beschädigt werden. • Stellen Sie kein heißes Kochgeschirr auf das Bedienfeld. • Lassen Sie das Kochgeschirr nicht leerkochen. • Lassen Sie keine Gegenstände oder Kochgeschirr auf das Gerät fallen. Die Oberfläche könnte beschädigt werden.
www.electrolux.com 3.1 Bedienfeldanordnung 9 10 11 8 7 1 6 2 3 5 4 Bedienen Sie das Gerät über die Sensorfelder. Die Anzeigen, Kontrolllampen und akustischen Signale informieren Sie über die aktiven Funktionen. Sensorfeld Funktion Ein- und Ausschalten des Geräts. 1 Anzeige der Kochstufe 2 Zeigt die Kochstufe an. 3 Einschalten der Power-Funktion. 4 Einschalten der Brückenfunktion. Einstellskala 5 Einstellen der Kochstufe. Zum Erhöhen oder Verringern der Zeit.
DEUTSCH Display 59 Beschreibung Die Ankochautomatik ist in Betrieb. Die Power-Funktion ist eingeschaltet. + Zahl Eine Störung ist aufgetreten. / OptiHeat Control (3-stufige Restwärmeanzeige): Weitergaren/Warmhalten/Restwärme. / Die Tastensperre oder die Kindersicherung ist aktiv. Das Kochgeschirr ist ungeeignet oder zu klein bzw. es befindet sich kein Kochgeschirr auf der Kochzone. Die Abschaltautomatik ist in Betrieb. 3.
www.electrolux.com 12 11 10 9 8 7 6 5 4 3 2 1 0 4.4 Brückenfunktion Die Brückenfunktion verbindet die beiden Kochzonen, sie funktionieren dann wie eine Kochzone. Stellen Sie zuerst die Kochstufe für eine der Kochzonen ein. / , um die BrückenBerühren Sie funktion für die linke und rechte Kochzone einzuschalten. Zum Einstellen oder Ändern der Kochstufe berühren Sie die rechte oder linke Einstellskala. / zur Deaktivierung Berühren Sie der Brückenfunktion.
DEUTSCH 4.8 Timer Kurzzeitmesser Mit dem Kurzzeitmesser stellen Sie ein, wie lange eine Kochzone für einen einzelnen Kochvorgang eingeschaltet bleiben soll. Wählen Sie erst die Kochzone aus und stellen Sie dann den Kurzzeitmesser ein. Sie können die Kochstufe einstellen, bevor Sie den Kurzzeitmesser einstellen oder umgekehrt. • Auswählen der Kochzone: Berühren so oft, bis die Anzeige der geSie wünschten Kochzone aufleuchtet.
www.electrolux.com verhindert, dass die Kochstufe versehentlich geändert wird. Stellen Sie erst die Kochstufe ein. zur Aktivierung der FunkBerühren Sie wird 4 Sekunden tion. Das Symbol lang angezeigt. Die Uhr läuft weiter. zur Deaktivierung der Berühren Sie Funktion. Die zuvor ausgewählte Kochstufe wird eingestellt. Diese Funktion wird deaktiviert, sobald das Gerät ausgeschaltet wird. 4.11 Kindersicherung Diese Funktion verhindert eine versehentliche Bedienung des Geräts.
DEUTSCH 63 Topfboden (wenn vom Hersteller als geeignet markiert). • Nicht geeignet: Aluminium, Kupfer, Messing, Glas, Keramik, Porzellan. 5.4 Energiesparen Kochgeschirr eignet sich für Induktionskochfelder, wenn… • ... Eine geringe Wassermenge darin auf einer Kochzone, die auf die höchste Stufe geschaltet ist, sehr schnell zu kochen beginnt. • ... Ein Magnet vom Geschirrboden angezogen wird. • Decken Sie Kochgeschirr, wenn möglich, mit einem Deckel ab.
www.electrolux.com Ko Verwendung: ch stu fe Zeit Tipps Nennleistungsaufnahme Zum Warmhalten von Speisen Nach Bedarf Benutzen Sie einen Deckel 3% 13 Sauce Hollandaise, schmelzen: Butter, Schokolade, Gelatine 5 - 25 Min. Ab und zu umrühren 3–8% 13 Stocken: Luftiges Omelett, gebackene Eier 10 - 40 Min. Mit Deckel garen 35 Köcheln von Reis und 25 - 50 Min.
DEUTSCH 65 6. REINIGUNG UND PFLEGE Reinigen Sie das Gerät nach jedem Gebrauch. Achten Sie immer darauf, dass der Boden des Kochgeschirrs sauber ist. Kratzer oder dunkle Flecken in der Glaskeramik beeinträchtigen die Funktionsfähigkeit des Geräts nicht. So entfernen Sie Verschmutzungen: – Folgendes muss sofort entfernt werden: geschmolzener Kunststoff, Plastikfolie, zuckerhaltige Lebensmittel. Andernfalls können die Verschmutzungen das Gerät beschädigen. Verwenden Sie einen 1. 2. 3.
www.electrolux.com Problem Die Ankochautomatik startet nicht. Mögliche Ursache Die Kochzone ist heiß. Abhilfe Lassen Sie die Kochzone abkühlen. Die höchste Kochstufe ist Die höchste Kochstufe eingestellt. hat die gleiche Leistung wie die Ankochautomatik. Die Kochstufe schaltet zwischen zwei Kochstufen um. Die Power-Management- Siehe „Power-ManageFunktion ist eingeschaltet. ment“. Die Sensorfelder werden heiß. Das Kochgeschirr ist zu groß, oder Sie haben es zu nah an die Bedienelemente gestellt.
DEUTSCH Problem leuchtet auf. 67 Mögliche Ursache Abhilfe Im Gerät ist ein Fehler aufgetreten, da ein Kochgeschirr leer gekocht ist. Der Überhitzungsschutz der Kochzonen und die Abschaltautomatik sind eingeschaltet. Schalten Sie das Gerät aus. Das heiße Kochgeschirr entfernen. Schalten Sie die Kochzone nach etwa 30 Sekunden wieder ein. Lag das Problem am Kochgeschirr, erlischt die Fehlermeldung im Display, aber die Restwärmeanzeige kann weiterhin leuchten.
www.electrolux.com 8.3 Montage min. 500mm min. 50mm min. 2mm B A min. 2 mm < 20 mm B A min. 2 mm > 20 mm min. 500 mm B A 12 mm 57 mm 28 mm 41 mm 38 mm 31 mm min 30 mm min. 500 mm B A 12 mm 57 mm 28 mm 41 mm 38 mm 31 mm min. 12 mm min. 2 mm R 5mm 55mm +1 490+1mm 680 mm min. 38 mm min.
DEUTSCH 69 Falls Sie einen Schutzboden verwenden (zusätzliches Zubehör)1), ist die Einhaltung des vorderen Belüftungsabstands von 2 mm unter dem Gerät nicht nötig. Wenn Sie das Gerät über einem Backofen einsetzen, können Sie den Schutzboden nicht verwenden. 1) Der Schutzboden ist möglicherweise in einigen Ländern nicht erhältlich. Wenden Sie sich an Ihren Händler vor Ort. 9. TECHNISCHE DATEN Modell EHL7640FOK Prod.Nr. 949 596 020 01 Typ 58 GDD D4 AU 220 - 240 V 50 - 60 Hz Induction 7.
www.electrolux.
DEUTSCH 71
892955202-A-332012 www.electrolux.