
Manual


BEFORE STARTING
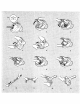
1 Check that the dust bag is in place.
2 Insert the hese until t-he cstches click to engage _press
the catches to release the hose).
3 Attach the telescopic wand to the hose handle and the
pawerhead tWhen you want to remove it ngain, i_ess the
lock button and pull the #aces apart) Be sure the on/off
swRch is in the 'off" position.
4a Pull out the cord and plug into the ouget.
4b P_ess the carrying handle to rewind the cord
5 Star[ the vacuum cleaner by genffy pressing the "auto"
or "rain" buttons. In the "auto" position, the SL_Ction
pOwer is automatically adjusted depending on the
surface, so you always get the perfect clean, If you
want to manually increase suction power to maximum
power, press the "auto" bLttton for three seconds or
more. To reduce suction power manually, press the
"rain* button. Turn off the vacuum cleaner by pressing
the off button,
Check lights at star_
When the machine is started, all the check lights initially
light up They will then all go out with the exception of
Optimum. The rain - a_to max lights flash as Soon as you
plug it in. You then select the suction power by pressing
one of the buttons on the hose handle.
Oxy3 adjusts to fit your needs
6 To help reduce back strain, Oxy _ features a l_exible
handle that makes it eas_sr to lift and carry the machine
7 The convenient parking position lets you store the
powerhend on the machine when you take a break (7a)
and when you store the machine (Tb).
How to Use the telescopic w_nd
8 Attach the telescopic tube to the hose hendIe so that the
catch clicks shut. Remove by pressing in the locking
button and pulling the I_eces apart.
9 Attach the powethead to the telescopic wand by
inserting the wand into the powethead until the catch
clicks shut.
10 Extend or shorten the telescopic wand by pushing the
Iocld ng bi_o_ in the direction of the nozzJe and
simultaneously adjusting the length of the telescopic wand.
Trite is a catch at both ends of the telescopic wand.
Using the powerhead
The powerhead is ideal for both hard floors and carpets.
The powerhead P_3eives its tow voltage elecq_rical feed via
the tstescopic wand and hose_ and no extra connection is
required. A blue light on the powerhead indicates tpat the
brush roll is t_rstng. If anything gets stuck in the brush roll
and makes it stop the light will go out. Do not use the
powerhend on rugs with long fdnges or a pile depth
e×ceeding 3/4". In order to avoid damage to the carpet, do
not let the powerhend stand still whi_e the brush ro_l is
rotating. DO not PJn over eleofric cords and turn off the
vactJum cleaner immediately _f_er use.
AVANT DE COMMENCER
1 V6rifier qua le sac fi pOussi_re est en place.
2 Introduire le tuyau )esqu'& ce que le dispOsitff de
verro_illage s'enclenche (appuyer sur los dispOsitifs de
verrouillage pour lib6rer le tuyau.)
3 Fixer le tube tetescopique & la poign_e de tuyau et au t_te
motorisEe. (Quand on veut le dstacher, appuyer sur le
pOuton de verrouiiIage et tirer sur les pieces pour tes
separer). Veiller & ce qua le bouton de marche/arr6t soit
sur la position "d'arr_t",
4a Sortir le cordon d'alimentotion et introduire sa fiche dens
une prise murale.
4b Appuyer sur la poign6e de transport pour rembobiner le
corder1
E Meltre I'aspirateur en marche en appuyant delicaternent sur
le_ boutons - auto _ et - rain * DOns la position _ auto *, la
puissance d'aspiration se r6gte aetomatiquement en
tonction de la surface de fagon _ assurer un nsttoyage
parfait. Pour pOusser manuellement la pu_ss_._ce
d'aspiration au maximum, appuyer sur le bouton - auto -
pendant au moins trois secondes. Pour require la
puissance d'aspitstion manuellement, appuyer sur le
bouton _ rain _. On Eteint I'aspirateur en appuyant sur le
bouton off (arret).
T_raoths a la ml_e e_ se_'toe
Quand on met Ia machine en so.ice to_s tes temoins
s'allument, lls s'eleignent ensuite tous & t'exception du
t_moin Optimum. Les temoels mst -- auto -- max clignotent
quand on prise In machi_e. On s6_ectionne ensuge la
puissance d'aspiration en appuyaof sur !'un des boutons de
la po_gnee de tuyau.
O%y_ se r_gle pout repondre _ vos berths
6 POUr t6duire ies contractures dorsales, Oxy 3 comporte une
poignee souple qui facilite le soutfivement et le transport
de la machine.
7 La position de stationnement pratique permet de ranger la
t&te motorisee sur la machine pendant les pauses tVa) et
lots du rangement de ]a machine (7dj
Uffll_ation du tube t61escopique
8 Rxer le tube t_lesco_qce sur le tuyau de sorte q_ _edisposi'6i
de vet rou=]lnges'encler vch_ Ret_rer le tuyau en appuyant s_ le
boston pa verrou_age et en s6parant los pieces
9 Rxer la iEte mototis69 au tube t_4escopique en }nt;oduisant
_etopa dans la t6te motoris6e jusqu'a ce qua le dispositff de
verroui{iage s'encJenche.
1o ReVenger ou raccou_cir ie tube t_escopique en appLryant sur
le bouton de verrouil_age dens la direction du suceur st en
r6g_ant simultonement la Iongue_r du tube teiescopique. II y
a un d_pasitif de vertouillage _ checune des exttemites du
tube te_esongique.
UtJlisat_on du suceur de trite motobs_
Le suceur de tEte roof oris&.e e._ idol pour los sols d[irs st los
t,_s. Le suceur de t_te mofodsee _ un_ aBmen_tst_on basso
tension par Bnterm&_fiaire du tube t_4escopi_ et du tuyau st
aucune autre cont_exJon rl'e_t n_ess_ire. Un t_mc_n _eu sur le
suceur ind_que qua _a brosse cylindrique toume. Si quoi qLle ce
soft demeure pros dans le rouleau cylinditque et I'emp_he de
tour ne_, le temoin s'eteint. Nepas utJliser le s_eut t_to
motorisee sur los moqusttos a tongues flanges ou sur une
moquette dent I'el2_sseur depasse 19 mm (3/4 be) Afin d'6v_er
d'endommnger la mnguette, nepas laisser le suceur immobile
alors qua ta brosse est en train be toumer. Nepas passer sur
le con3on d'alimentation avec I'aspirateur et steindre ce
demier d_s qu'on a fini de s'en servir
ANTES DE COMENZAR
1 Veritique pae la boise para polvo se encuentte en su sitio.
2 Inserte la manguera haste qua los pastilles hngan un
clic (presi6nofos pare desconector la mar_guera).
3 Conecte el tobo telesc6bico a la empuhadura de la
manguera y a la cabazel de pofencia. IPara extraerto
nueva_nente, presione el boron de traba y separe las
piezas.l Aseg_rese de que el boto_ on/off
(encendido/apngado) est6 en Is posicibo de "apagnda _.
4a .Jale el cable y enchqfelo en Ia tome de corriento.
4b Presione la manija de transporte pare rebobinar el cable
E Encienda la aspiradora presionando suavemente los
botones "aLto" O _min _. En _a posi_idn "auto", el poder
de suction se ai_st_ a_om&ticamente segL)n la
superd¢ie, pare qua siempre Iogre una lira p_eza
perfeofa. Si quiere aumentar rnanuaJmente el pealer de
succ_n a la potoncia maxima, presione el botnd "auto _
qurante tres segundos o m&8. Pare reducir el podet de
sucst6n manu_Jmente, presione el botdn "rain". Apague
la asbiradora presionando el pOt6n de off (apagndo).
Ltlce$ de _ontrof ei3 el encendido
Cuando se enciende el artstacto, se en¢ienden tod&s la$
_tx;es de control Lunge se apagar#n to(3as manes la krz
Optimum (6ptimo) Cuando enchufe ta aspiradora
destellar_n ias luces de rnin - auto _ max. Entonces podr_
seleccionar el poder de succi6n presionando t_no de los
botones e_ la empul_adura de ta manguera
Oxy_se ajusta pare satisfacer su$ necesidades
E Ox'y 3 quanta con una manija flexible qL=e hace mas facil
_ev_tar y t ransportar _aaspiradora y ayuda a redtteir
los qolores de espalda
Y La pr_stiea pOsici6n de repose [e permite guardar e!
cabezal de poter_3i_ dentro del artstacto cuar_do realize
una pause (7el y cuanbo guarda la aspirandra (7b)
Use del tube tetescopico
8 Cordite el tuba te}_sc_ a la empahedura de la
manguera hasta qua e_pa_lio trabe con un clic. Extr_galo
presionando e_boton de tmhe y separe las plazas.
9 Conecte e_ cshezal de potencia aJ tube tetescdp_ca
insertanpO el tube dentro del caheza_ haste gue el pastille
trabe oon L_nc_ic,
10 Extier_da o reduzca el tube telesc6pico _esionando el
het6n de trapa en direccihe a la boquifla y ajustando
simuffaneameofe la _ongitud de4 tuhe telescSpico. Cada
extreme del tube telesc6pioo tiene un pastille.
Use de la ca hazel dR potencia
La cabazel de pOter_Ja pare pisos es ideal tanto pare
affcrnbras come pe_ pisos duros Esta cabazel de pofencia
pare _sos recibe aiirne_tocihe e_6ctfica de baja tensk_n a
trav&s de] tube ttYesc61_co y de la manguera, per ic qua no
toque.re de L_a conexion ex#a, Una luz azul en la boqui[la
indica qua el cepillo ciiind dco esta girando. Si aigun ob_sto
queda atorndo en el cepiflo c_l_ddco y hace qua se de[enga,
se apagar& la luz. No t_lice la bcquilla motortzada en
affombras con fleo_s _argos o con una pr_ft_didad llnayor a
3/4"¸ Pare evitar paSar la alfombra, no deje la boq_lla qt_eta
mientms el cecile cillnddco gir& No paso ia asl_radora sohte
cab4es el6ctricos y apaguela inmediatamente despa_ del use.