user manual Oven EOB98000
electrolux Electrolux. Thinking of you. Share more of our thinking at www.electrolux.com Contents Operating Instructions............................ 3 Safety instructions.................................. 3 Description of the Appliance .................. 4 Before Using for the first time ................. 9 Using the Oven ...................................... 10 Cleaning and Care................................. What to do if …..................................... Installation Instructions ...........
electrolux 3 Operating Instructions 1 Safety instructions Electrical safety • This appliance must be only connected by a registered electrician. • In the event of a fault or damage to the appliance: Take the fuses out or switch off. • Repairs to the appliance must only be carried out by qualified service engineers. Considerable danger may result from improper repairs. If repairs become necessary, please contact our Customer Services or your dealer.
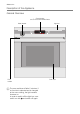
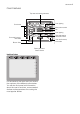
electrolux Description of the Appliance General Overview Oven displays and Touch Control sensor fields Water drawer Door handle 3 The oven switches off after 2 minutes, if no function is selected and is changed at the oven nothing, the light remains however on. In order to switch off the light bar, oven switch on with and switch off again.
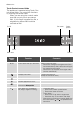
electrolux 5 The electronic oven controls Indicators Menu option symbol (with oven shelf level) Clock Time functions Heat indicator Temperature Weight Symbols Certain symbols are displayed in the displayed according to the function set. Symbol Display (Examples) Function Countdown timer 4:30 The countdown timer is active. Time 10:00 Indicates the current time set. Duration 1:00 Indicates the period of time required for the cooking process.
electrolux Touch Control sensor fields The appliance is operated using Touch Control sensor fields. You control the functions by touching the sensor fields. When you are using the controls make sure that you only touch one sensor field. If your finger is applied too flat, a neighbouring sensor field could be touched as well. On/Off Set values Select options Scroll Main menu Confirm Sensor field Function Comment , To move down and up in the menu.
electrolux 7 Oven Features Top heat and heating elements Oven lighting Oven levels Meat probe socket Fan Oven lighting Rear wall heating element/Fat filter Oven shelf runners, removable Oven shelf runners, removable Bottom Heat Steam generator/ Steam rosette Inside of door On the inside of the oven door you will find the numbers of the different oven shelves.
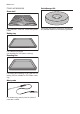
electrolux Oven accessories QuickSponge 180 Oven shelf For cookware, cake tins, roasts and grilled foods. Baking tray For cakes and biscuits (not suitable for Full Steam cooking). Roasting Pan For baking and roasting or as a pan for collecting fat (not suitable for Full Steam cooking). Meat probe For determining exactly how far joints of meat are cooked. Extremely absorbent sponge for absorbing any residual water from the steam generator.
electrolux 9 Before Using for the first time 3 If you would like to change one of these 3 The time only has to be set if the applibase settings at a later date, please refer to the Basic Settings section. ance is disconnected from the power supply for a long time. Setting the language Initial cleaning 1. Clean the oven before using it for the first time. 1 Important: Do not use caustic or abrasive cleaning agents! These can damage the oven surfaces.
electrolux Using the Oven The menus in overview Main menu Assisted Cooking Sub-menu Pork/Veal Beef/Game/Lamb Poultry Fish Cake Desserts Pizza/Pie/Bread Casseroles/Gratins Side Dishes Combi Steaming Convenience Specials Heating Functions Fan Cooking Moist Fan Cooking Conventional Cooking Pizza Setting Turbo Grill Economy Grill Dual Grill Bottom Heat Slow Cook Quarter Steam + Heat Half Steam + Heat Full Steam My Programmes 1- My Program 2- My Program ...
electrolux 11 Main menu Basic Settings Sub-menu Set Time of Day Time Indication Set+Go Heat+Hold Time Extension Display Contrast Display Brightness Set language Buzzer Volume Key Tones Alarm/Error Tones Service Factory Settings Operation of the menus Example 1. Switch the appliance on with . You will find yourself in the main menu. 2. 3. With or select the desired main menu. Use to move to the appropriated sub-menus. The sub-menu selected is displayed.
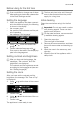
electrolux Residual heat indicator After switching off the oven, the residual heat is displayed to the degree. Inserting the baking tray or roasting pan Displaying temperature to the degree The temperature is displayed to the degree instead of the bar of the heating up indicator for 5 seconds during the heating up time. Press and at the same time. 3 When the temperature set is reached, an audible signal sounds. Push the baking tray or roasting pan between the guide bars of the selected oven level.
electrolux 13 Inserting the oven shelf and roasting pan together Lay the oven shelf on the roasting pan. Push the roasting pan between the guide bars of the selected oven level. Inserting/Removing the Fat Filter Only use the fat filter when roasting to protect the rear heating elements from fat splashes. Inserting the fat filter Hold the fat filter by the grip and insert the two mounts downwards into the opening on the rear wall of the oven (fan opening).
electrolux The menu Assisted Cooking The Assisted Cooking in overview The dishes in the Kitchen Assistant (except for Specials) are prepared with automatic systems. The automatic systems offer the optimum settings (oven functions, temperature, cook time) for the respective dish.
electrolux 15 Category Cake Desserts Dish Lemon cake Gugelhupf Swedish cake Savarin cake Biscuit base Brownies Cheesecake Muffins Fruit cake Tart, sweet Crumble cake Carrot cake Butter plait Almond cake Yeast plait Fruit tart Crème caramel Cherry pudding Coconut custard Yeast dumplings Cappuccino cake Pizza/Pie/Bread Tray pizza Quark cups Onion pie White bread Quiche Lorraine Famer bread Goat’s cheese tart Piroggen Cheese flan Casseroles/Gratins Side Dishes Combi Steaming
electrolux Category Convenience Dish Pizza, frozen Bread/rolls American pizza, frozen Bread/rolls, frozen Pizza, chilled Apple strudel, frozen Pizza snacks, frozen Fish fillet, frozen Chips Chicken wings Croquettes Lasagne/Cannelloni Röstis Specials Defrost Keep Warm Drying Preserving Regenerating Plate Warming You will find practical information on the various automatic systems, recipes and oven functions in the accompanying booklet.
electrolux 17 4. Using matic. or select Meatprobe Auto- 5. Confirm with . Message appears telling you to insert the Meatprobe. 6. Insert Meatprobe (see section Meatprobe). 7. The automatic programme is started. As soon as the automatic programme has finished, an audible signal sounds. 8. Press any key to switch off the signal. 9. Remove Meatprobe. 3 Within a few minutes a provisional end time at which the set core temperature will be reached is calculated.
electrolux The Oven Functions menu The oven functions in overview Using the oven functions you can set baking and roasting sessions to suit your requirements. Oven function Application Fan Cooking For baking on up to three oven levels at the same time. Set the oven temperatures 20-40 °C lower than when using Conventional. Moist Fan Cooking For energy-saving baking and cooking of mainly dry bakery items as well as for baking in tins on one level.
electrolux 19 3 Besides the temperature other functions can be set using (see section Additional functions). The menu My Programmes My Programmes in overview Sub menu Description 1- My Program 2- My Program ... To save optimum settings for your own recipes. Edit Programme Name To rename stored programmes. 3 You can store 20 programmes. Operation of My Programmes Storing a programme 1. 2. 8. Select oven function or Assisted Cooking with the desired settings.
electrolux The cleaning menu Cleaning in overview Sub menu Description Steam Cleaning To clean oven with steam. Cleaning Assistant Before Steam Cleaning reminds you what has to be observed with Steam Cleaning The Cleaning Assistant can be switched on and off. 3 How you operate the Steam Cleaning and switch the Cleaning Assistant on and off is described in the section “Cleaning and care”.
electrolux 21 Setting Display Description Alarm/Error Tones – – On Off Warning beeps sound when steps which cannot be carried out are selected. Switch warning beeps on or off. Service ECAIA207 V03IA003 24 Indicates the version of the software and the period of operation. Factory Settings Reset all settings to the factory settings (My Programmes too). 3 Between 22:00 and 6:00 the display re- duces its brightness when the appliance is switched off to save energy.
electrolux To switch on Heat+Hold 1. Select oven function. 2. Press key repeatedly until the ”Heat+Hold” window appears. 3. Confirm with . The function Heat+Hold is now switched on. 4. As soon as the oven function is completed, a signal sounds and Heat+Hold starts. The oven function runs at 80°C for 30 minutes. As soon as the 30 minutes with Heat+Hold are over, the oven switches itself off. 3 Irrespective of the oven function set Heat+Hold remains active. You can move between the oven functions.
electrolux 23 Duration or End Time Duration For setting how long the oven is to operate. End Time For setting when the oven is to switch itself off again. 1. Select oven function. 2. Press key repeatedly until the ”Duration/End Time” window appears. 3. Using or key, set the desired cooking time or switch-off time (max. 23 hours 59 minutes). 4. Confirm with or wait 5 seconds. The settings of the selected oven function are displayed with the cooking time or switch-off time set.
electrolux To switch off Key Lock 1. Press the key. 2. Confirm with . 3 The Key Lock does not protect the ap- pliance from being accidentally switched off. After the appliance is switched off, the Key Lock is automatically cancelled. Child Lock for the oven As soon as the Child Lock child safety device is activated, the oven cannot be operated. Switching on the Child Lock No Oven Function must be selected. Press and keys at the same time until a message appears in the display.
electrolux 25 8. Press any key to switch off the signal. 3 The Meatprobe can also be set, if an oven function has already been selected. To subsequently change the core temperature, press key. 3 The core temperature is displayed from 30°C. Removing the Meatprobe Full Steam 1. Water (approx.650 ml) is not poured directly into the steam generator, but into the water drawer in the control panel. 1 Warning: The Meatprobe is very hot.
electrolux Half Steam + Heat and Quarter Steam + Heat The continual change from hot air to steam takes place automatically, with Half Steam + Heat however with a greater percentage of steam. The oven functions Half Steam + Heat and Quarter Steam + Heat are operated in the same way as the oven function Full Steam 3.
electrolux 27 To open the oven door. 1. Keep lever pressed. 2. Open the door. To close the oven Close door without pressing the lever. Deactivating door lock To deactivate the door lock, the lever is moved to the right again. Proceed as described above. 3 Switching off the appliance does not remove the mechanical door lock. 2. Demount lever: Remove lever (1). 3. Remove trim from the under side of the door trim (B)(2) and push in (3). 4.
electrolux 3 On the open side of the door trim(B) there is a guide bar(C). This must be pushed between the outer door panel and the guide corner(D). 5. The clip seal(E) must be snapped in. Close the oven door.
electrolux 29 Cleaning and Care 1 Warning: First switch off the appliance and let it cool down before carrying out any cleaning. Warning: For safety reasons, do not clean the appliance with steam blasters or highpressure cleaners. Attention: Do not use any corrosive cleaning fluids, sharp objects or stain removers. Do not clean the glass oven door with abrasive fluids or metal scrapers, which could scratch the surface. The glass could crack and shatter.
electrolux Cleaning Assistant 2. Slightly swivel the rail on the front bracket to the inside. 3. Lift the rails off the rear hook and remove to the front. 3 Before Steam Cleaning the Cleaning As- sistant reminds you what has to be observed with Steam Cleaning. Cleaning Assistant To switch on and off 1. Using or select the menu option Cleaning. 2. Confirm with . 3. Using or select the menu option Cleaning Assistant. 4. Using or switch the Cleaning Assistant on or off.
electrolux 31 2. Swivel the grid on the front mounting bracket over the bolt to the wall. 3. Insert the rail into the front hooks. Water Drawer and Steam Generator 1. Pour water and vinegar (about 250 ml) into the steam generator via the water drawer. Leave to work for approx. 10 minutes. 2. 3. 4. 5. Steam generation system 1 Important: Wipe the steam generator 3 1 dry after each use. Soak up water with a sponge. Remove any lime residue with water and vinegar.
electrolux Oven Light 1 Danger of electrocution! Before • • replacing the oven light bulb: Switch off the oven. Take the fuses out of the fuse box, or switch off. Replacing the oven side light bulb/ cleaning the glass cap 1. Take out the side rails. 2. Unscrew the metal frame using a crosstip screwdriver. 3 To protect the oven light bulb and the glass cap, lay a cloth on the bottom of the oven. Replacing the rear oven light bulb/ cleaning the glass cap 1. Take off the cap by turning to the left.
electrolux 33 Oven door For easier cleaning of the oven interior the oven door of your appliance can be taken off its hinges. Removing the oven door from its hinges 1. Open the oven door as far as it will go. 2. 3. Undo the clamping levers (A) on both door hinges fully. Close the oven door as far as the first position (approx. 45°). 4. Take hold of the oven door with a hand on each side and pull it away from the oven at an upwards angle (Take care: It is heavy).
electrolux 2. Open the oven door as far as it will go. 3. Fold up the clamping levers (A) on both door hinges back into their original positions. 4. Removing the door glass and water collecting channel 1. Open the oven door as far as it will go. 2. Undo the clamping levers (A) on both door hinges fully. 3. Close the oven door as far as the first position (approx. 45°). 4. Take hold of the door trim (B) on the upper edge of the door at both sides and press inwards to release the clip seal.
electrolux 35 5. Hold the upper edge of the door glass and take it out of the guide by pulling it upwards. 6. Tip the water collecting channel towards the door glass and lift upwards to remove from the guide. Cleaning the door glass and the water collecting channel Clean the door glass panels and the water collecting channel thoroughly with a solution of water and washing-up liquid. Then dry them carefully. Inserting door glass panels and the water collecting channel 1.
electrolux 3 On the open side of the door trim (B) 5. Fold up the clamping levers (A) on both door hinges back into their original positions. 6. Close the oven door. there is a guide bar (C). This must be pushed between the outer door panel and the guide rail (D). 4. The clip seal (E) must be snapped in. Open the oven door as far as it will go.
electrolux 37 What to do if … Problem The oven is not heating up Possible cause Remedy The oven has not been switched on Switch oven on The required settings have not been set Check the settings The house wiring fuse (in the fuse box) has tripped Check fuse. If the fuses trip several times, please call a qualified electrician The oven lighting is not operat- The oven light bulb is faulty ing Replace oven light bulb “F11” appears in the clock dis- The meat probe has short circuited play.
electrolux Installation Instructions 1 Important: Any electrical installation work must be carried out by a qualified electrician/competent person. The oven must be installed according to the instructions supplied. 1 Safety Instructions for the Installer • • Protection against access to live parts must be guranteed by the installation. The unit in which the appliance is fitted must satisfy the requirements of DIN 68930 in respect of stability.
electrolux 39
electrolux
electrolux 41 3,5x25
electrolux Disposal 2 Packaging material The packaging materials are environmentally friendly and can be recycled. The plastic components are identified by markings, e.g. >PE<, >PS<, etc. Please dispose of the packaging materials in the appropriate container at the community waste disposal facilities. 2 Old appliance W 1 on the product or on its The symbol packaging indicates that this product may not be treated as household waste.
electrolux 43 Service In the event of technical faults, please first check whether you can remedy the problem yourself with the help of the operating instructions (section “What to do if…”). If you were not able to remedy the problem yourself, please contact the Customer Care Department or one of our service partners. In order to be able to assist you quickly, we require the following information: – – – Model description Product number (PNC) Serial number (S No.
www.electrolux.