electrolux 1 user manual IE GB Built-in oven EOG 10000
electrolux 3 Welcome to the world of Electrolux Thank you for choosing a first class product from Electrolux, which hopefully will provide you with lots of pleasure in the future. The Electrolux ambition is to offer a wide variety of quality products that make your life more comfortable. You find some examples on the cover in this manual. Please take a few minutes to study this manual so that you can take advantage of the benefits of your new machine.
electrolux Contents Warnings and Important Safety Information ........................................................ 5 Description of the Appliance .............................................................................. 7 Controls............................................................................................................. 8 Before using the Oven for the first time .............................................................. 9 Using the Oven .....................................
electrolux 5 Warnings and Important Safety Information Always keep these user instructions with the appliance. Should the appliance be passed on to third persons or sold, or if you leave this appliance behind when you move house, it is very important that the new user has access to these user instructions and the accompanying information. These warnings are provided for the safety of the users and those living with them. You MUST read these warnings carefully before installing or using the oven.
electrolux • • • • • • • • • If is dangerous to make modifications of any kind to this appliance or to its specifications. During the baking, roasting and grilling process, the oven window and the other parts of the appliance get hot, so children should be kept away from the appliance. Take care, if connecting electrical appliances to sockets near the oven, that cables do not come into contact with hot rings or get caught in the oven door.
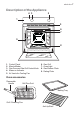
electrolux 7 Description of the Appliance 2 4 3 1 5 6 7 9 8 1. 2. 3. 4. 5. Control Panel Minute Minder Gas Oven and Gas Grill Control Knob Mains on Indicator Air Vents for Cooling Fan 6. 7. 8. 9.
electrolux Controls Oven function control knob The oven is off - 240 Gas Oven On (heat from the bottom) Range of temperature adjustment Gas Grill On (heat from the top) Mains on indicator The mains on light will come on when the gas oven function control knob is set. Minute minder The minute minder will mark the end of a timed period with an acoustic alarm. The maximum timing is 60 minutes. Turn the minute minder knob clockwise to the maximum time position, then turn it back to the required time.
electrolux 9 Before using the Oven for the first time Remove all packaging, both inside and outside the oven, before using the oven. Before using for the first time, the oven should be heated up without food. During this time, an unpleasant odour may be emitted. This is absolutely normal. It is caused by manufacturing residues. Ensure the room is well ventilated. 1. Light the gas oven burner (see “Using the Gas Oven”) and set the temperature to 240. 2. Open a window for ventilation. 3.
electrolux Using the Oven The oven is supplied with an exclusive system which produces a natural circulation of air and the constant recycling of steam. This system makes it possible to cook in a steamy environment and keep the dishes soft inside and crusty outside. Moreover, the cooking time and energy consumption are reduced to a minimum. During cooking steam may be produced which can be released when opening the oven door. This is absolutely normal.
electrolux 11 the burner ignites. It is possible to check the flame through the holes in the bottom of the oven. 2. Upon ignition, keep the knob pressed for about 5/10 seconds, then release it and turn it to the required setting. the oven burner does not light )evenIf after 15 seconds: 1. Release the control knob and turn it to the “Off position” 2. Open the oven door and wait for at least one minute before trying to light the oven burner again.
electrolux The effects of dishes on cooking results Dishes and tins vary in their thickness, conductivity, colour, etc. which affects the way they transmit heat to the food inside them. A Aluminium, earthenware, oven glassware and bright shiny utensils reduce cooking and base browning. B Enamelled cast iron, anodized aluminium, aluminium with non-stick interior and coloured exterior and dark, heavy utensils increase cooking and base browning.
electrolux 13 Baking and Toasting Table Gas Oven Cooking Timings do not include pre-heating. The empty oven should always be pre-heated for 10 minutes.
electrolux Grilling Timings do not include pre-heating. The empty oven should always be pre-heated for 10 minutes.
electrolux 15 Cleaning and Maintenance Before cleaning switch the oven off and let it cool down. The appliance must not be cleaned with a superheated steam cleaner or a steam jet cleaner. Important: Before carrying out any cleaning operation, the appliance must be disconnected from the power supply. To ensure a long life for your appliance, it is necessary to perform the following cleaning operations regularly: - Only perform when the oven has cooled down. - Clean the enamelled parts with soapy water.
electrolux Oven Cavity The enamelled base of the oven cavity is best cleaned whilst the oven is still warm. Wipe the oven over with a soft cloth soaked in warm soapy water after each use. From time to time it will be necessary to do a more thorough cleaning, using a proprietary oven cleaner. Oven Shelves and Shelf Supports To clean the oven shelves and the shelf supports, soak in warm soapy water and remove stubborn marks with a well wetted soap impregnated pad. Rinse well and dry with a soft cloth.
electrolux 17 Never use steel wool, acids or abrasive products as they can damage the oven surface. Clean the oven control panel following the same precautions. DO NOT clean the oven door while the glass panels are warm. If this precaution is not observed the glass panel may shatter. If the door glass panel becomes chipped or has deep scratches, the glass will be weakened and must be replaced to prevent the possibility of the panel shattering.
electrolux Replacing The Oven Light Disconnect the appliance If the oven bulb needs replacing, it must comply with the following specifications: - Electric power: 15 W/25 W, - Electric rate: 230 V (50 Hz), - Resistant to temperatures of 300°C, - Connection type: E14. These bulbs are available from your local Service Force Centre. To replace the faulty bulb: 1. Ensure the oven is isolated from the electrical supply. 2. Push in and turn the glass cover anticlockwise. 3.
electrolux 19 If Something is Wrong If the appliance is not working correctly, please check the following before contacting the Electrolux Service Centre: PROBLEM SOLUTION The gas oven burner or the gas grill burner do not light. Check that the oven is switched on at the wall. or Check that the power supply has not been interrupted before the cooling fan has had time to cool the oven down or Check that there is not a problem with your gas supply.
electrolux Technical Data Heating element ratings Oven burner 2700 W (Natural Gas) 2500 W (LPG) Gas grill burner 1900 W Oven light 25 W Cooling fan motor 25 W Total gas rating 2700 W (Natural Gas) Total electric rating 50 W Operating voltage (50 Hz) 230 V Appliance gas supply Natural Gas G20 (2H) - 20 mbar Appliance gas category II2H3+ Appliance class 3 Dimensions of the recess Height under top mm 593 in column mm 580 Width mm 560 Depth mm 550 Oven Height mm 335 Width mm 395 Depth
electrolux 21 Important Safety Requirements This appliance must be installed in accordance with the Gas Safety (Installation and Use) Regulations (current addition) and the I.E.E. Wiring Regulations. Detailed recommendations are contained in the following British Standard Codes of Practice - B.S. 6172, B.S. 5440: Part 2 and B.S. 6891: Current Editions. For appliances installed in the Republic of Ireland please refer to NSAI- Domestic Gas Installation I.S.
electrolux Instructions for the Installer Installation and connection must be done in compliance with the regulations in force. Any interventions must be carried out when the appliance is switched off. Only accredited engineers may work on the appliance. The manufacturer disclaims any liability if the safety measures are not observed.
electrolux 23 than 60°C above the ambient temperature. Before the oven is connected, check that the main fuse and the domestic installation can support the load and that the power supply is properly earthed. The manufacturer disclaims any responsibility should these safety measures not be carried out. Terminal block The oven is fitted with an easily accessible terminal block which is designed to operate with a single-phase power supply of 230 V.
electrolux Gas Connection The use of rubber flexible hoses is not permitted. A) View from above Connecting the to the gas supply The use of rubber flexible hoses is not permitted. The gas supply connection ramp is located in the upper side of the oven, right behind the control panel. To carry out the gas connection: 1. Partially insert the oven in the recess (about 30 cm.) and operate on the connection ramp from above.
electrolux 25 Never use a flame for the leakproof test ! Check the gas supply ramp and the gas connection pipe are not squeezed while the oven is positioned into the recess. The use of a gas cooking appliance results in the production of heat and moisture in the room in which it is installed. Ensure that the kitchen is well ventilated: keep natural ventilation holes open or install a mechanical ventilation device (mechanical extractor hood).
electrolux Gas Oven Burner Data GAS TYPE Natural Gas (G20) LPG (G30/G31) INJECTOR NOMINAL NOMINALGAS REDUCED MARK GAS FLOWIN GAS 1/100 mm POWER POWER (1/100 mm) (kW) m3/h g/h . (kW) 114 2,7 0,257 - 078 2,5 - 182 - BY-PASS NEEDLE NOMINAL GAS PRESSURE (mbar) 1,0 Reg.
electrolux 27 Conversion from Natural to LPG Gas IMPORTANT The replacement/conversion from Natural to LPG gas should only be undertaken by a competent and qualified engineer. It is important to note that this model is designed for use with natural gas but can be converted for use with LPG providing the correct injectors are fitted. The gas rate is adjusted to suit. Replacement of gas oven burner injector To replace the gas burner oven injector, follow this procedure: 1.
electrolux Replacement of gas grill burner injector To replace the gas grill burner injector, follow this procedure: 1. Undo the two fixing screws (“A”) which keep the oven gas burner in place 2. Gently slide the gas grill burner off its slot and slowly move it downwards, taking care not to cause stress to the spark plug connection wire (“B”) and the thermocouple (“D”) conductor; 3.
electrolux 29 Minimum level adjustment of gas oven burner This procedure must be undertaken by a competent and qualified engineer only. 1. Disconnect the appliance from the mains supply. 2. Remove all the knobs. 3. With a thin bladed screwdriver, completely tighten the minimum level adjustment screw (“A”). 4. Refit all the oven parts following the above described procedure backwards. 5. Restore the mains supply.
electrolux Instructions for Building In For problem-free functioning of the builtin appliance, the kitchen unit or the recess into which the appliance is built must have suitable dimensions. In accordance with the regulations in force, all parts which ensure the shock protection of live and insulated parts must be fastened in such a way that they cannot be undone without tools. These also include the fixing of any end walls at the beginning or end of a line of built-in units.
electrolux 31 Securing the Appliance to the Cabinet 1. Open the oven door. 2. Fasten the oven to the cabinet placing the four distance holders (Fig. D - A) which fit exactly into the holes in the frame and then fit the four wood screws (Fig. D - B) provided. Fig.
electrolux Guarantee/Customer Service Standard guarantee conditions We, Electrolux, undertake that if within 12 months of the date of the purchase this Electrolux appliance or any part thereof is proved to be defective by reason only of faulty workmanship or materials, we will, at our option repair or replace the same FREE OF CHARGE for labour, materials or carriage on condition that: • The appliance has been correctly installed and used only on the electricity supply stated on the rating plate.
electrolux 33 Please note a valid purchase receipt or guarantee documentation is required for in guarantee service calls. Customer Care For general enquiries concerning your Electrolux appliance, or for further information on Electrolux products please contact our Customer Care Department by letter or telephone at the address below or visit our website at www.electrolux.co.
electrolux www.electrolux.co.uk 35694-4802 10/08 R.