ERN3313AOW ................................................ .............................................
www.electrolux.com CONTENTS 1. 2. 3. 4. 5. 6. 7. 8. 9. SAFETY INSTRUCTIONS . . . . . . . . . . . . . . . . . . . . . . . . . . . . . . . . . . . . . . . . . . . . . . . . . . 3 CONTROL PANEL . . . . . . . . . . . . . . . . . . . . . . . . . . . . . . . . . . . . . . . . . . . . . . . . . . . . . . . 5 DAILY USE . . . . . . . . . . . . . . . . . . . . . . . . . . . . . . . . . . . . . . . . . . . . . . . . . . . . . . . . . . . . . 7 HELPFUL HINTS AND TIPS . . . . . . . . . . . . . . . . . . . . . . . .
ENGLISH 1. 3 SAFETY INSTRUCTIONS In the interest of your safety and to ensure the correct use, before installing and first using the appliance, read this user manual carefully, including its hints and warnings. To avoid unnecessary mistakes and accidents, it is important to ensure that all people using the appliance are thoroughly familiar with its operation and safety features.
www.electrolux.com 1. • • • • Power cord must not be lengthened. 2. Make sure that the power plug is not squashed or damaged by the back of the appliance. A squashed or damaged power plug may overheat and cause a fire. 3. Make sure that you can come to the mains plug of the appliance. 4. Do not pull the mains cable. 5. If the power plug socket is loose, do not insert the power plug. There is a risk of electric shock or fire. 6.
ENGLISH obtain from your local authorities. Avoid damaging the cooling unit, especially at the rear near the heat 5 exchanger. The materials used on this appliance marked by the symare recyclable. bol 2. CONTROL PANEL 1 2 3 1 ON/OFF button 4 5 It is possible to change predefined sound of buttons to a loudly one by pressing together Mode button and Temperature colder button for some seconds. Change is reversible. 2 Mode button 3 Display 4 Temperature colder button 5 Temperature warmer button 2.
www.electrolux.com 3. To disconnect the appliance from the power disconnect the mains plug from the power socket. 2.4 Temperature regulation The set temperature of the fridge may be adjusted by pressing the temperature button. Set default temperature: +5°C for the fridge. The temperature indicator shows the set temperature. The set temperature will be reached within 24 hours. After a power failure the set temperature remains stored. 2.
ENGLISH 7 3. DAILY USE 3.1 Cleaning the interior Before using the appliance for the first time, wash the interior and all internal accessories with lukewarm water and some neutral soap so as to remove the typical smell of a brand-new product, then dry thoroughly. If DEMO appears on the Display, the appliance is in demonstration mode: refer to “WHAT TO DO IF...” paragraph. Do not use detergents or abrasive powders, as these will damage the finish. 3.
www.electrolux.com 3.5 FreeStore The refrigerator compartment is equipped with a device that allows for rapid cooling of foods and more uniform temperature in the compartment. This device activates by itself when needed, for example for a quick temperature recovering after door opening or when the ambient temperature is high. Allows you to switch on the device manually when needed (refer to FreeStore mode).
ENGLISH 9 5. CARE AND CLEANING CAUTION! Unplug the appliance before carrying out any maintenance operation. This appliance contains hydrocarbons in its cooling unit; maintenance and recharging must therefore only be carried out by authorized technicians. 5.1 Periodic cleaning The equipment has to be cleaned regularly: • clean the inside and accessories with lukewarm water and some neutral soap. • regularly check the door seals and wipe clean to ensure they are clean and free from debris.
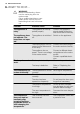
www.electrolux.com 6. WHAT TO DO IF… WARNING! Before troubleshooting, disconnect the mains plug from the mains socket. Only a qualified electrician or competent person must do the troubleshooting that is not in this manual. Problem Possible cause Solution The appliance is noisy The appliance is not supported properly Check if the appliance stands stable (all the four feet should be on the floor) The appliance does not operate. The lamp does not operate. The appliance is switched off.
ENGLISH 11 Problem Possible cause Solution Water flows on the rear plate of the refrigerator. During the automatic defrosting process, frost defrosts on the rear plate. This is correct. Water flows into the refrigerator. The water outlet is clogged. Clean the water outlet. Products prevent that water flows into the water collector. Make sure that products do not touch the rear plate. Temperature cannot Shopping function switchbe set . ed on.
www.electrolux.com 7. INSTALLATION 7.1 Positioning WARNING! If you are discarding an old appliance that has a lock or catch on the door, you must ensure that it is made unusable to prevent young children being trapped inside. The appliance shall have the plug accessible after installation.
ENGLISH 13 7.3 Door reversibility The door of the appliance opens to the right. If you want to open the door to the left, follow these steps before you install the appliance: 1. Loosen and remove the upper pin. 2. Remove the door. 3. Remove the spacer. 4. With a key, loosen the lower pin. On the opposite side: 1. Tighten the lower pin. 2. Install the spacer. 3. Install the door. 4. Tighten the upper pin. 7.4 Ventilation requirements 5 cm The airflow behind the appliance must be sufficient. min.
www.electrolux.com If necessary cut the adhesive sealing strip and then apply it to the appliance as shown in figure. x x Drill the appliance using a Ø 2.5 mm drill (10 mm max. penetration). Fix the square fitting to the appliance. 13 mm 1 Ø 2.5 mm 2 3 2 1 Install the appliance in the niche. Push the appliance in the direction of the arrow (1) until the upper gap cover stops against the kitchen furniture.
ENGLISH 15 Adjust the appliance in the niche. Make sure that the distance between the appliance and the cupboard front-edge is 44 mm. The lower hinge cover (in the accessories bag) makes sure that the distance between the appliance and the kitchen furniture is correct. Make sure that the clearance between the appliance and the cupboard is 4 mm. Open the door. Put the lower hinge cover in position. 4mm 44mm Attach the appliance to the niche with 4 screws.
www.electrolux.com Attach the covers (C, D) to the lugs and the hinge holes. Install the vent grille (B). Attach the hinge covers (E) to the hinge. C D E E B Disconnect the parts (Ha), (Hb), (Hc) and (Hd). Install the part (Ha) on the inner side of the kitchen furniture.
ENGLISH 17 Push the part (Hc) on the part (Ha). Ha Hc 8 mm Ha Open the appliance door and the kitchen furniture door at an angle of 90°. Insert the small square (Hb) into guide (Ha). Put together the appliance door and the furniture door and mark the holes. Remove the small squares and drill holes with ø 2 mm at 8 mm from the outer edge of the door. Place the small square on the guide again and fix it with the screws supplied.
www.electrolux.com Press the part (Hd) on the part (Hb). Hb Hd Do a final check to make sure that: • All screws are tightened. • The sealing strip is attached tightly to the cabinet. • The door opens and closes correctly. 8. NOISES There are some sounds during normal running (compressor, refrigerant circulation).
ENGLISH HISSS! BLUBB! BRRR! HISSS! BRRR! CRACK! BLUBB! 9. TECHNICAL DATA According to 1/1998. (I. 12.
www.electrolux.com Noise level dB/A Built-in 34 Igen The technical information are situated in the rating plate on the internal left side of the appliance and in the energy label. 10. ENVIRONMENT CONCERNS Recycle the materials with the symbol . Put the packaging in applicable and electronic appliances. Do not dispose appliances marked with the symbol containers to recycle it. Help protect the environment and human health and to recycle waste of electrical with the household waste.
ENGLISH 21
www.electrolux.
ENGLISH 23
212717152-HU-00-042013 www.electrolux.